Artisan Finalist Blog Hop — Day 10

2013artisanfinalistAWell, here we are at the last day of the blog hop for those of us who were selected as Stampin’ Up! Artisan finalists, but who were not chosen for the design team.

My last project for you is a scrapbook page.  It includes pictures of my son, and I’ve tried to achieve a grungy look.

Artisan Brother Scrapbook PageThis page was so much fun to make.  It is so not my normal style, but once I got started, I really liked it.  After making this page, I was ready for the Gorgeous Grunge set to come out.  And now, I have to say,  I really like this grungy look.

Here’s a closer look at some of the stamping and embellishments.  I usually find that I don’t do a lot of stamping on my scrapbook pages, but that was not true with this page.  I stamped all over the place!

Artisan Brother Scrapbook Page Close Up 1
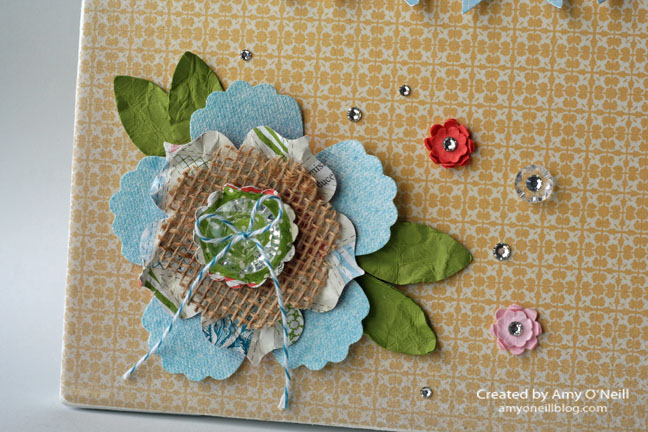
Here’s a closer look at the “doo-dads” in the top left corner.  I love the way this turned out.

Artisan Brother Scrapbook Page Corner Close UpNow you’re ready to hop on over to Breelin Renwick’s blog to continue along the blog hop trail.  She has been so inspiring over these past few days!  If you’d prefer to work your way backwards, you can do that too by clicking on the link for Wendy Weixler’s blog below.  Not only has it been so fun to see her amazing entries, but I have so enjoyed getting to know her a little better.  She is one amazing lady!

2013artfinalistback copy2013artfinalistnext copy

I hope you’ve enjoyed getting to see these ten projects as well.  Entering this contest is always a lot of work, but I feel like a grow a little more as a stamper each time, and I always come away with new friendships and great experiences.  Thanks for letting me share part of that with you.

Enjoy your Monday evening!  I’ll be back with regular programming tomorrow.  Thanks for stopping by!

Supplies Used:
Stamps:  Blue Ribbon, Designer Typeset Photopolymer Stamps, World’s Greatest, Remember This and That Rotary Stamp, Hey There (My Paper Pumpkin)
Ink:  Midnight Muse, Tangerine Tango, Basic Gray, Crumb Cake, Pool Party, Versamark, Whisper White Craft
Paper:  Pool Party Core’dinations Card Stock, Tangerine Tango, Basic Gray, Whisper White, Midnight Muse, Pool Party, Epic Day This and That Designer Series Paper, Summer Smooches Designer Series Paper, Silver Glimmer Paper
Accessories:  Regals Designer Buttons, Pool Party Baker’s Twine, Rhinestone Basic Jewels, 1-1/4” Circle Punch, 2-3/8” Scallop Circle Punch, Adorning Accents Edgelits, Apothecary Accents Framelits, 3/16” Brights Brads, Pewter and White Stampin’ Emboss Powders, Epic Day This and That Designer Washi Tape, Midnight Muse 3/8” Stitched Satin Ribbon, Very Vanilla ½” Seam Binding ribbon (dyed with Basic Gray ink), sewing machine, Color Spritzer Tool, Stampin’ Sanding Block

Artisan Finalist Blog Hop — Day 9

2013artisanfinalistAWell, we’re almost to the end of our blog hop for those of us who were selected as the 20 finalists for Stampin’ Up’s Artisan Award, but were not selected for the Artisan design team.

Today I have my fifth and final card to share with you.

Artisan Flower Trim HeartI used some of the Flower Trim (if Stampin’ Up! should ever decide to bring this retired product back, I would be so happy), and dyed it with a sponge dauber and Calypso Coral ink.  I die cut a heart from some scrap card stock using one of the Hearts collection framelits, and hot glued the flowers on it.

Here’s a look at the inside:

Artisan Flower Trim Heart InsideYou can venture on over to Breelin Renwick’s blog now to see her beautiful project, or you can work your way backwards starting with the amazing Wendy Weixler.  Either way, you’re sure to find a stamping treat for the eyes.

2013artfinalistback copy2013artfinalistnext copy


Enjoy your Sunday evening!  Thanks for stopping by!

Supplies Used:
Stamps:  Everything Eleanor, Loving Thoughts
Ink:  Sahara Sand, Pink Pirouette
Paper:  Sahara Sand, Pink Pirouette, Calypso Coral, Whisper White, Silver Glimmer Paper, 2011-2013 In Color Designer Series Paper Stack, Neutrals Designer Series Paper Stack
Accessories:  5/8” Flower Trim, Hearts Collection Framelits, Vintage Faceted Designer Buttons, Calypso Coral Baker’s Twine, Delicate Details Lace Tape, Scallop Edge Border punch, 1” Circle punch, Color Spritzer Tool, sewing machine


Artisan Finalist Blog Hop — Day 8

2013artisanfinalistAWe are moving right along and are now on Day 8 of the blog hop for the Artisan Finalists who were not selected for the design team.  It’s been going by so fast — there has been a blur of eye-catching, spectacular projects these past few days.

Today I have a 3-D project for you.  We had to make two for our entry, and this one was my favorite.  I’m not sure what to call this one.  I have seen these before made out of tin or other types of metal, but I wanted to make mine out of paper.  I’ll call it a hanging pocket for flowers.

Artisan 3-D Hanging Flower BoxThis was definitely a trial-and-error kind of project.  Once I got the dimensions right for the project, it was easy — I was just able to have fun decorating it.  It’s hard to tell from the picture, but the sides form a “V” shape.  They start out wider at the top and taper to a point at the bottom.  I used lots of sticky strip to adhere everything together.

I started by sponging Whisper White Craft ink onto the Natural Composition Specialty dsp.  After assembling the pocket, I adhered the tiny pearls all the way around the pocket.  I don’t know about you, but I always have those three long strings of attached pearls left on my Pearl Basics Jewels sheets.  Since I hate to throw things away because one never knows when something might come in handy, I had several sheets left with just these rows.  They were put to use on this project, so it wasn’t as time consuming as one might think to attach all of the pearls.

Artisan 3-D Hanging Flower Close Up of Big FlowerTo make the big flower, I used some ribbon scraps and did lots of sponging and used gold smooch spritz (oh, how I miss that stuff!).  I dyed the flower trim for the center of the flower with the smooch spritz too.  I used lots of layers here.

Artisan 3-D Hanging Flower Close Up of TrimI layered some Crumb Cake Seam Binding Ribbon at the top, and then added some Flower Trim (which has also sadly been retired — I LOVED that stuff!), which I also lightly sponged with Crumb Cake ink.  I embossed the Friend banner with gold embossing powder.

Artisan 3-D Hanging Flower Close Up of FlowersAnd then I got to make the flowers.  I just love this color combination — Crumb Cake, Midnight Muse, Summer Starfruit and a touch of Gumball Green.  I inserted a piece of green flower foam in the pocket and used some green flower stems I found at the craft store.  I covered the foam with some of the First Edition Specialty dsp (another item I sorely miss), which I shredded and crumpled.

This was one of those rare projects that turned out exactly like I had envisioned before starting it.  I was able to finish it within one day, and I was sad to have to give it away.

Now you should hop on over to Breelin Renwick’s blog and check out her amazing project.  Or if you prefer, you can work your way backwards and go visit the fabulous Wendy Weixler.  Either way, you can work your way around to see all ten beautiful projects.

2013artfinalistback copy

2013artfinalistnext copy

Enjoy your Saturday evening!  Thanks for stopping by!

Supplies Used:
Stamps: Amazing Family
Ink:  Versamark, Whisper White Craft, Crumb Cake, Midnight Muse
Paper:  Very Vanilla, Natural Composition Specialty Designer Series Paper, First Edition Specialty Designer Series Paper, Comfort Café Designer Series Paper, 2012-2014 In Color Designer Series Paper Stack, Print Poetry Designer Series Paper Stack, Crumb Cake, Summer Starfruit, Midnight Muse
Accessories:  Tea Lace Paper Doilies, Paper Daisies, Blossom punch, 1-1/4” Scallop Circle punch, 5/8” Flower Trim, Gold Glow Smooch Spritz, Linen Thread, Natural 7/16” Trim Ribbon, Very Vanilla ½” Seam Binding Ribbon, Victoria 5/8” Crochet Trim, Summer Starfruit 3/8” Stitched Satin Ribbon,  Crumb Cake ½” Seam Binding Ribbon, ¾” Circle punch, Vintage Faceted Designer Buttons, Pearl Basic Jewels, flower stems (non-SU),  Scallop Edge Border punch, Gold Stampin’ Emboss Powder

Artisan Finalist Blog Hop — Day 7

2013artisanfinalistA

We’re already on Day 7 of the blog hop for the Artisan Finalists who are not on the design team.  I hope you’ve enjoyed it so far.

Today I have another card for you.

Artisan Flower TagThis one is not my normal style, but I wanted to show that I could attempt other styles too.  I was going for a shabby chic style here.  For me, this style means “pile it on.”  🙂

Here’s a look at the inside:

Artisan Flower Tag InsideI did love this dsp!  It had such pretty patterns and colors.

Now you’re ready to hop on over to Breelin Renwick’s blog and check out her amazing project.  If you’d prefer, you can hop backwards to Wendy Weixler’s blog and see her incredible talent.  Either way, you’re sure to see something incredible.

2013artfinalistback copy2013artfinalistnext copy

Enjoy your Friday evening and weekend!  Thanks for stopping by!

Supplies Used:
Stamps:  Field Flowers, Fabulous Phrases, Woodgrain
Ink:  Pink Pirouette, Cherry Cobbler, Lucky Limeade, Versamark, Crumb Cake
Paper:  Pink Pirouette, Crumb Cake, Very Vanilla, Fan Fair Designer Series Paper, First Edition Specialty Designer Series Paper, Cherry Cobbler
Accessories:  Natural 7/8” Cotton Ribbon, Victoria 5/8” Crochet Trim, Cherry Cobbler ½” Seam Binding Ribbon, Very Vanilla 1/8” Taffeta Ribbon, Linen Thread, Vintage Trinkets, Naturals Designer Buttons, Neutrals Designer Buttons, Cherry Cobbler Baker’s Twine, Jewelry Tag punch, White Stampin’ Emboss Powder, Dazzling Diamonds Stampin’ Glitter, Tea Lace Paper Doilies, Scallop Edge Border punch, Gesso (non-SU), Sewing Machine, Color Spritzer Tool

Artisan Finalist Blog Hop — Day 6

2013artisanfinalistAI really hope you’ve been enjoying the blog hop for the ten Artisan Finalists which are not on the design team.  I’ve enjoyed looking at all of the details on the other finalists’ projects.  And I’ve picked up a few tips and techniques along the way.

Today I have another scrapbook page for you.

Artisan Love U2 Scrapbook Page


This one has a picture of my two girls which was taken a few years ago.  That was the best picture day ever for the two of them — lots of spontaneous hand-holding, and genuine, happy smiles.  I will definitely treasure all of the photos I got of them on that day!

To draw the eye to the picture, I used a paint brush and brushed a layer of gesso on the dsp under and above the photo.

Artisan Love U2 Scrapbook Page Close Up 1I used a mix of heart punches and framelits to cut out a bunch of hearts from various dsp collections, and then I used my sewing machine to stitch them down.  I also did some stitching around the edge of the page.

Artisan Love U2 Scrapbook Page Close Up 3For the page title, I die cut the letters from Silver Glimmer paper and placed them on a scalloped heart from the Hearts Collection framelits.  It is actually vellum paper which I misted with a mixture of Melon Mambo re-inker and rubbing alcohol.

Artisan Love U2 Scrapbook Page Close Up 2One of the things that I love about scrapbooking 12″ x 12″ pages is that there is almost always room for little “doo-dad” embellishments.

Next up on the hop is Breelin Renwick.  I have so enjoyed looking at her entries!  If you prefer to go backwards (that is perfectly alright), you can visit Wendy Weixler’s blog, and peruse her beautiful project.

2013artfinalistback copy

2013artfinalistnext copy

Enjoy your Thursday evening!  Thanks for stopping by!

Supplies Used:
Ink:  Melon Mambo Classic Stampin’ Ink Refill
Paper:  Melon Mambo, Island Indigo, White Vellum Card Stock, Whisper White, World Spectacular Designer Series Paper, 2011-2013 In Color Designer Series Paper Stack, Sunshine & Sprinkles Designer Series Paper, Brights Collection Designer Series Paper Stack, Summer Smooches Designer Series Paper, Floral District Designer Series Paper, Tea for Two Designer Series Paper, Silver Glimmer Paper
Accessories:  Hearts Collection Framelits, Labels Collection Framelits, Full Heart punch, Small Heart Punch, Hearts a Flutter Framelits, Vintage Faceted Designer Buttons, Island Indigo Baker’s Twine, Typeset Alphabet Bigz die, Rhinestone Basic Jewels, Brights Designer Buttons, Victoria 5/8” Crochet Trim, Tea Lace Paper Doilies, Artisan Embellishments Kit, Dotted Scallop Ribbon Border Punch, Stampin’ Spritzer , Vanilla Shimmer Smooch Spritz, Sewing Machine, Gesso
Font:  Bradley Hand ITC


Artisan Finalist Blog Hop — Day 5

2013artisanfinalistA

Today marks the half-way point on our Artisan Finalist Blog Hop.  Five projects down, five more to go.  Today I’m going to share another card with you:

Artisan ButterflyI thought this card was very true to my style.  For the butterfly, I die cut a piece of cardboard and then applied some Whisper White craft ink with a sponge dauber.  I then glued down some of the Glass Stampin’ Glitter on the butterfly.

Here’s the inside:

Artisan Butterfly InsideNext on the blog hop is Breelin Renwick’s blog, or you can work your way backwards and visit Wendy Weixler’s blog.

2013artfinalistback copy

2013artfinalistnext copy

Enjoy your Wednesday night!  Thanks for stopping by!

Supplies Used:
Stamps:  Vintage Verses (Sale-a-Bration), Oh, Hello
Ink:  Calypso Coral, Island Indigo, Lucky Limeade, Pink Pirouette, Crumb Cake
Paper:  Crumb Cake, Pretty in Pink, Island Indigo, Tea for Two Designer Series Paper
Accessories:  Tea Lace Paper Doilies, Victoria 5/8” Crochet Trim, Island Indigo 3/8” Ruffled Ribbon, Subtles Designer Buttons, Island Indigo Baker’s Twine, 7/8” Scallop Circle punch, Silver Glass Stampin’ Glitter, Beautiful Butterflies Bigz die, cardboard (from a SU cardboard box), white acrylic paint, sewing machine

Artisan Finalist Blog Hop — Day 4

2013artisanfinalistA

I hope you’ve been enjoying the blog hop for the ten Artisan Finalists who did not make the design team.  We’re on day 4 now, and I have a 3-D project to share with you.

This project consisted of three canvases.  I first painted the canvases with gesso, and then used Mod-Podge to adhere the dsp to the canvas.  I then covered the top with Mod-Podge as well.  I sanded the edges to smooth them and give them a slightly distressed look.

Artisan 3-D Canvas All The largest canvas has the name Olivia on it.  She must be my fictional daughter as we don’t have any Olivia’s in our house, but I wanted to use a six-letter name because I thought it would fit so nicely on the canvas.  Since we don’t get these projects back from Stampin’ Up!, I decided to just use a random name and I think Olivia is a pretty name, don’t you?  🙂

Artisan 3-D CanvasThe letters are from My Digital Studio, and I punched them out.  The banners were made with the Bitty Banners and Hearts Aflutter framelits collections.

Artisan 3-D Canvas Banner

The blue part of the flower was made with a Canvas Creations sheet, which I spritzed with Island Indigo reinker mixed with rubbing alcohol.  I also die cut a layer of burlap.

Artisan 3-D Canvas Close UpHere are pictures of the other two canvases:

Artisan 3-D Canvas 2

Artisan 3-D Canvas 3My two daughters have asked that I make similar canvases for their rooms, now that I’ve finished the decorations for the fake Olivia.  It wasn’t really a hard project to make — just a little time consuming, so I do plan on making more of these.

Are you ready to venture on and visit the next blog?  Breelin Renwick will have a project that you don’t want to miss.  Or you could work your way backwards and see Wendy Weixler’s awesome project.

2013artfinalistback copy

2013artfinalistnext copy

Enjoy your Tuesday evening!  Thanks for stopping by!

Supplies Used:
Ink So Saffron, Lucky Limeade, Island Indigo, Calypso Coral
Paper:  Tea for Two Designer Series Paper, First Edition Specialty Designer Series Paper, Pink Pirouette, Calypso Coral, Lucky Limeade, Very Vanilla, So Saffron
Accessories:   Tea Lace Paper Doilies, Paper Daisies, Vintage Faceted Designer Buttons, Subtles Designer Buttons, Rhinestone Basic Jewels, 3/16” Brights Brads, Canvas Creations, Burlap (non-SU), Gesso (non-SU), Canvases (non-SU), Mod Podge (non-SU), Vanilla Shimmer Smooch Spritz
Baker’s Twine:  Island Indigo, Lucky Limeade, Calypso Coral
Punches:  Itty Bitty Shapes Punch Pack, 1-1/4” Scallop Circle Punch, Blossom Punch, Blossom Petals Builder Punch, Boho Blossoms Punch, 7/8” Scallop Circle Punch
Dies:  Floral Frames Framelits, Fun Flowers Bigz L, Bitty Banners Framelits, Hearts a Flutter Framelits,
MDS:  Just Perfect Alphabet in Calypso Coral

Artisan Finalist Blog Hop — Day 3

2013artisanfinalistA

Well, moving right along…We’re on Day 3 of the Artisan Finalist Blog Hop.  It has been so fun to see everyone’s amazing projects up close.  I don’t know about your experience, but at Convention there were just so many people trying to look at the display boards at the same time and it was really hard to see some of the projects.  With this blog hop, I can see so many more details and learn how some of the projects were made.

I have another card for you today.

Artisan BirthdayI wanted to make a colorful, cheerful birthday card.  I do love these colors together.  Here’s a look at the inside of the card:

Artisan Birthday InsideNow you can hop on over to Breelin Renwick’s blog to continue on with the blog hop.  Or you can work your way backwards by visiting Wendy Weixler’s blog.

2013artfinalistback copy

2013artfinalistnext copy

Since this project was made before the current catalog was released, there are retired products on this card.

Enjoy your Monday evening!  Thanks for stopping by!

Supplies Used:
Stamps:  Make a Wish, Fabulous Phrases, That’s the Ticket, Pennant Parade
Ink:  Daffodil Delight, Marina Mist, Calypso Coral, Gumball Green
Paper:  Whisper White, Gumball Green, Calypso Coral, Marina Mist, World Spectacular Designer Series Paper, 2011-2013 In Color Designer Series Paper Stack
Accessories:  Designer Frames Folders, Itty Bitty Shapes Punch Pack, Pearl Basic Jewels, Subtles Designer Buttons, Large Scallop Edgelits, Scallop Edge Border punch, Ticket Duo Builder punch, Petite Pennants Builder punch, Marina Mist 1/8” Taffeta Ribbon, Sewing Machine

Artisan Finalist Blog Hop — Day 2

2013artisanfinalistA

Welcome!  We’re on day 2 of our Artisan Finalist blog hop.  The ten finalists who were not chosen to be on the design team are sharing our ten projects.

My project today is a scrapbook page.  Scrapbooking was my first love when it came to paper crafting.  I love to do it, but find that I don’t do it very often anymore.  It’s just so much quicker to make a card.  Making the three required scrapbook pages is always my favorite part of this contest.

Artisan Fab Scrapbook PageThis page was actually pretty simple to make.  I just used lots of circle punches.  Punches make everything easier!

Artisan Fab Scrapbook Page Close Up 2I stamped over some of the circles with a stamp from Circle Circus (now retired).  I also added some washi tape to the photo.

Artisan Fab Scrapbook Page Close Up 1This is an older picture of my three kids that we took for a Christmas card one year.  I love this picture of them.

Because I made this page back in May, before the new catalog was released, I have used some retired products (mainly the dsp and buttons).

Now you should hop on over to Breelin Renwick’s blog and see her fabulous creation!  Or you can work your way backwards and visit Wendy Weixler’s page.  Either way, you’re sure to see something beautiful!

2013artfinalistnext copy

2013artfinalistback copy

Enjoy your Sunday evening!  Thanks for stopping by!

Supplies Used:
Stamps Oh, Hello, Designer Typeset Photopolymer stamps, Remember This and That Rotary Stamp, Circle Circus
Ink:  Basic Gray, Rich Razzleberry, Basic Black, Floral District Designer Series Paper
Paper:  Basic Gray, Basic Black, Daffodil Delight, Lucky Limeade
Accessories:  Epic Day This and That Designer Washi Tape, Whisper White Baker’s Twine, Hung Up Cute Clips, Rhinestone Basic Jewels, Subtles Designer Buttons, Brights Designer Buttons, Typeset Alphabet Bigz die,
Punches:  Elegant Butterfly, Bitty Butterfly, 2-1/2” Circle, 1-3/4” Circle, 1” Circle, 1-3/8” Circle, ¾” Circle, Itty Bitty Shapes Punch Pack

Artisan Finalist Blog Hop — Day 1

2013artisanfinalistA

Two posts in one day!  That’s unusual for me.  Well, I’m back for the second time today because those of us who were chosen as Artisan Award Finalists, but didn’t make the design team are doing a blog hop over the next ten days to share our projects.

We each made ten projects — 5 cards, 3 scrapbook pages, and 2 3-d items, and we all put a lot of work into these projects.   I hope you’ll follow along the blog hop trail and check all of them out.  There are some truly amazing projects made by some amazing artists to see along the way.

My first project is a card.  This was actually the first card I made.  I made it back in February and was going to use it for one of my regular blog postings.  But then I thought that maybe I should set it aside just in case I decided to enter the Artisan contest again.  If only I had done that with all of my other projects!  By the time May rolled around (the deadline to enter was May 22), I had only done this with two cards and still had eight projects to go. It seems like I never decide to enter until the last minute.  Life would be so much easier if I planned ahead.

Artisan FirstI even finished the insides of my cards for this contest.  That truly was a last minute decision.  I did this on the morning of packing up all of my entries to send off to Stampin’ Up! (which was only six days before they had to be in Utah).  It made me very nervous to stamp on the insides because the outsides were finished and ready to go, so if I didn’t stamp something straight it would have been disaster.  I didn’t do much with the inside of this one, but it’s much more than I normally do.  🙂

Artisan First InsideWell, now you’re ready to hop on to the next blog, which is Breelin Renwick.  If you’d rather go in reverse order you can do that too, and go visit Wendy Weixler.  Either way, you can make a full circle and visit all ten blogs with the click of a button.

2013artfinalistback copy2013artfinalistnext copy

Some of the products I used on these Artisan entries are now retired, as I made all of these projects before the new catalog was released.

Enjoy your Saturday evening!  I’ll be back tomorrow evening (and the next eight evenings after that) with another Artisan project.  Thanks for stopping by!

Supplies Used:
Stamps:  Oh, Hello, Madison Avenue (Sale-a-Bration)
Ink:  Midnight Muse, Summer Starfruit
Paper:  Whisper White, Basic Gray, Summer Starfruit, Neutrals Designer Series Paper Stack, Comfort Café Designer Series Paper, Creped Filter Paper, Silver Glimmer Paper
Accessories:  Dotted Scallop Ribbon Border punch, Delicate Details Lace Tape, White Baker’s Twine, 2-1/2” Circle punch, 2-3/8” Scallop Circle punch, 1-3/4” Scallop Circle punch, 1-3/8” Circle punch, 1-1/4” Circle punch, ½” Circle punch, In Color Dahlias, 3/16” Corner punch