Artisan Finalist Blog Hop — Day 5

2013artisanfinalistA

Today marks the half-way point on our Artisan Finalist Blog Hop.  Five projects down, five more to go.  Today I’m going to share another card with you:

Artisan ButterflyI thought this card was very true to my style.  For the butterfly, I die cut a piece of cardboard and then applied some Whisper White craft ink with a sponge dauber.  I then glued down some of the Glass Stampin’ Glitter on the butterfly.

Here’s the inside:

Artisan Butterfly InsideNext on the blog hop is Breelin Renwick’s blog, or you can work your way backwards and visit Wendy Weixler’s blog.

2013artfinalistback copy

2013artfinalistnext copy

Enjoy your Wednesday night!  Thanks for stopping by!

Supplies Used:
Stamps:  Vintage Verses (Sale-a-Bration), Oh, Hello
Ink:  Calypso Coral, Island Indigo, Lucky Limeade, Pink Pirouette, Crumb Cake
Paper:  Crumb Cake, Pretty in Pink, Island Indigo, Tea for Two Designer Series Paper
Accessories:  Tea Lace Paper Doilies, Victoria 5/8” Crochet Trim, Island Indigo 3/8” Ruffled Ribbon, Subtles Designer Buttons, Island Indigo Baker’s Twine, 7/8” Scallop Circle punch, Silver Glass Stampin’ Glitter, Beautiful Butterflies Bigz die, cardboard (from a SU cardboard box), white acrylic paint, sewing machine

Autumn Temperatures can Come — FMS99

Well, look at that!  We’re on sketch #99 at Freshly Made Sketches this week, and the fantabulous  (she deserves her own superlative) Rita Wright has a fun sketch for us this week:

Now I will have to say that this one had me stumped for quite a while.  I just didn’t know what to put in those circles.  I finally decided that they didn’t have to be circles and that I should use hexagons.  And then I decided to use little favorites in the negatives of the punched hexagons.

Column of Three -- FMS99I pulled out some of the new Sweater Weather dsp because I LOVE Fall colors and I’ve been dying to use it.  The title of this dsp just made me laugh out loud because I can’t even imagine wearing a sweater — it has been so HOT here the past three weeks.  Though I’m not ready for the kids to go back to school, I am ready for some Autumn temperatures.

I hope you can make time to join us with this challenge.  Go see what the other designers made at the Freshly Made Sketches site— you’ll see a wide variety of incredible projects this week.  And make sure you come back next week for our 100th sketch milestone! There will definitely be a few fun surprises — that’s all I’m saying!

Supplies Used:
Stamps:  Six-Sided Sampler
Ink:  Crushed Curry
Paper:  Chocolate Chip, Soft Sky, Very Vanilla, Sweater Weather dsp
Embellishments:  Naturals Designer Buttons, Early Espresso Baker’s Twine, Pearl Basic Jewels, Hexagon punch, Boho Blossoms punch, Dotted Scallop Ribbon Border punch, Candy Dots Brad Bases, Regals Candy Dots

Artisan Finalist Blog Hop — Day 4

2013artisanfinalistA

I hope you’ve been enjoying the blog hop for the ten Artisan Finalists who did not make the design team.  We’re on day 4 now, and I have a 3-D project to share with you.

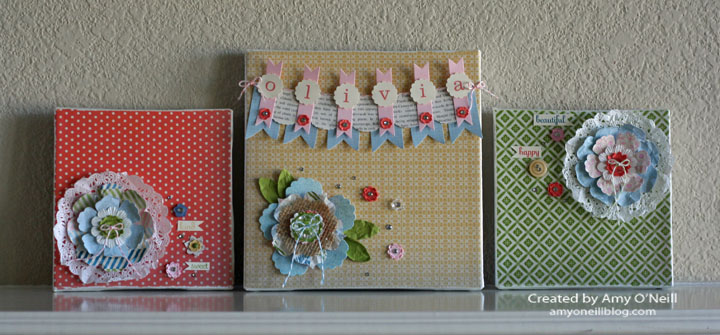
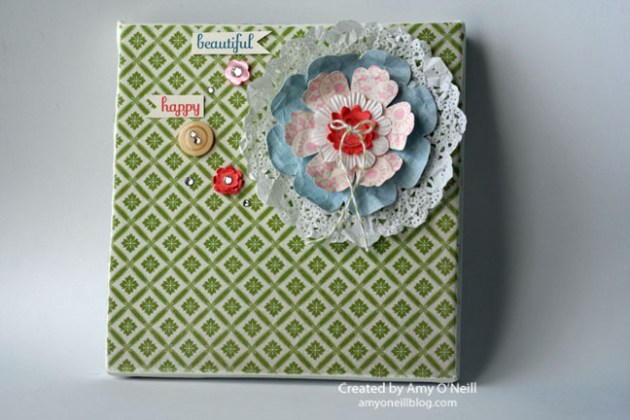
This project consisted of three canvases.  I first painted the canvases with gesso, and then used Mod-Podge to adhere the dsp to the canvas.  I then covered the top with Mod-Podge as well.  I sanded the edges to smooth them and give them a slightly distressed look.

Artisan 3-D Canvas All 
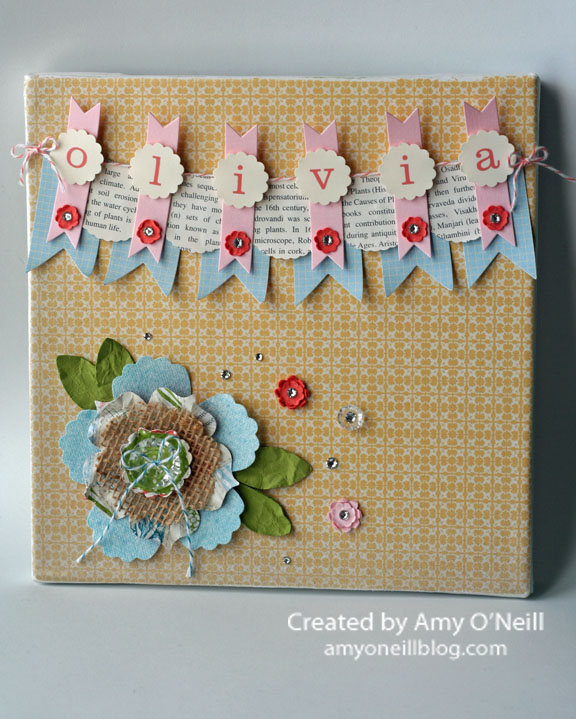
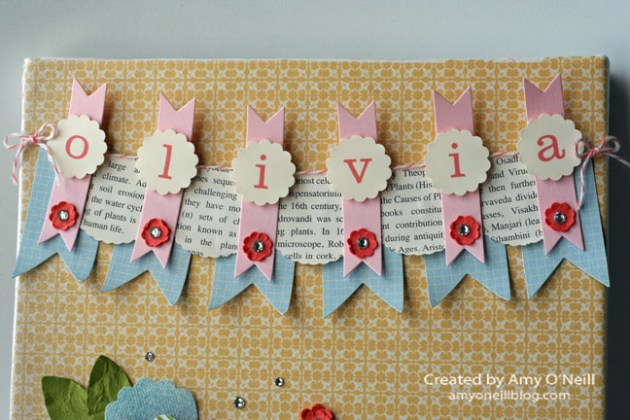
The largest canvas has the name Olivia on it.  She must be my fictional daughter as we don’t have any Olivia’s in our house, but I wanted to use a six-letter name because I thought it would fit so nicely on the canvas.  Since we don’t get these projects back from Stampin’ Up!, I decided to just use a random name and I think Olivia is a pretty name, don’t you?  🙂

Artisan 3-D CanvasThe letters are from My Digital Studio, and I punched them out.  The banners were made with the Bitty Banners and Hearts Aflutter framelits collections.

Artisan 3-D Canvas Banner

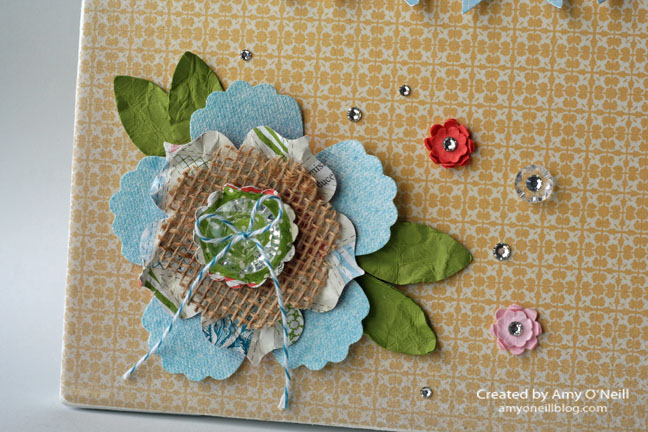
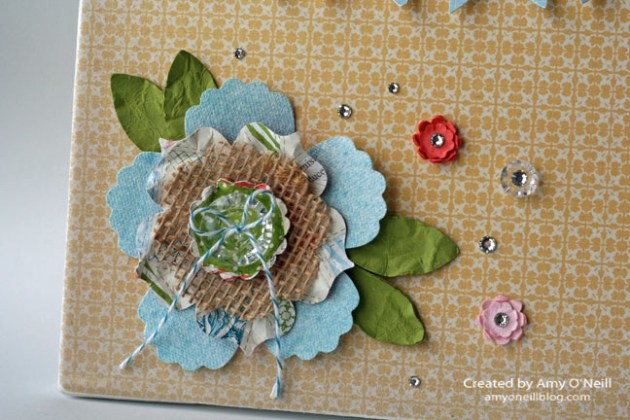
The blue part of the flower was made with a Canvas Creations sheet, which I spritzed with Island Indigo reinker mixed with rubbing alcohol.  I also die cut a layer of burlap.

Artisan 3-D Canvas Close UpHere are pictures of the other two canvases:

Artisan 3-D Canvas 2

Artisan 3-D Canvas 3
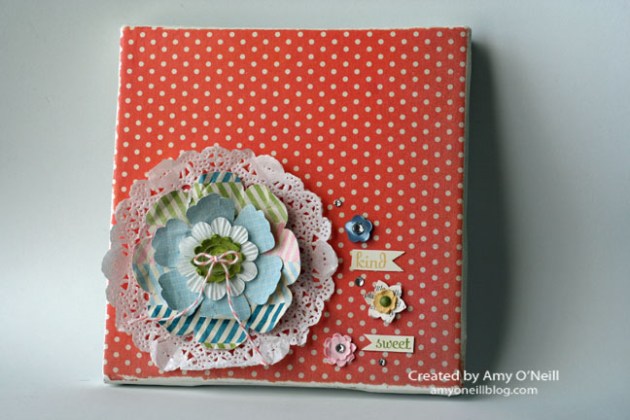
My two daughters have asked that I make similar canvases for their rooms, now that I’ve finished the decorations for the fake Olivia.  It wasn’t really a hard project to make — just a little time consuming, so I do plan on making more of these.

Are you ready to venture on and visit the next blog?  Breelin Renwick will have a project that you don’t want to miss.  Or you could work your way backwards and see Wendy Weixler’s awesome project.

2013artfinalistback copy

2013artfinalistnext copy

Enjoy your Tuesday evening!  Thanks for stopping by!

Supplies Used:
Ink So Saffron, Lucky Limeade, Island Indigo, Calypso Coral
Paper:  Tea for Two Designer Series Paper, First Edition Specialty Designer Series Paper, Pink Pirouette, Calypso Coral, Lucky Limeade, Very Vanilla, So Saffron
Accessories:   Tea Lace Paper Doilies, Paper Daisies, Vintage Faceted Designer Buttons, Subtles Designer Buttons, Rhinestone Basic Jewels, 3/16” Brights Brads, Canvas Creations, Burlap (non-SU), Gesso (non-SU), Canvases (non-SU), Mod Podge (non-SU), Vanilla Shimmer Smooch Spritz
Baker’s Twine:  Island Indigo, Lucky Limeade, Calypso Coral
Punches:  Itty Bitty Shapes Punch Pack, 1-1/4” Scallop Circle Punch, Blossom Punch, Blossom Petals Builder Punch, Boho Blossoms Punch, 7/8” Scallop Circle Punch
Dies:  Floral Frames Framelits, Fun Flowers Bigz L, Bitty Banners Framelits, Hearts a Flutter Framelits,
MDS:  Just Perfect Alphabet in Calypso Coral

Artisan Finalist Blog Hop — Day 3

2013artisanfinalistA

Well, moving right along…We’re on Day 3 of the Artisan Finalist Blog Hop.  It has been so fun to see everyone’s amazing projects up close.  I don’t know about your experience, but at Convention there were just so many people trying to look at the display boards at the same time and it was really hard to see some of the projects.  With this blog hop, I can see so many more details and learn how some of the projects were made.

I have another card for you today.

Artisan BirthdayI wanted to make a colorful, cheerful birthday card.  I do love these colors together.  Here’s a look at the inside of the card:

Artisan Birthday InsideNow you can hop on over to Breelin Renwick’s blog to continue on with the blog hop.  Or you can work your way backwards by visiting Wendy Weixler’s blog.

2013artfinalistback copy

2013artfinalistnext copy

Since this project was made before the current catalog was released, there are retired products on this card.

Enjoy your Monday evening!  Thanks for stopping by!

Supplies Used:
Stamps:  Make a Wish, Fabulous Phrases, That’s the Ticket, Pennant Parade
Ink:  Daffodil Delight, Marina Mist, Calypso Coral, Gumball Green
Paper:  Whisper White, Gumball Green, Calypso Coral, Marina Mist, World Spectacular Designer Series Paper, 2011-2013 In Color Designer Series Paper Stack
Accessories:  Designer Frames Folders, Itty Bitty Shapes Punch Pack, Pearl Basic Jewels, Subtles Designer Buttons, Large Scallop Edgelits, Scallop Edge Border punch, Ticket Duo Builder punch, Petite Pennants Builder punch, Marina Mist 1/8” Taffeta Ribbon, Sewing Machine

Artisan Finalist Blog Hop — Day 2

2013artisanfinalistA

Welcome!  We’re on day 2 of our Artisan Finalist blog hop.  The ten finalists who were not chosen to be on the design team are sharing our ten projects.

My project today is a scrapbook page.  Scrapbooking was my first love when it came to paper crafting.  I love to do it, but find that I don’t do it very often anymore.  It’s just so much quicker to make a card.  Making the three required scrapbook pages is always my favorite part of this contest.

Artisan Fab Scrapbook PageThis page was actually pretty simple to make.  I just used lots of circle punches.  Punches make everything easier!

Artisan Fab Scrapbook Page Close Up 2I stamped over some of the circles with a stamp from Circle Circus (now retired).  I also added some washi tape to the photo.

Artisan Fab Scrapbook Page Close Up 1This is an older picture of my three kids that we took for a Christmas card one year.  I love this picture of them.

Because I made this page back in May, before the new catalog was released, I have used some retired products (mainly the dsp and buttons).

Now you should hop on over to Breelin Renwick’s blog and see her fabulous creation!  Or you can work your way backwards and visit Wendy Weixler’s page.  Either way, you’re sure to see something beautiful!

2013artfinalistnext copy

2013artfinalistback copy

Enjoy your Sunday evening!  Thanks for stopping by!

Supplies Used:
Stamps Oh, Hello, Designer Typeset Photopolymer stamps, Remember This and That Rotary Stamp, Circle Circus
Ink:  Basic Gray, Rich Razzleberry, Basic Black, Floral District Designer Series Paper
Paper:  Basic Gray, Basic Black, Daffodil Delight, Lucky Limeade
Accessories:  Epic Day This and That Designer Washi Tape, Whisper White Baker’s Twine, Hung Up Cute Clips, Rhinestone Basic Jewels, Subtles Designer Buttons, Brights Designer Buttons, Typeset Alphabet Bigz die,
Punches:  Elegant Butterfly, Bitty Butterfly, 2-1/2” Circle, 1-3/4” Circle, 1” Circle, 1-3/8” Circle, ¾” Circle, Itty Bitty Shapes Punch Pack

Artisan Finalist Blog Hop — Day 1

2013artisanfinalistA

Two posts in one day!  That’s unusual for me.  Well, I’m back for the second time today because those of us who were chosen as Artisan Award Finalists, but didn’t make the design team are doing a blog hop over the next ten days to share our projects.

We each made ten projects — 5 cards, 3 scrapbook pages, and 2 3-d items, and we all put a lot of work into these projects.   I hope you’ll follow along the blog hop trail and check all of them out.  There are some truly amazing projects made by some amazing artists to see along the way.

My first project is a card.  This was actually the first card I made.  I made it back in February and was going to use it for one of my regular blog postings.  But then I thought that maybe I should set it aside just in case I decided to enter the Artisan contest again.  If only I had done that with all of my other projects!  By the time May rolled around (the deadline to enter was May 22), I had only done this with two cards and still had eight projects to go. It seems like I never decide to enter until the last minute.  Life would be so much easier if I planned ahead.

Artisan FirstI even finished the insides of my cards for this contest.  That truly was a last minute decision.  I did this on the morning of packing up all of my entries to send off to Stampin’ Up! (which was only six days before they had to be in Utah).  It made me very nervous to stamp on the insides because the outsides were finished and ready to go, so if I didn’t stamp something straight it would have been disaster.  I didn’t do much with the inside of this one, but it’s much more than I normally do.  🙂

Artisan First InsideWell, now you’re ready to hop on to the next blog, which is Breelin Renwick.  If you’d rather go in reverse order you can do that too, and go visit Wendy Weixler.  Either way, you can make a full circle and visit all ten blogs with the click of a button.

2013artfinalistback copy2013artfinalistnext copy

Some of the products I used on these Artisan entries are now retired, as I made all of these projects before the new catalog was released.

Enjoy your Saturday evening!  I’ll be back tomorrow evening (and the next eight evenings after that) with another Artisan project.  Thanks for stopping by!

Supplies Used:
Stamps:  Oh, Hello, Madison Avenue (Sale-a-Bration)
Ink:  Midnight Muse, Summer Starfruit
Paper:  Whisper White, Basic Gray, Summer Starfruit, Neutrals Designer Series Paper Stack, Comfort Café Designer Series Paper, Creped Filter Paper, Silver Glimmer Paper
Accessories:  Dotted Scallop Ribbon Border punch, Delicate Details Lace Tape, White Baker’s Twine, 2-1/2” Circle punch, 2-3/8” Scallop Circle punch, 1-3/4” Scallop Circle punch, 1-3/8” Circle punch, 1-1/4” Circle punch, ½” Circle punch, In Color Dahlias, 3/16” Corner punch

End of Lovely Romance Week

Well, we’re at the end of Lovely Romance week.  So what do you think about this set?  It definitely isn’t one I would normally choose, as it isn’t my normal style.  But I have enjoyed using it, and I have even grown to love the coordinating dsp, Venetian Romance.  It has such beautiful colors and it’s very different from the other offerings.

This is my 3-D project for the Convention display boards for this suite of products.  I used one of the Kraft Gift Boxes for it.

Lovely Romance Display 3d

This is such a fun girly box.  I love all of the lace and ruffles on it.  And these colors are so pretty together.

So what’s up for the next week?  Well, the ten Artisan Finalists who were not selected for the design team are doing a blog hop and it starts tonight.  We’ll be showing our ten projects which we submitted for the contest.  It seems like it was so long ago when we made them, and it has been hard to not share them until now.  I hope you’ll come check them out.

Enjoy your Saturday!  Thanks for stopping by!

Lovely Romance with a Big Bow — FabFri24

It’s time for another Fab Friday challenge!  And this week we have a soft and pretty color challenge for you.

I am in love with these colors!  And when I saw them, I knew they’d be perfect for a Lovely Romance card to go along with my theme week.

Lovely Romance Big Bow

I really like the Natural 7/8″ Cotton Ribbon, and it ties so beautifully.  I couldn’t resist adding a big, impractical bow to this card.  🙂

I hope you’ll join us at Fab Friday this week.  Go check out what the other designers made with these beautiful colors at the Fab Friday site.

Enjoy your Friday!  Come back tomorrow and I’ll have my favorite Lovely Romance project for you.  Thanks for stopping by!

Supplies Used:
Stamps:  Lovely Romance, Viola’s Lace (wheel)
Ink:  Crumb Cake, Pistachio Pudding, Crisp Cantaloupe
Paper:  Crumb Cake, So Saffron, Very Vanilla, Venetian Romance dsp
Embellishments:  Dotted Scallop Ribbon Border punch, Natural 7/8″ Cotton Ribbon, Pistachio Pudding 3/8″ Ruffle Stretch Trim, Vintage Faceted Designer Button, Pearl Basic Jewels, Linen Thread, Apothecary Accents framelits

Lovely Romance Meets Beautifully Baroque

Lovely Romance Display 3I think the Beautifully Baroque embossing folder goes so well with the Lovely Romance set.  For this Convention display sample, I embossed the Basic Gray card stock and then used a sponge dauber to gently apply Whisper White craft ink to the raised surfaces.

When we got our boxes of supplies with which to make the samples back in May, we didn’t receive the new In-Color markers, and we couldn’t order them yet because they weren’t included on the pre-order supplies.  I knew I wanted to color this pretty stamp with Strawberry Slush, so I stamped it twice — once in Strawberry Slush and once in Pool Party, and then fussy cut out the Strawberry Slush part.  It’s much easier to use markers!

Enjoy your Thursday!  Thanks for stopping by!


Little Lovely Romance — FMS 98

It’s Wednesday, and the amazing Jen Mitchell has a fun sketch for us at Freshly Made Sketches:

I decided to make a little 3″x 3″ note card for this sketch, and since I’m having Lovely Romance week, I used the Lovely Romance stamp set.  I also used one of the new envelope liner dies — very fun!

Romantic 3 x 3I hope you’ll join in this challenge.  You can check out what the other designers made at the Freshly Made Sketches site.

Enjoy your Wednesday!  Thanks for stopping by!