End of School Year Treats — Monday Montage #70

Monday Montage Banner -- October

Welcome to another Monday Montage blog hop!  We are a group of ten stampers who love to share what we create with you, and all you have to do to follow along is click on the links at the bottom of each post.

This is the last week of school for my kiddos.  Summer Vacation!!!  I’m excited to have them home full time for the summer, and I know they’re excited too.  But I’ll bet we’re all not nearly as excited as their teachers!  My daughters wanted me to make them some little treats to hand out to friends on their last day of school.  I used the new Perfectly Wrapped stamp set to whip up some cute little sacked treats in no time.

I started with some mini paper sacks.  I stamped the Happy Day stamp from Perfectly Wrapped with Flirty Flamingo ink (I love this color) and the circle outline in Daffodil Delight.

Happy Day Treats
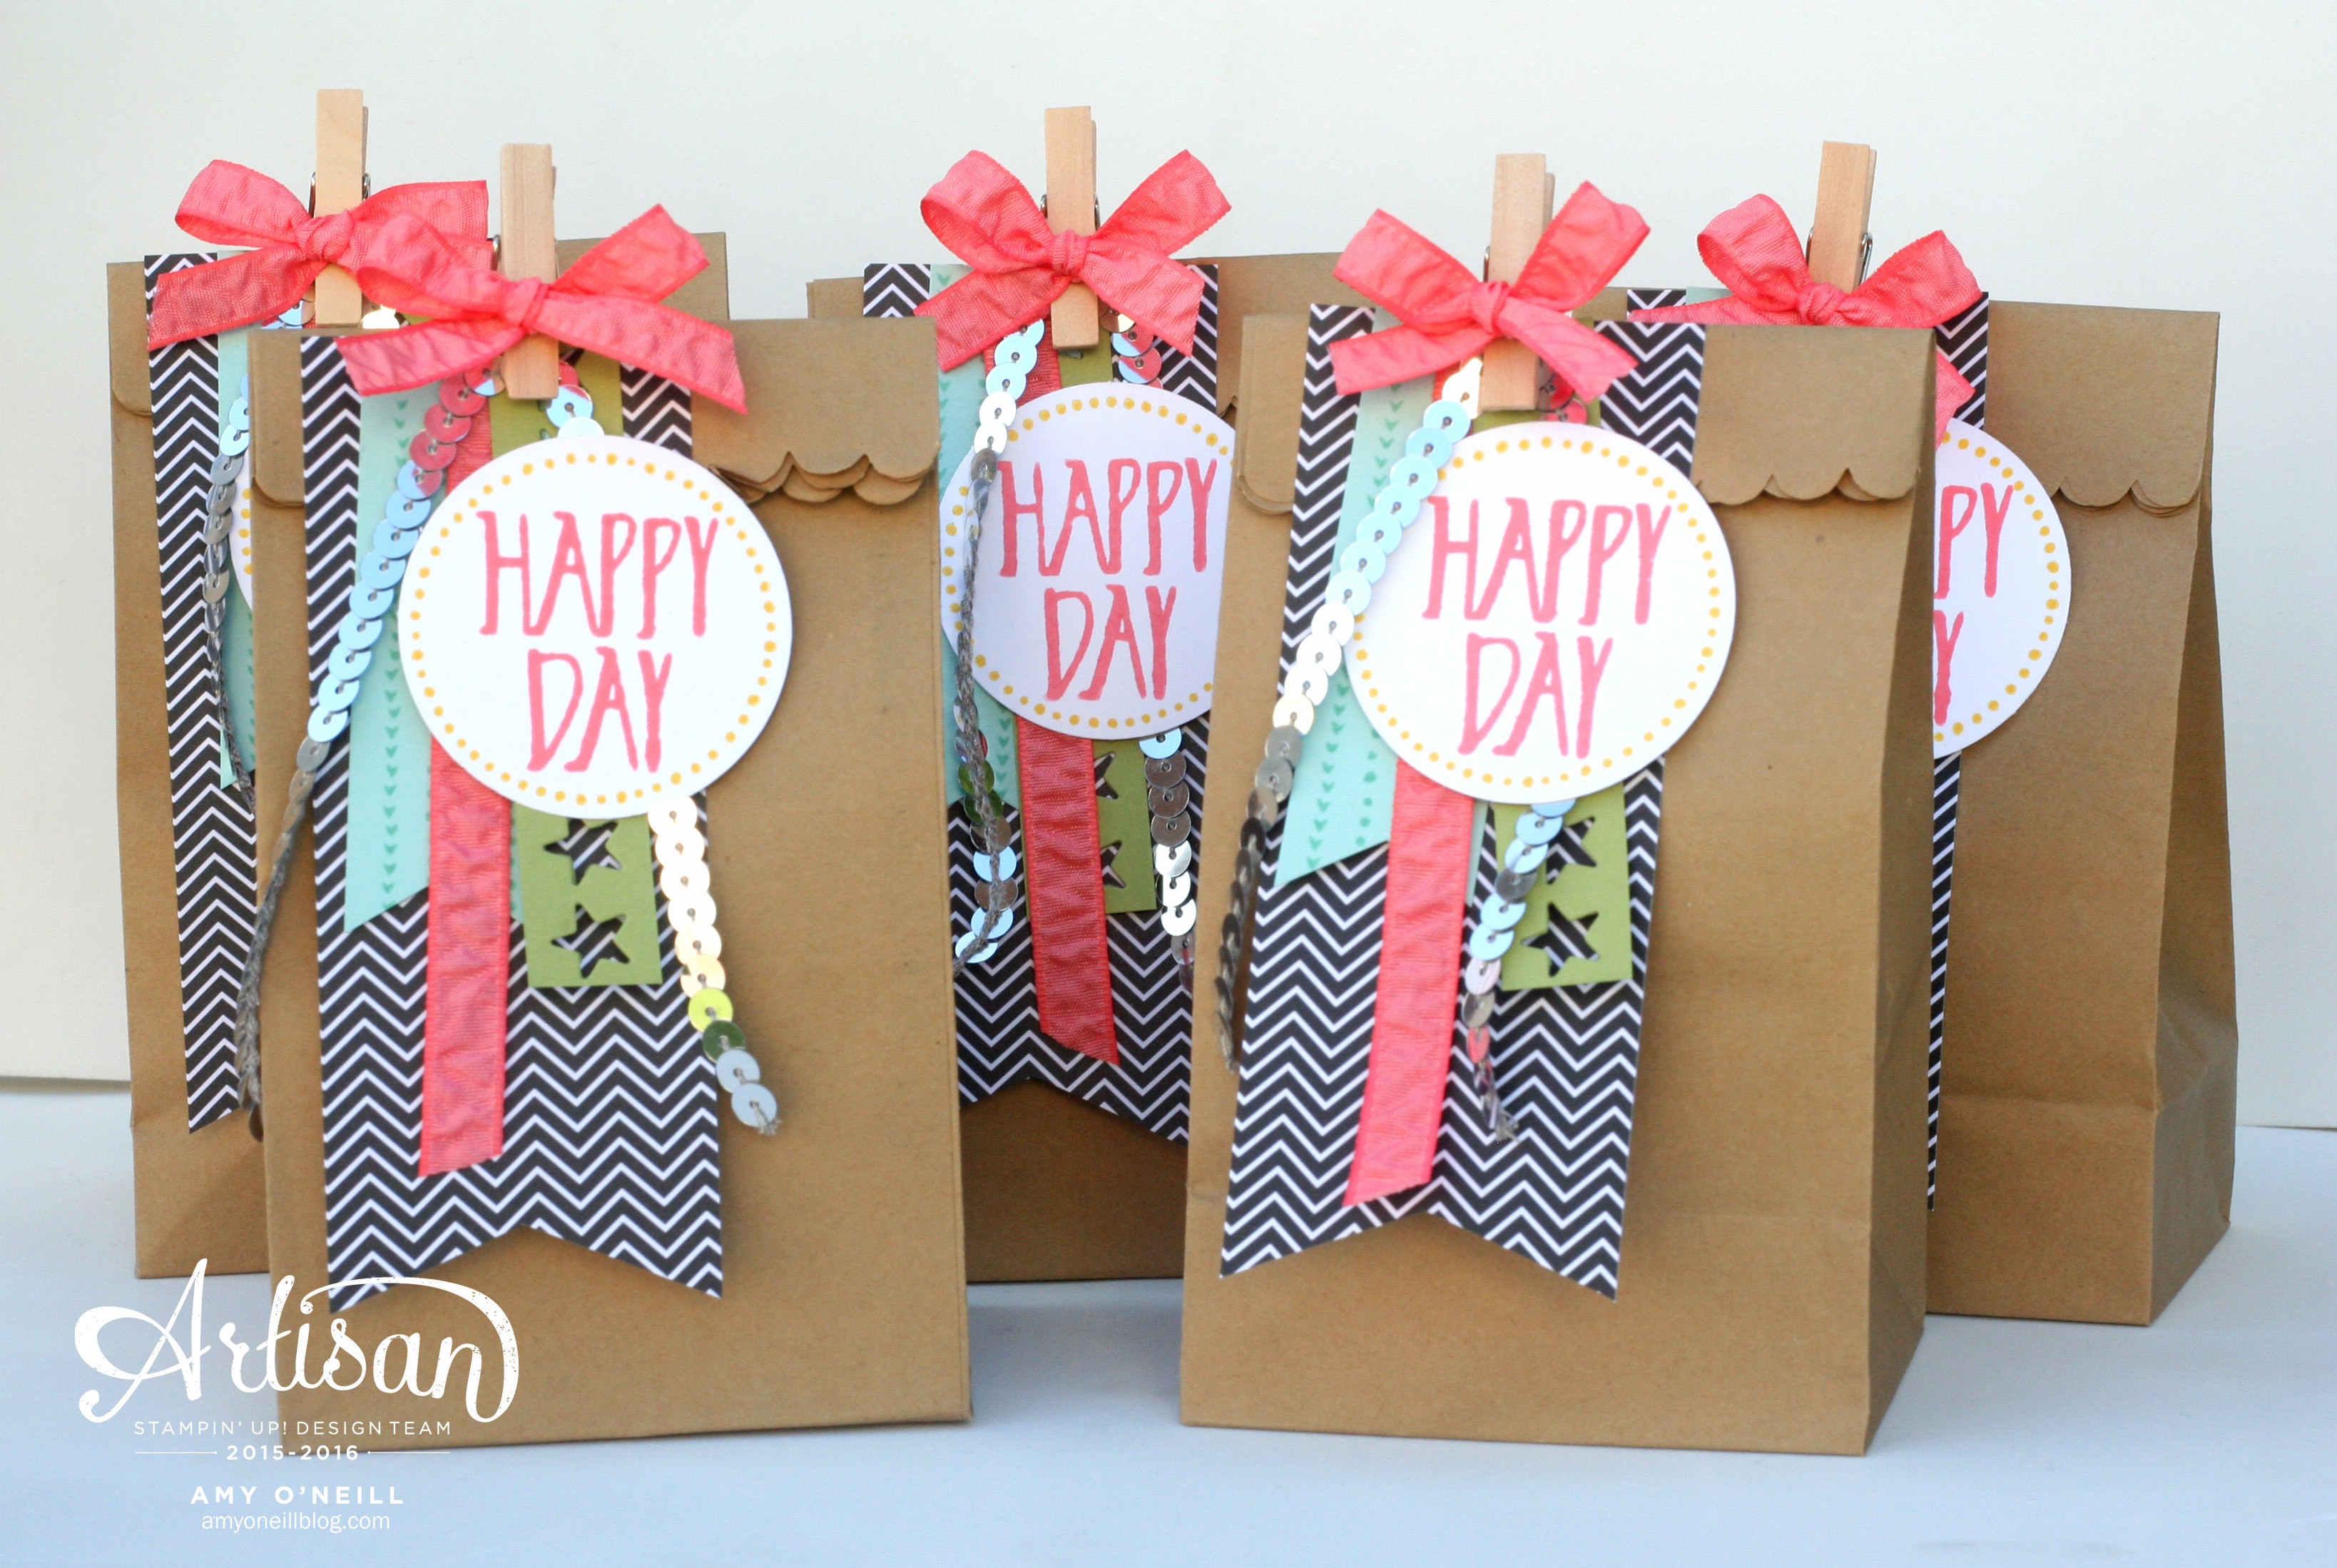
The banners are strips of Pool Party and Pear Pizzazz cardstock, Flirty Flamingo 3/8″ Ruched Ribbon, Silver Sequin Trim, and Pop of Pink Specialty DSP.

Happy Day Treats Single
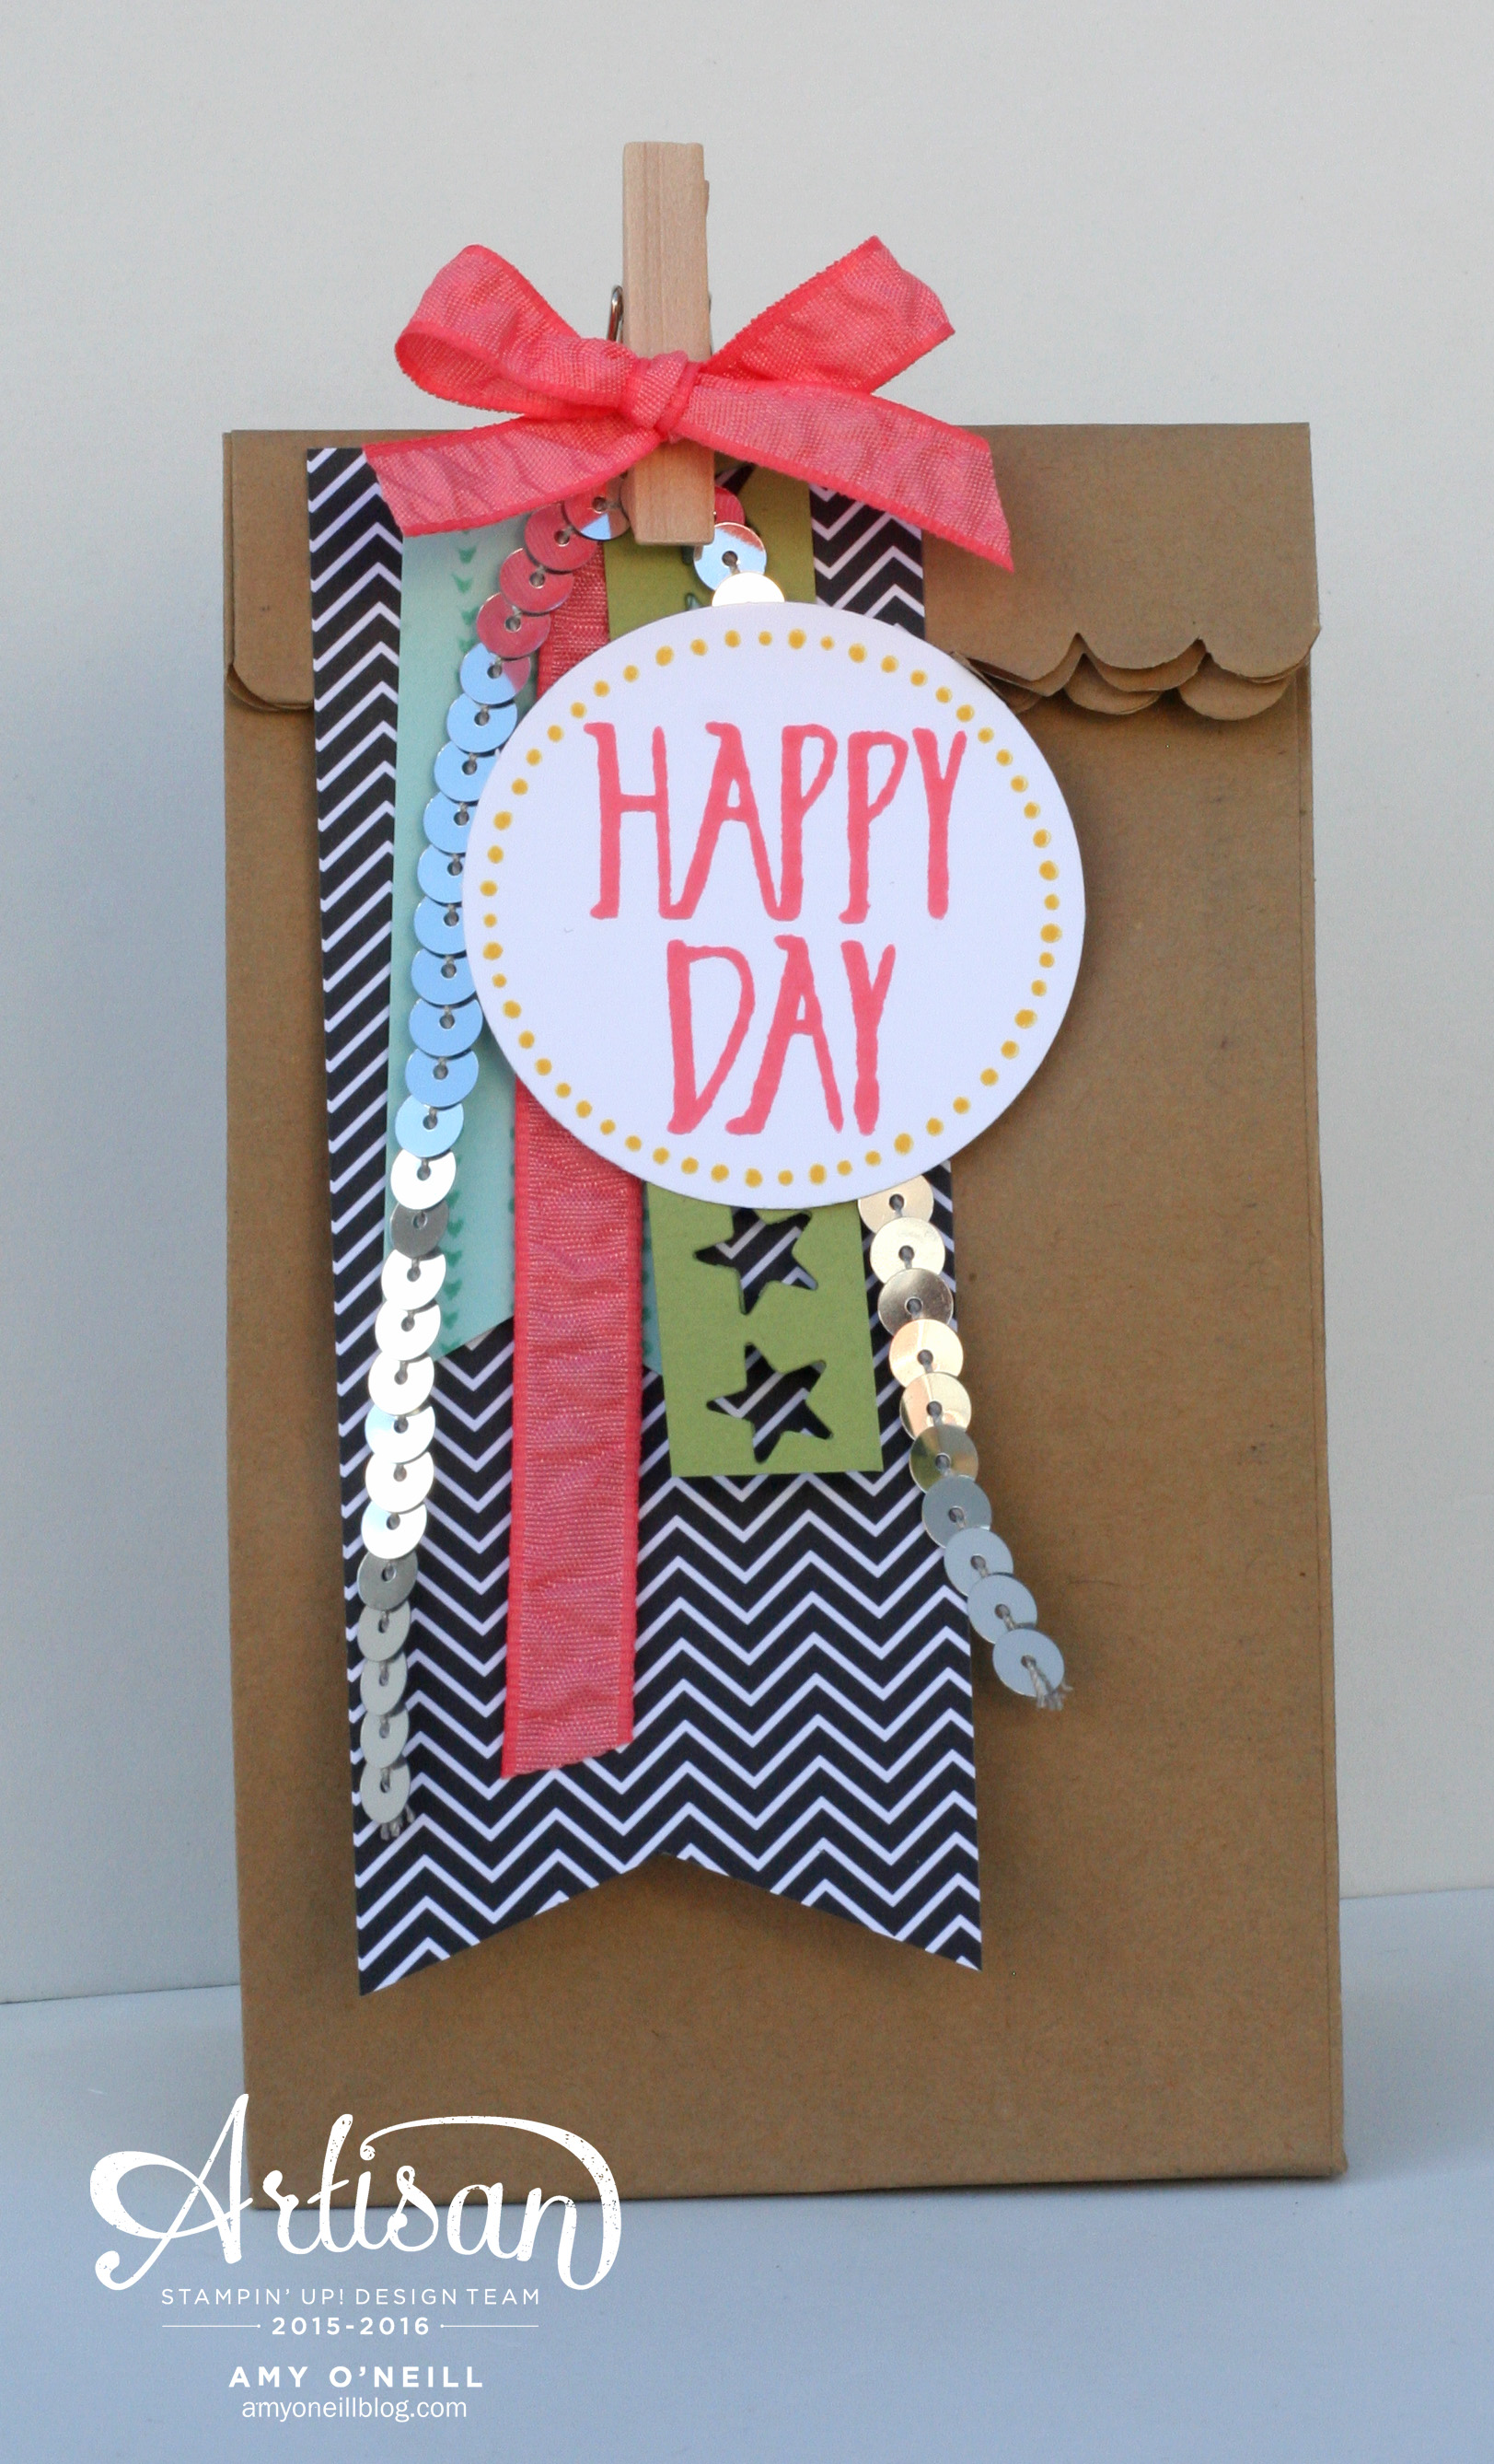
I put some little candy treats inside. I am really loving this fun color combination, and can’t wait to use it again.

Happy Day Treats Close Up

You’re ready to hop on over to Breelin Renwick’s blog.  I always love seeing what she makes!  If you prefer to work your way backwards, you can jump back to Wendy Weixler’s blog.  Either way, be sure to work your way through all of the blogs so you don’t miss a thing!

mondaymontageback (1)mondaymontagenext copy

Enjoy your Monday!  Thanks for stopping by!

Flamingo Paradise — FMS238

We have another sketch for you over at the Freshly Made Sketches site today.  And this week our hostess is our super talented friend from Colorado, Kim Singdahlsen.  Take a look at what she has for us:

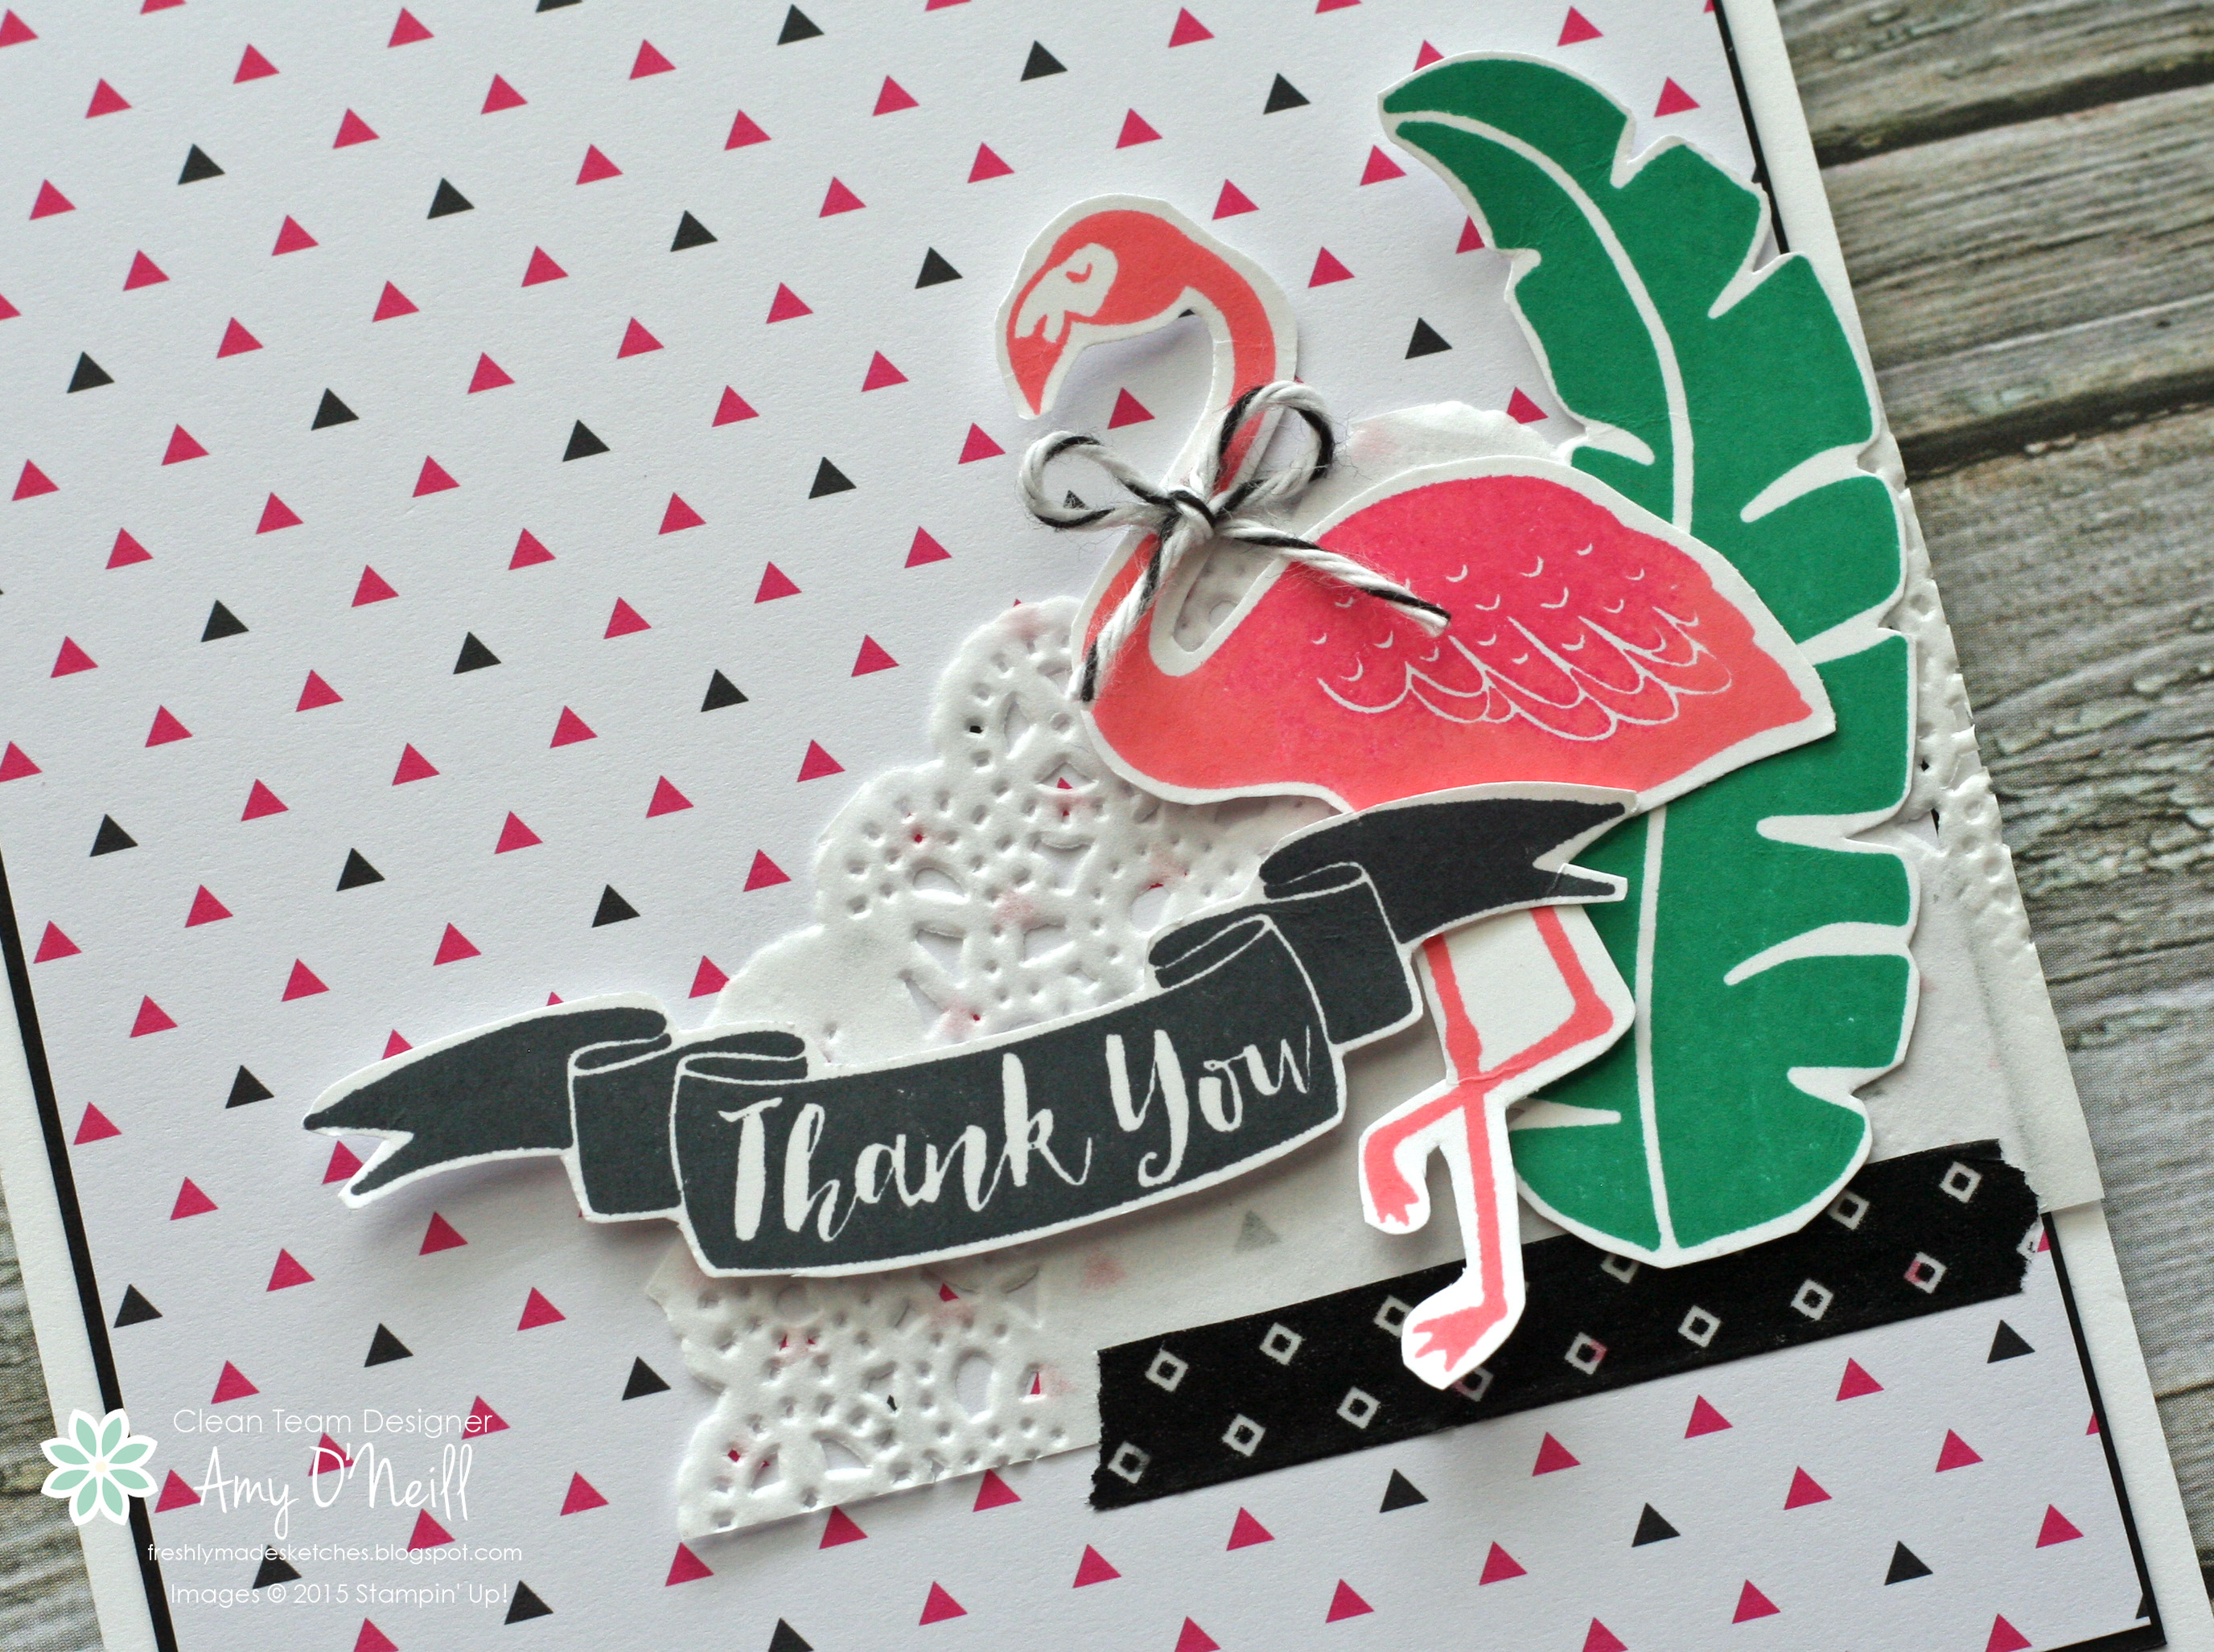
This sketch is right up my alley!  I’ll call it “clean collage style.”  I have a new stamp set, Pop of Paradise, that will be available next week when the new catalog goes live, and I have been itching to ink it up.  I’ve paired it here with a piece of Pop of Pink Specialty DSP.

Flamingo ParadiseI stamped the flamingo with Flirty Flamingo ink (what better color could there be for a flamingo stamp, right?) and sponged on a little Melon Mambo ink on the wing area.  The leaf was stamped with Emerald Envy ink.  I used a little strip of Pop of Pink Designer Washi Tape to help hold the doily down and to give the flamingo something on which to stand.

Flamingo Paradise Close UpWe hope you’ll play along and make your own card using the sketch and post it in the gallery.  We love to see what you make!  Meanwhile, be sure to hop on over to the Freshly Made Sketches site for some inspiration and to see what the design team made.

Enjoy your Wednesday!  Thanks for stopping by!


A Grateful Bunch for K — Stampin’ Up! Artisan Blog Hop

Welcome to another Stampin’ Up! Artisan Design Team Blog Hop!  There are 20 of us from around the globe who will be sharing our projects with you twice each month.  All you need to do to follow along is click on the link at the bottom of each post.

Our theme for this month is “May flowers.”  We had three different stamp sets from which to choose, and for this hop I chose the Grateful Bunch stamp set and coordinating Blossom Bunch Punch.

Letter KI have a daughter whose favorite color rotates between yellow and orange.  She loves sunny, happy colors.  And her name starts with a “K.”  I found these fun wooden letters at a local big box store and decided to decorate one for her room.

I stamped these fun flowers using Hello Honey, Tangelo Twist and Pumpkin Pie ink and punched them out using the coordinating punch.  This is a project that looks like it would take a long time to create because there are so many flowers.  But it really didn’t take that long because the stamp and punch make three flowers at a time.  I just used glue dots to adhere all of the flowers to the monogram.

Letter K Close Up

I made a bow from the Pumpkin Pie 1/4″ Cotton Ribbon and a few strands of the White 1-1/4″ Jute Ribbon and a Very Vintage Designer Button.  I had to get a little ribbon-tying lesson from fellow Artisan, Connie Collins.  She ties beautiful bows and was so kind in giving me a quick lesson across the miles.  Love her!

K Grateful Bunch NotecardI made a little coordinating gift card to enclose with the monogram letter.  I used the Epic Alphabet for the letter “k.”

K Grateful Bunch Notecard Close Up

You’re ready to hop on over to The Netherlands and visit Chantal de Kaste’s blog by clicking on the link below.  You can use Google Translate for any blogs for which you need translation help.  It’s so fun to hop around the world!

Bloghop button_0915

Enjoy your Thursday!  Thanks for stopping by!

Supplies Used:
Stamps:  Grateful Bunch, Epic Alphabet
Ink:  Tangelo Twist, Hello Honey, Pumpkin Pie
Paper:  Whisper White
Embellishments:  Blossom Bunch Punch, Pumpkin Pie 1/4″ Cotton Ribbon, White 1-1/4″ Jute Ribbon, Very Vintage Designer Buttons, White Baker’s Twine

Eat all the Cake–FMS237

We have another sketch ready for you over at the Freshly Made Sketches site!  And this week our hostess is the lovely Linda Callahan, whose stamping and sense of humor always bring a smile to my face.  Look at what she has for us this week:

The sky is the limit with this sketch!  Sometimes sketches help me narrow down my stamp set choices by what will fit/work with the sketch.  But with this sketch, one could use just about anything.  So, I decided to make a birthday card because I needed one.  Plus, I have a new set that will be released with the new catalog on June 1st, called Birthday Banners, and I’ve been wanting to play with it.

Eat All the CakeI started by stamping the candle images with Watermelon Wonder and Pool Party inks.  I stamped the flames with So Saffron and Crushed Curry inks by using the Rock ‘n Roll technique (stamp the entire image with the lighter color, So Saffron, and then roll the edge of the image on the darker color’s ink pad to pick up a little of its color on one side).

The banner was stamped on a piece of Whisper White cardstock using Peekaboo Peach and Dapper Denim inks, and popped up with Stampin’ Dimensionals.  I added some It’s My Party Enamel Dots and Gold Metallic Thread for some embellishments.

Eat All the Cake Close UpThis card has lots of white space — way more than I’m typically comfortable using.  And now that I look at the photos, I see that my photography doesn’t show the scoring lines I used that go with the sketch.  Sigh…  They are more visible in person.

We hope you’ll join us and create your own card using the sketch!  We love looking through the gallery and seeing your work!  For a dose of creative inspiration, head on over to the Freshly Made Sketches site and see what the design team has in store for you this week!  You’ll be wowed!

Enjoy your Wednesday!  Thanks for stopping by!

Dijon Delights — Monday Montage #69

Monday Montage Banner -- October

Welcome to another Monday Montage blog hop!  We are a group of ten stampers who love to share what we create with you, and all you have to do to follow along is click on the links at the bottom of each post.

I still have another sneak peek from the display boards at last month’s On Stage event to share with you today.  One of the new sets that will be available starting June 1st is Love & Affection.  It is a pretty floral set with even prettier sentiments.

Dijon Love & AffectionOne of the colors that I was asked to focus on was Delightful Dijon.  So for this card, I ran a piece of Delightful Dijon through the Big Shot with the Softly Falling embossing folder.  I then cut it into two piece and inserted a piece of white card stock, on which I stamped some of the floral images from Love & Affection with Watermelon Wonder and Mint Macaron inks.

Dijon Love & Affection Close UpThe sentiment was embossed with Black Stampin’ Emboss Powder.  I added a little bit of black baker’s twine and called it a day.  This would be an easy card to send through the mail.

Dijon ButterflyOn this last card, I watercolored some Delightful Dijon ink onto a piece of Shimmery White card stock with a paint brush.  The butterfly was cut from Vellum Cardstock using one of the Butterflies Thinlits dies.

Aren’t these sentiments so sweet!  I love them!

You’re ready to hop on over to Breelin Renwick’s blog.  I always love seeing what she makes!  If you prefer to work your way backwards, you can jump back to Wendy Weixler’s blog.  Either way, be sure to work your way through all of the blogs so you don’t miss a thing!

mondaymontageback (1)mondaymontagenext copy

Enjoy your Monday!  Thanks for stopping by!

Adios Cute Typewriter — FMS236

We have another sketch challenge for you over at the Freshly Made Sketches site, and this week our super talented friend, Rita Wright, is our hostess.  Check out what she has for us:

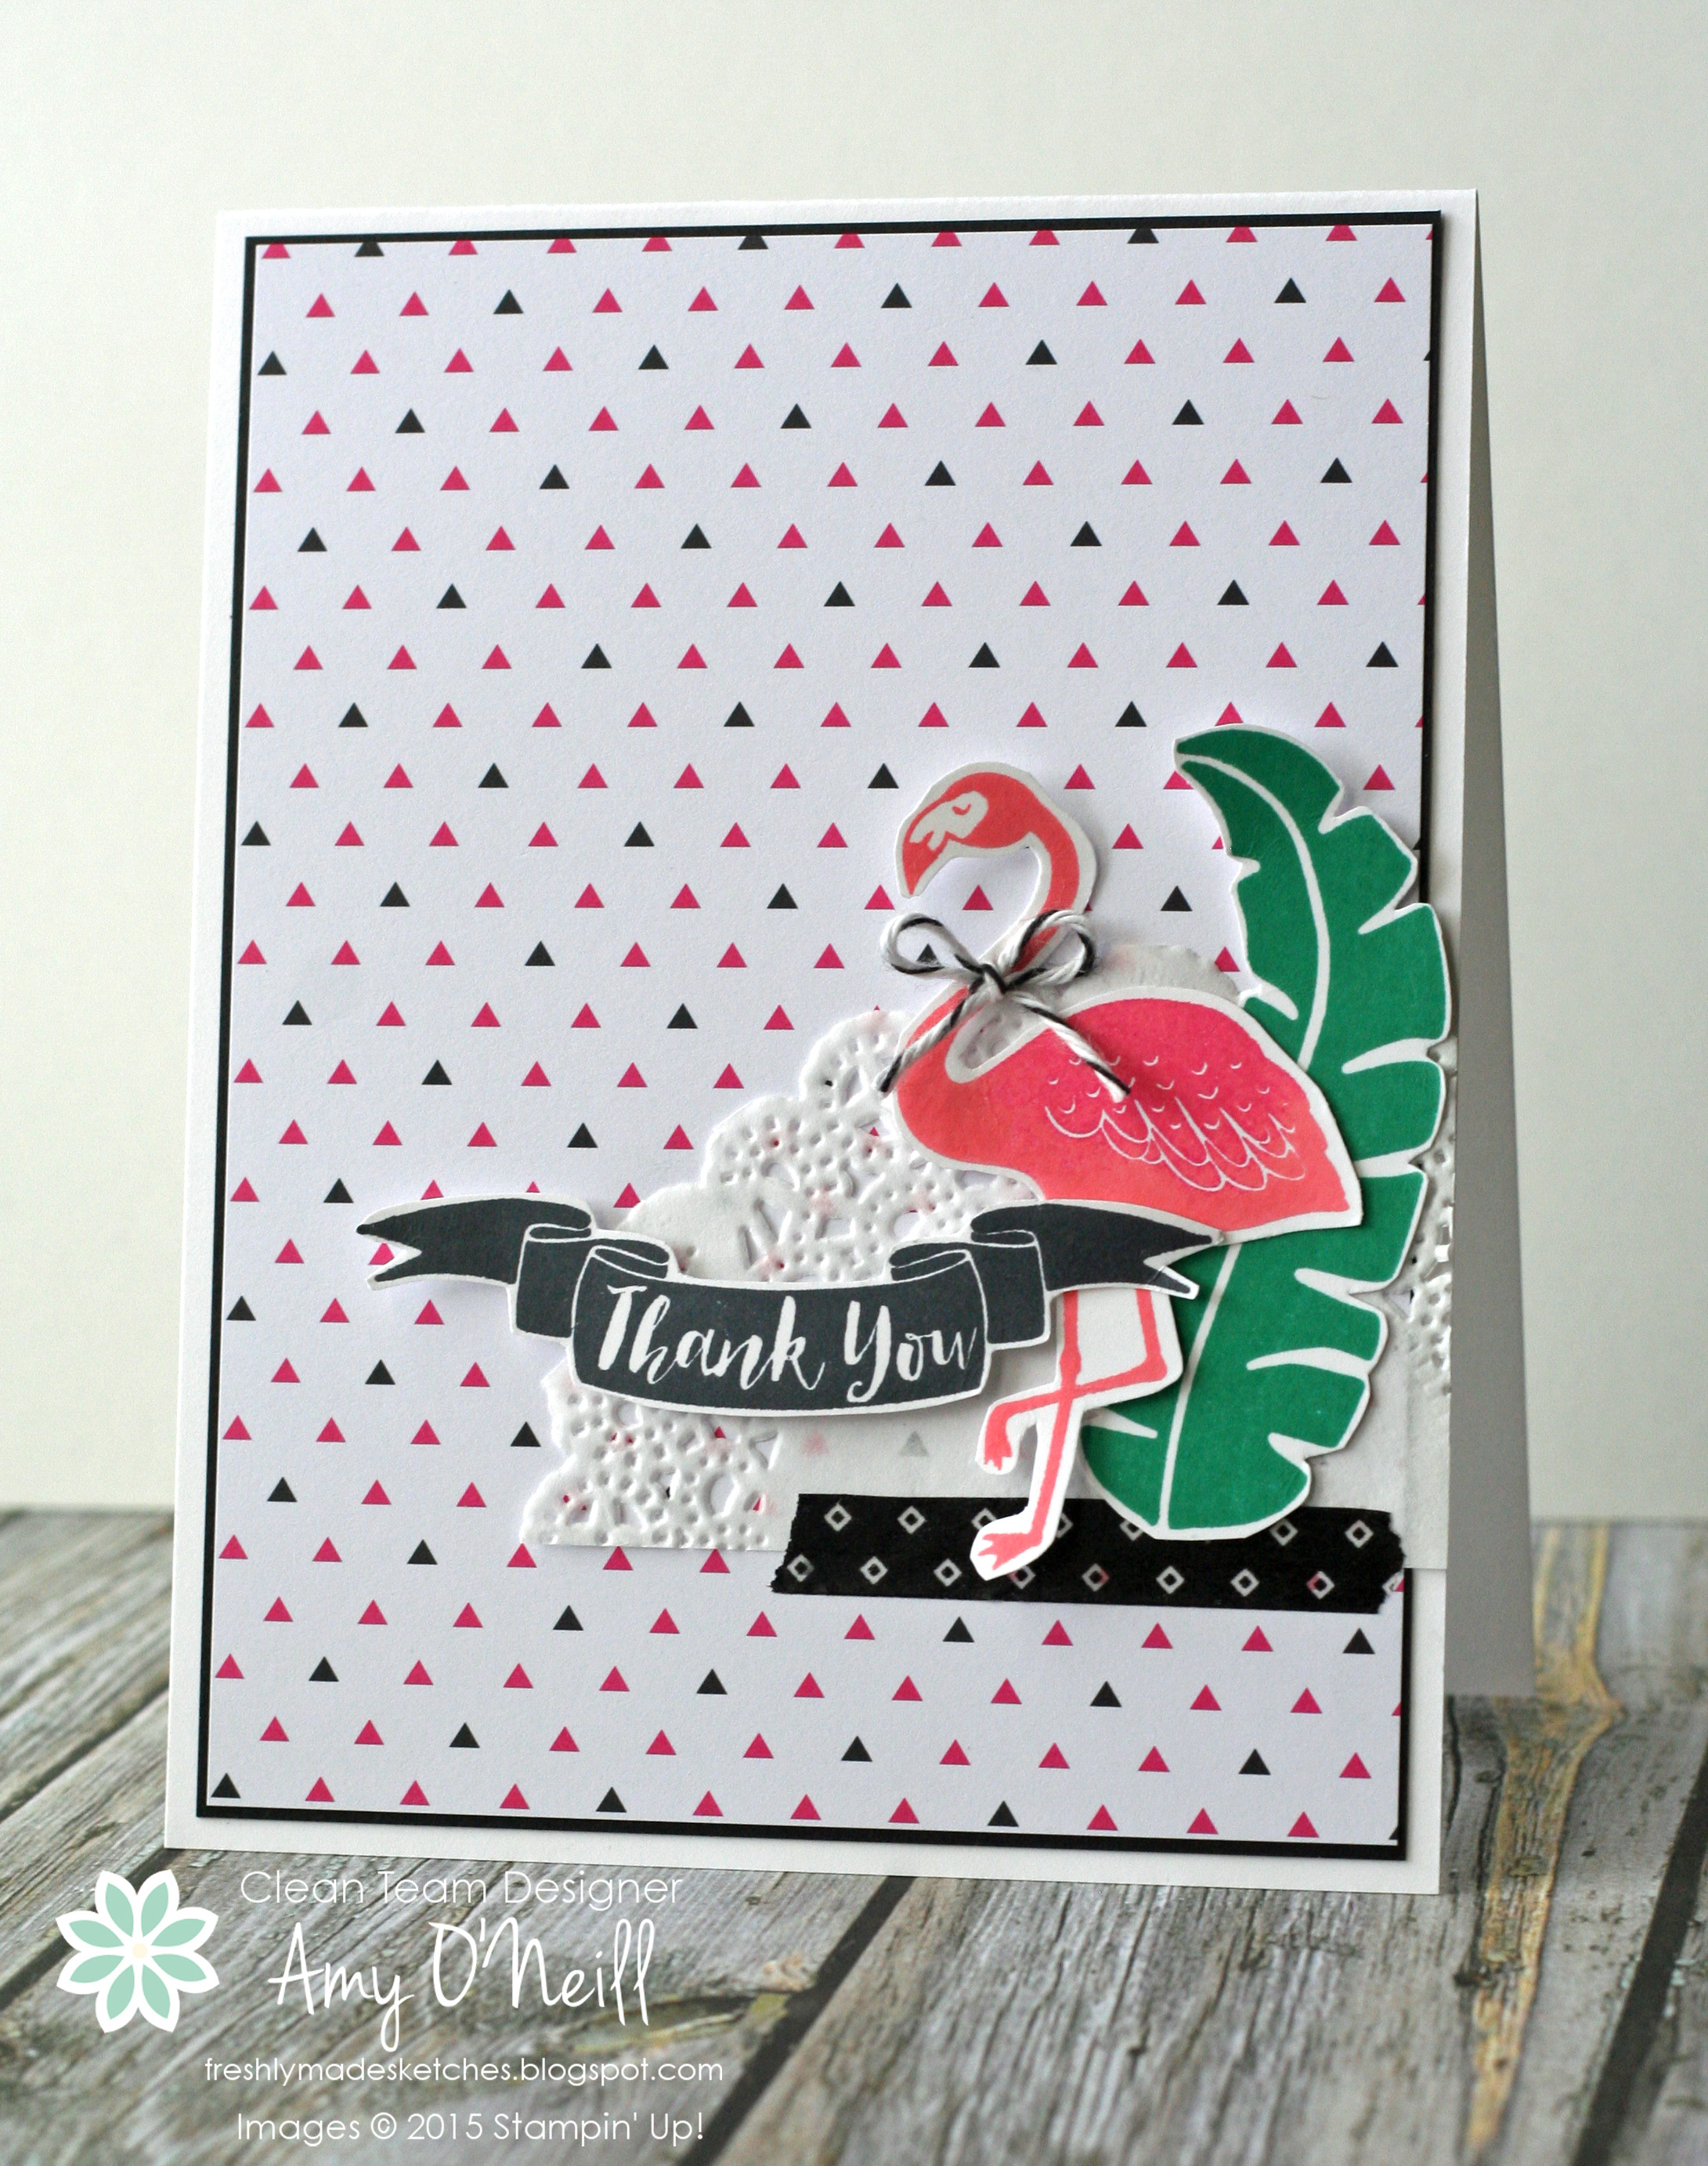
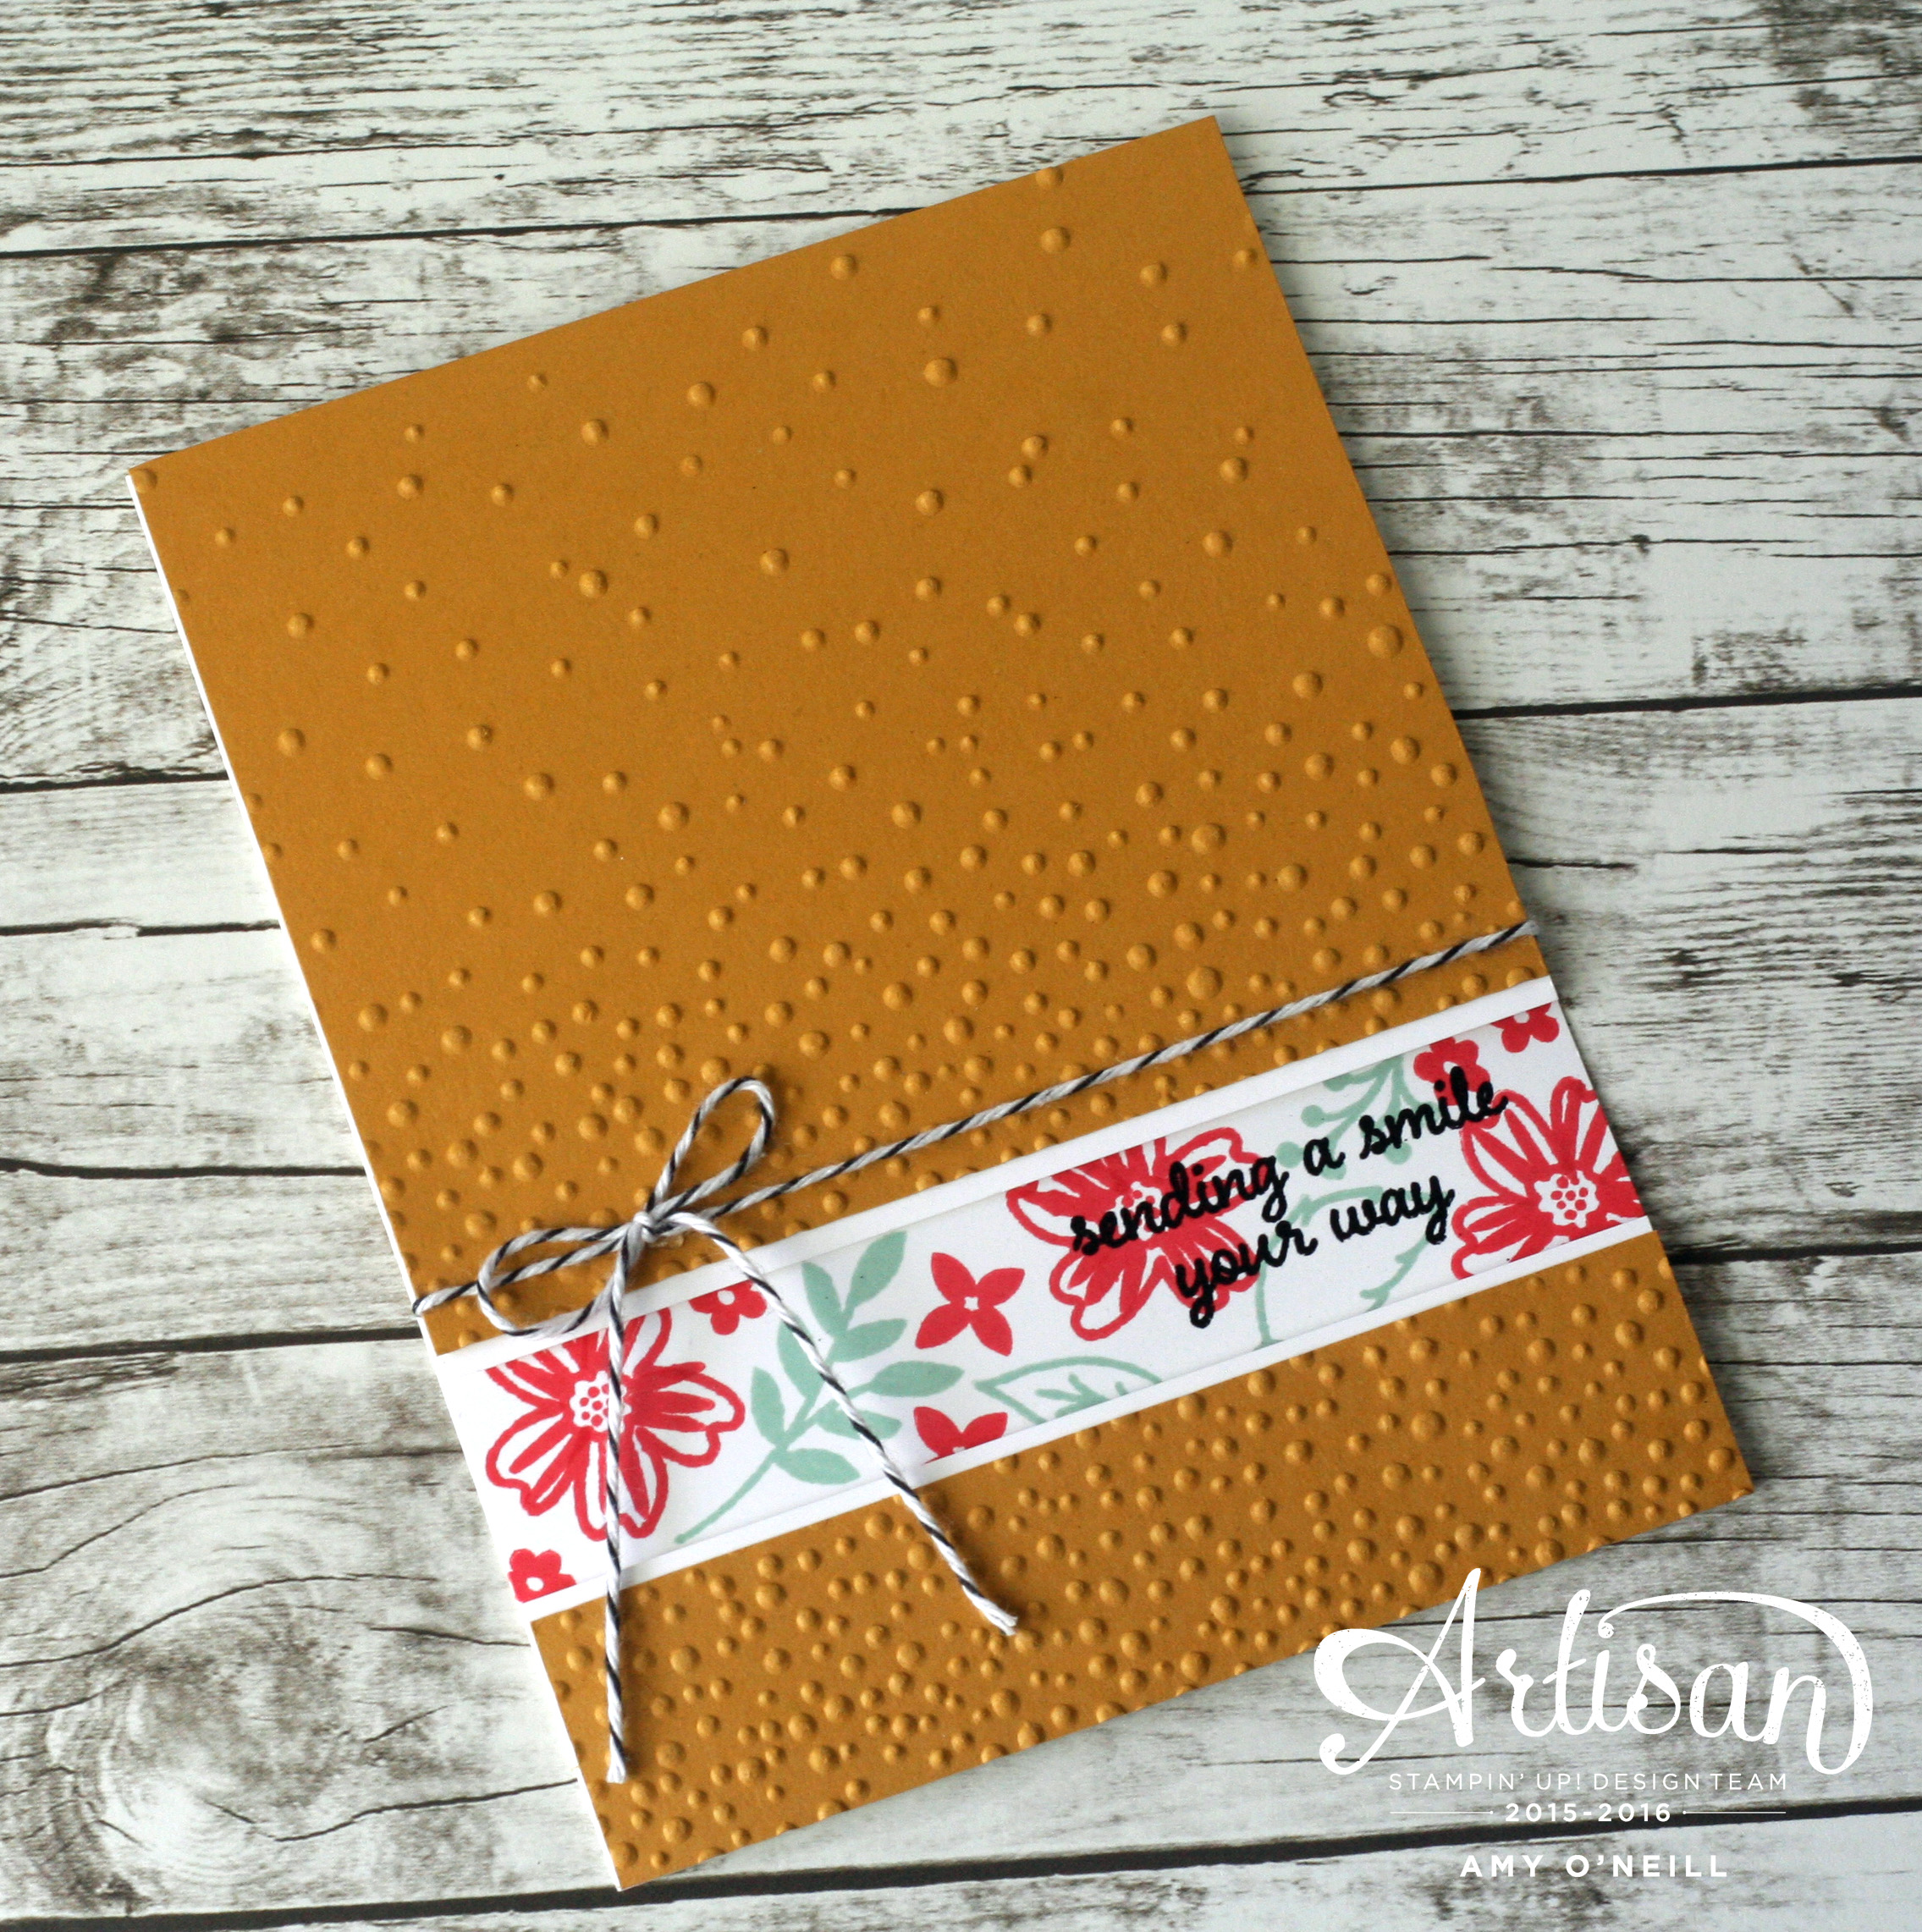
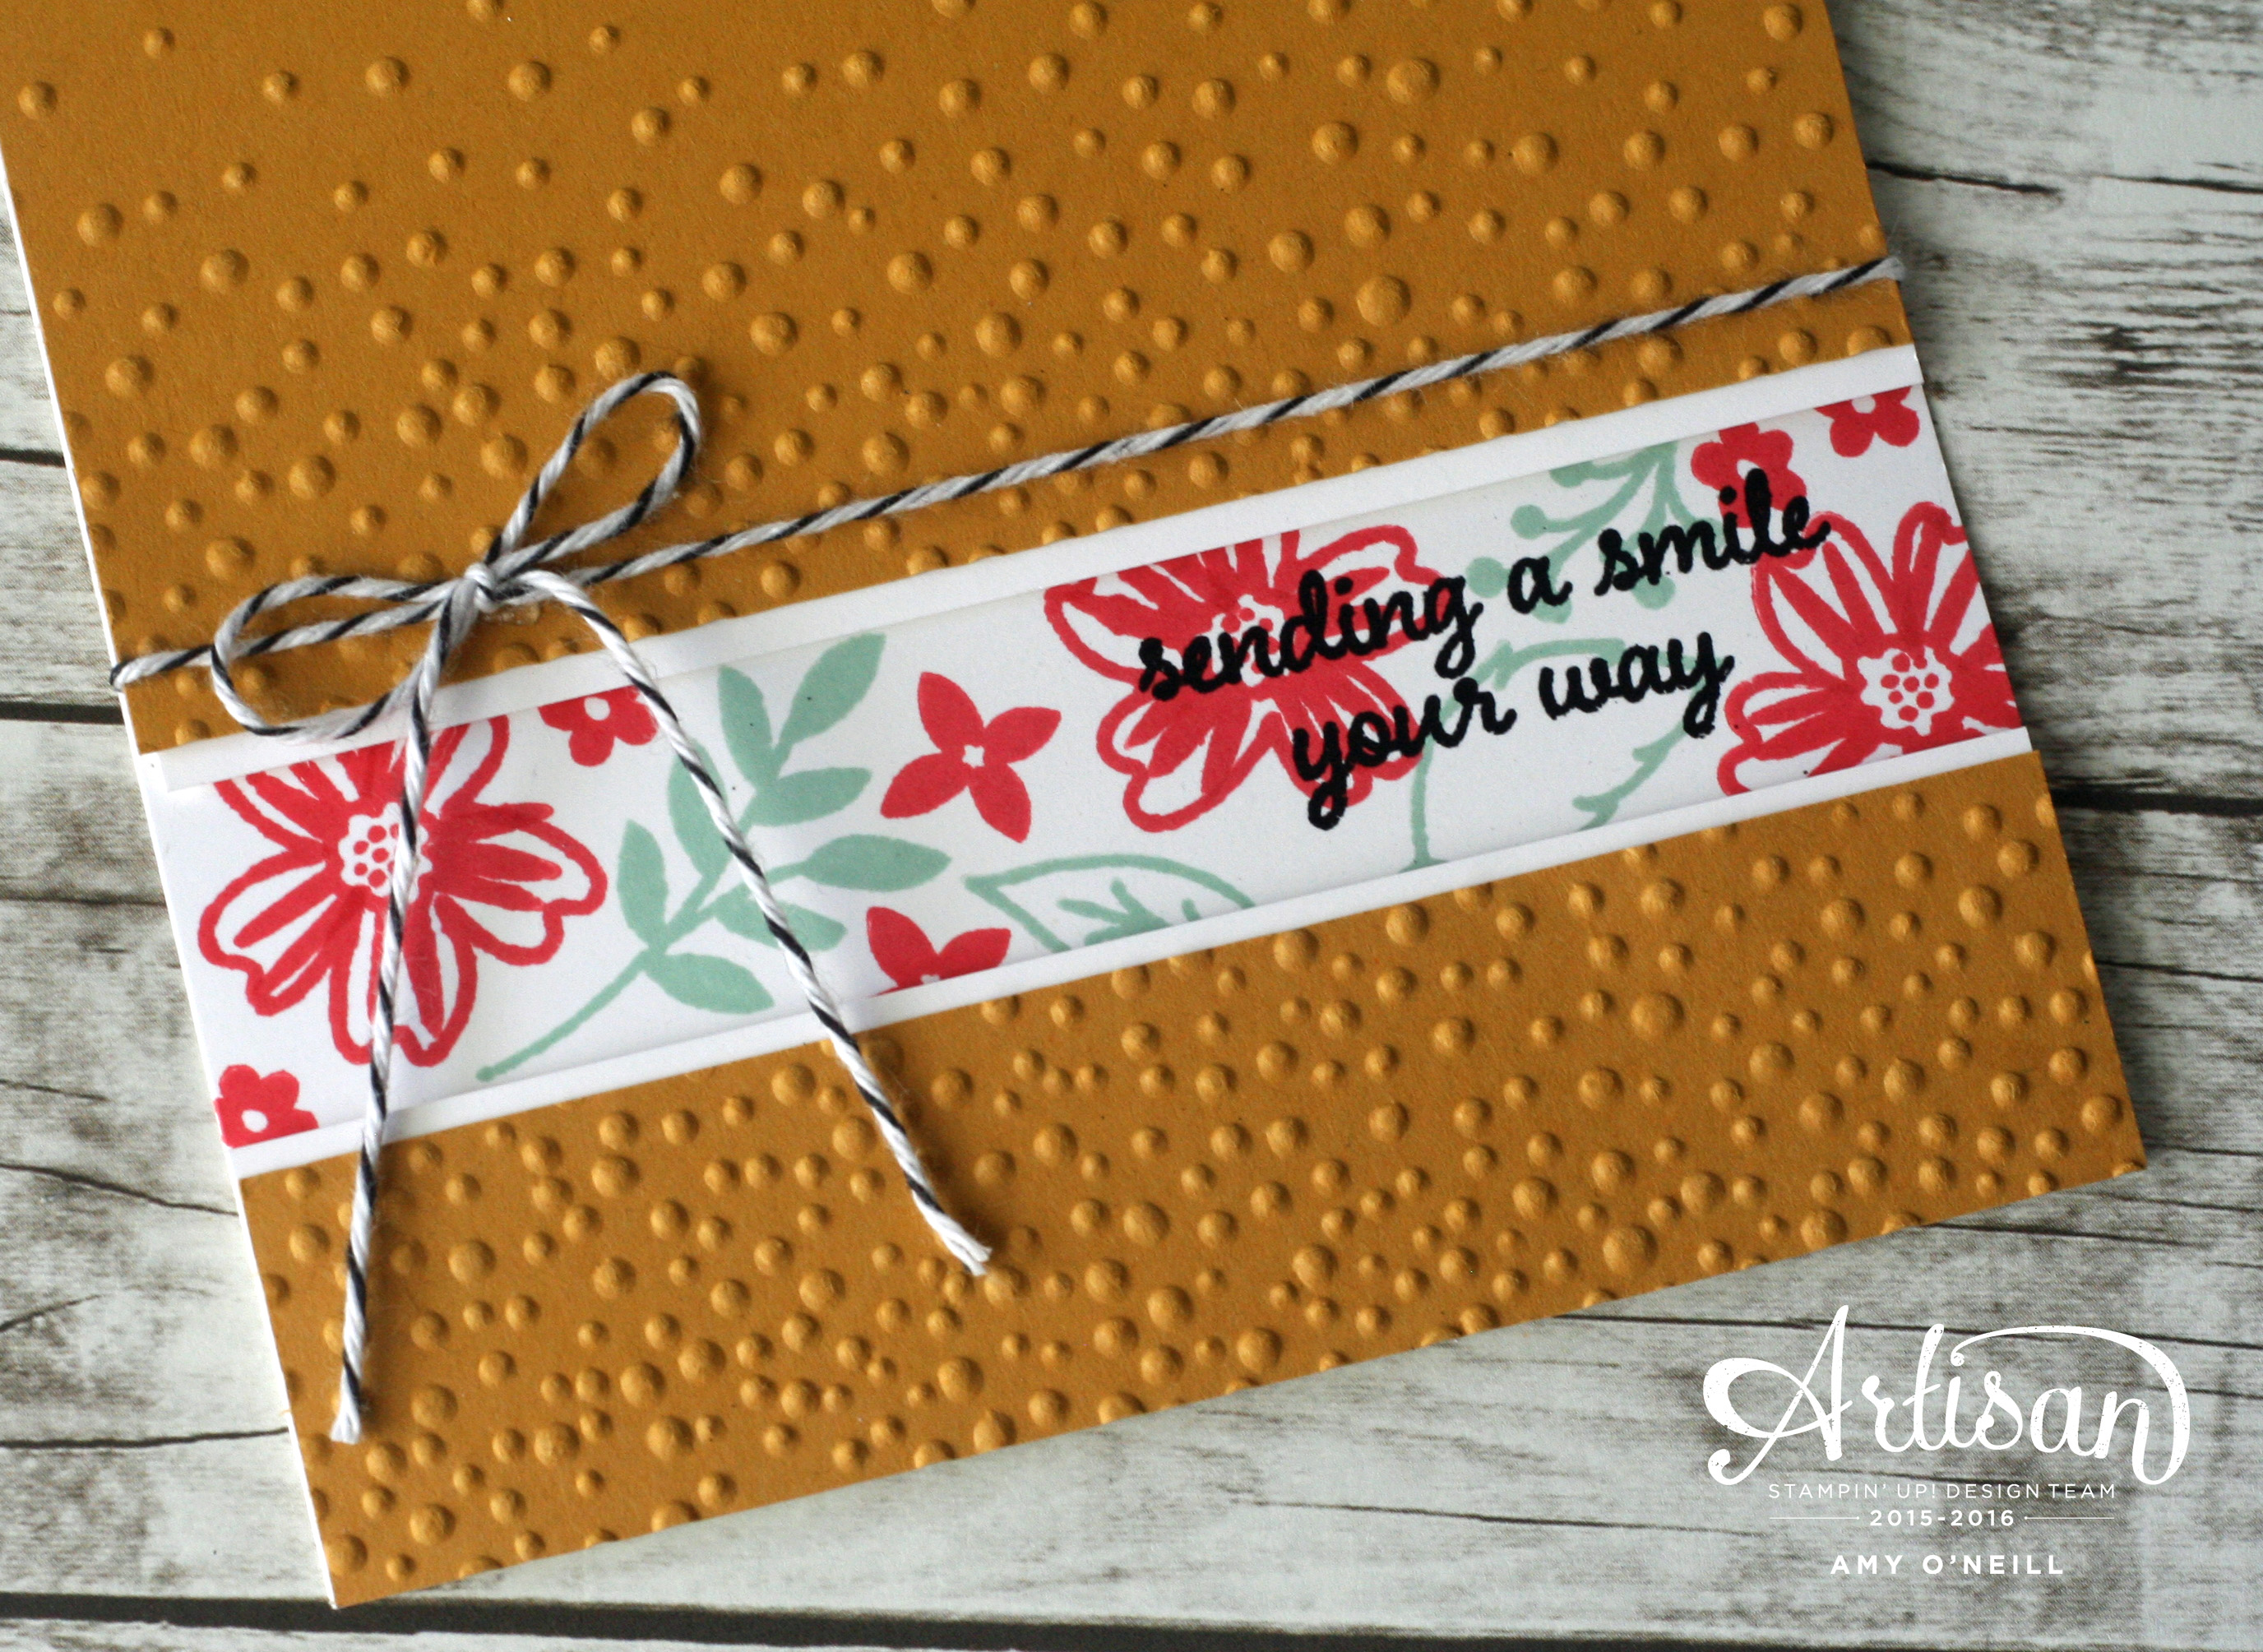
Since I’m still in mourning over the upcoming retirement of some beloved stamp sets, I used one of these sets for this sketch.  I love the cute little typewriter in the Tap Tap Tap set.

Adios Cute Typewriter 1I used a color palette of Pool Party, Smoky Slate and Basic Gray, and my favorite new In Color which will be available starting June 1st, Peekaboo Peach.  It is such a happy shade of peach and I know I am going to have fun using it with many different colors.
I used a piece of Schoolhouse dsp for the background.  I love how the fun polka dots on the dsp mimic the cute typewriter alphabet.

Adios Cute Typewriter Close Up

We hope you’ll play along and create your own card using the sketch!  If you’d like some inspiration, head over to the Freshly Made Sketches site to see what the design team created this week.

Enjoy your Wednesday!  Thanks for stopping by!

Growing Thanks and Congrats — Stampin’ Up! Artisan Blog Hop

Welcome to another Stampin’ Up! Artisan Design Team Blog Hop!  There are 20 of us from around the globe who will be sharing our projects with you twice each month.  All you need to do to follow along is click on the link at the bottom of each post.

Our theme for this month is “May flowers.”  We had three different stamp sets from which to choose, and for this hop I chose the Helping Me Grow set.  I love the flowers in this set, and it has some other great elements as well.

Growing ThanksFor this first card, I stamped the flowers on a sheet of Whisper White card stock and colored them with a Blender Pen using Real Red, Tangerine Tango, So Saffron, and Hello Honey ink pads.  I then cut them out using my Paper Snips.  The little leaves were cut out of Old Olive cardstock with one of the Botanical Builder Framelits Dies.  I pressed the Expressions Natural Elements sentiment onto a Versamark pad and embossed it with Black Stampin’ Emboss Powder.

Growing Thanks Close UpI love the bright flowers against the Typeset dsp, which is on the retiring list (boy, am I going to miss this stuff!).

Growing CongratsFor this next card, I stamped the image onto a Project Life 3″ x 4″ Grid Card.   This is another retiring item I am really going to miss, as I use them for a lot of other things besides Project Life memory keeping.

I colored the flowers with Real Red, Old Olive, Hello Honey, and Soft Sky inks using a Blender Pen.  A Tea Lace Paper Doily and some 1-1/4″ Burlap Ribbon, which I cut to a narrower width with my Craft Scissors (gasp — these are retiring, too!  Get them quick!), were added as embellishments.

Growing Congrats Close Up

You’re ready to hop on over to The Netherlands and visit Chantal de Kaste’s blog by clicking on the link below.  You can use Google Translate for any blogs for which you need translation help.  It’s so fun to hop around the world!

Bloghop button_0915

Enjoy your Thursday!  Thanks for stopping by!

Supplies Used:
Stamps:  Helping Me Grow
Ink:  Real Red, Tangerine Tango, So Saffron, Old Olive, Hello Honey, Basic Black, and Soft Sky, Versamark
Paper:  Kraft Cardstock, Whisper White, Basic Black, Typeset Specialty dsp, Project Life 3″ x 4″ Grid Cards
Accessories:  Tea Lace Paper Doilies, 1-1/4″ Burlap Ribbon, Expressions Natural Elements, Black Stampin’ Emboss Powder, Black Baker’s Twine, Gold Basic Metal Buttons,  Botanical Builder Framelits Dies

Every Lovely Word — Monday Montage #68

Monday Montage Banner -- October

Welcome to another Monday Montage blog hop!  We are a group of ten stampers who love to share what we create with you, and all you have to do to follow along is to click on the links at the bottom of each post.

I have a sneak peek for your today.  It features a stamp set that will be included in the new annual catalog, which will be released on June 1.  It’s called Love & Affection.

Every Lovely WordI love the sweet flowers in this set, but I love the sentiments even more.

I used a color combo of Watermelon Wonder, Blushing Bride, Old Olive and Daffodil Delight for this card.  To keep the Baker’s Twine exactly where I wanted it, I used little drops from the Fine Tip Glue Pen.  I love that glue!

Every Lovely Word Close UpYou’re ready to hop on over to Breelin Renwick’s blog.  I always love seeing what she makes!  If you prefer to work your way backwards, you can jump back to Wendy Weixler’s blog.  Either way, be sure to work your way through all of the blogs so you don’t miss a thing!

mondaymontageback (1)mondaymontagenext copy

Sweet Sugarplum Rose Garden — FMS224

We have another new sketch for you over at the Freshly Made Sketches site today, and our favorite pilot, Jennifer Timko, is our fearless hostess.  Take a look at what she has for us:

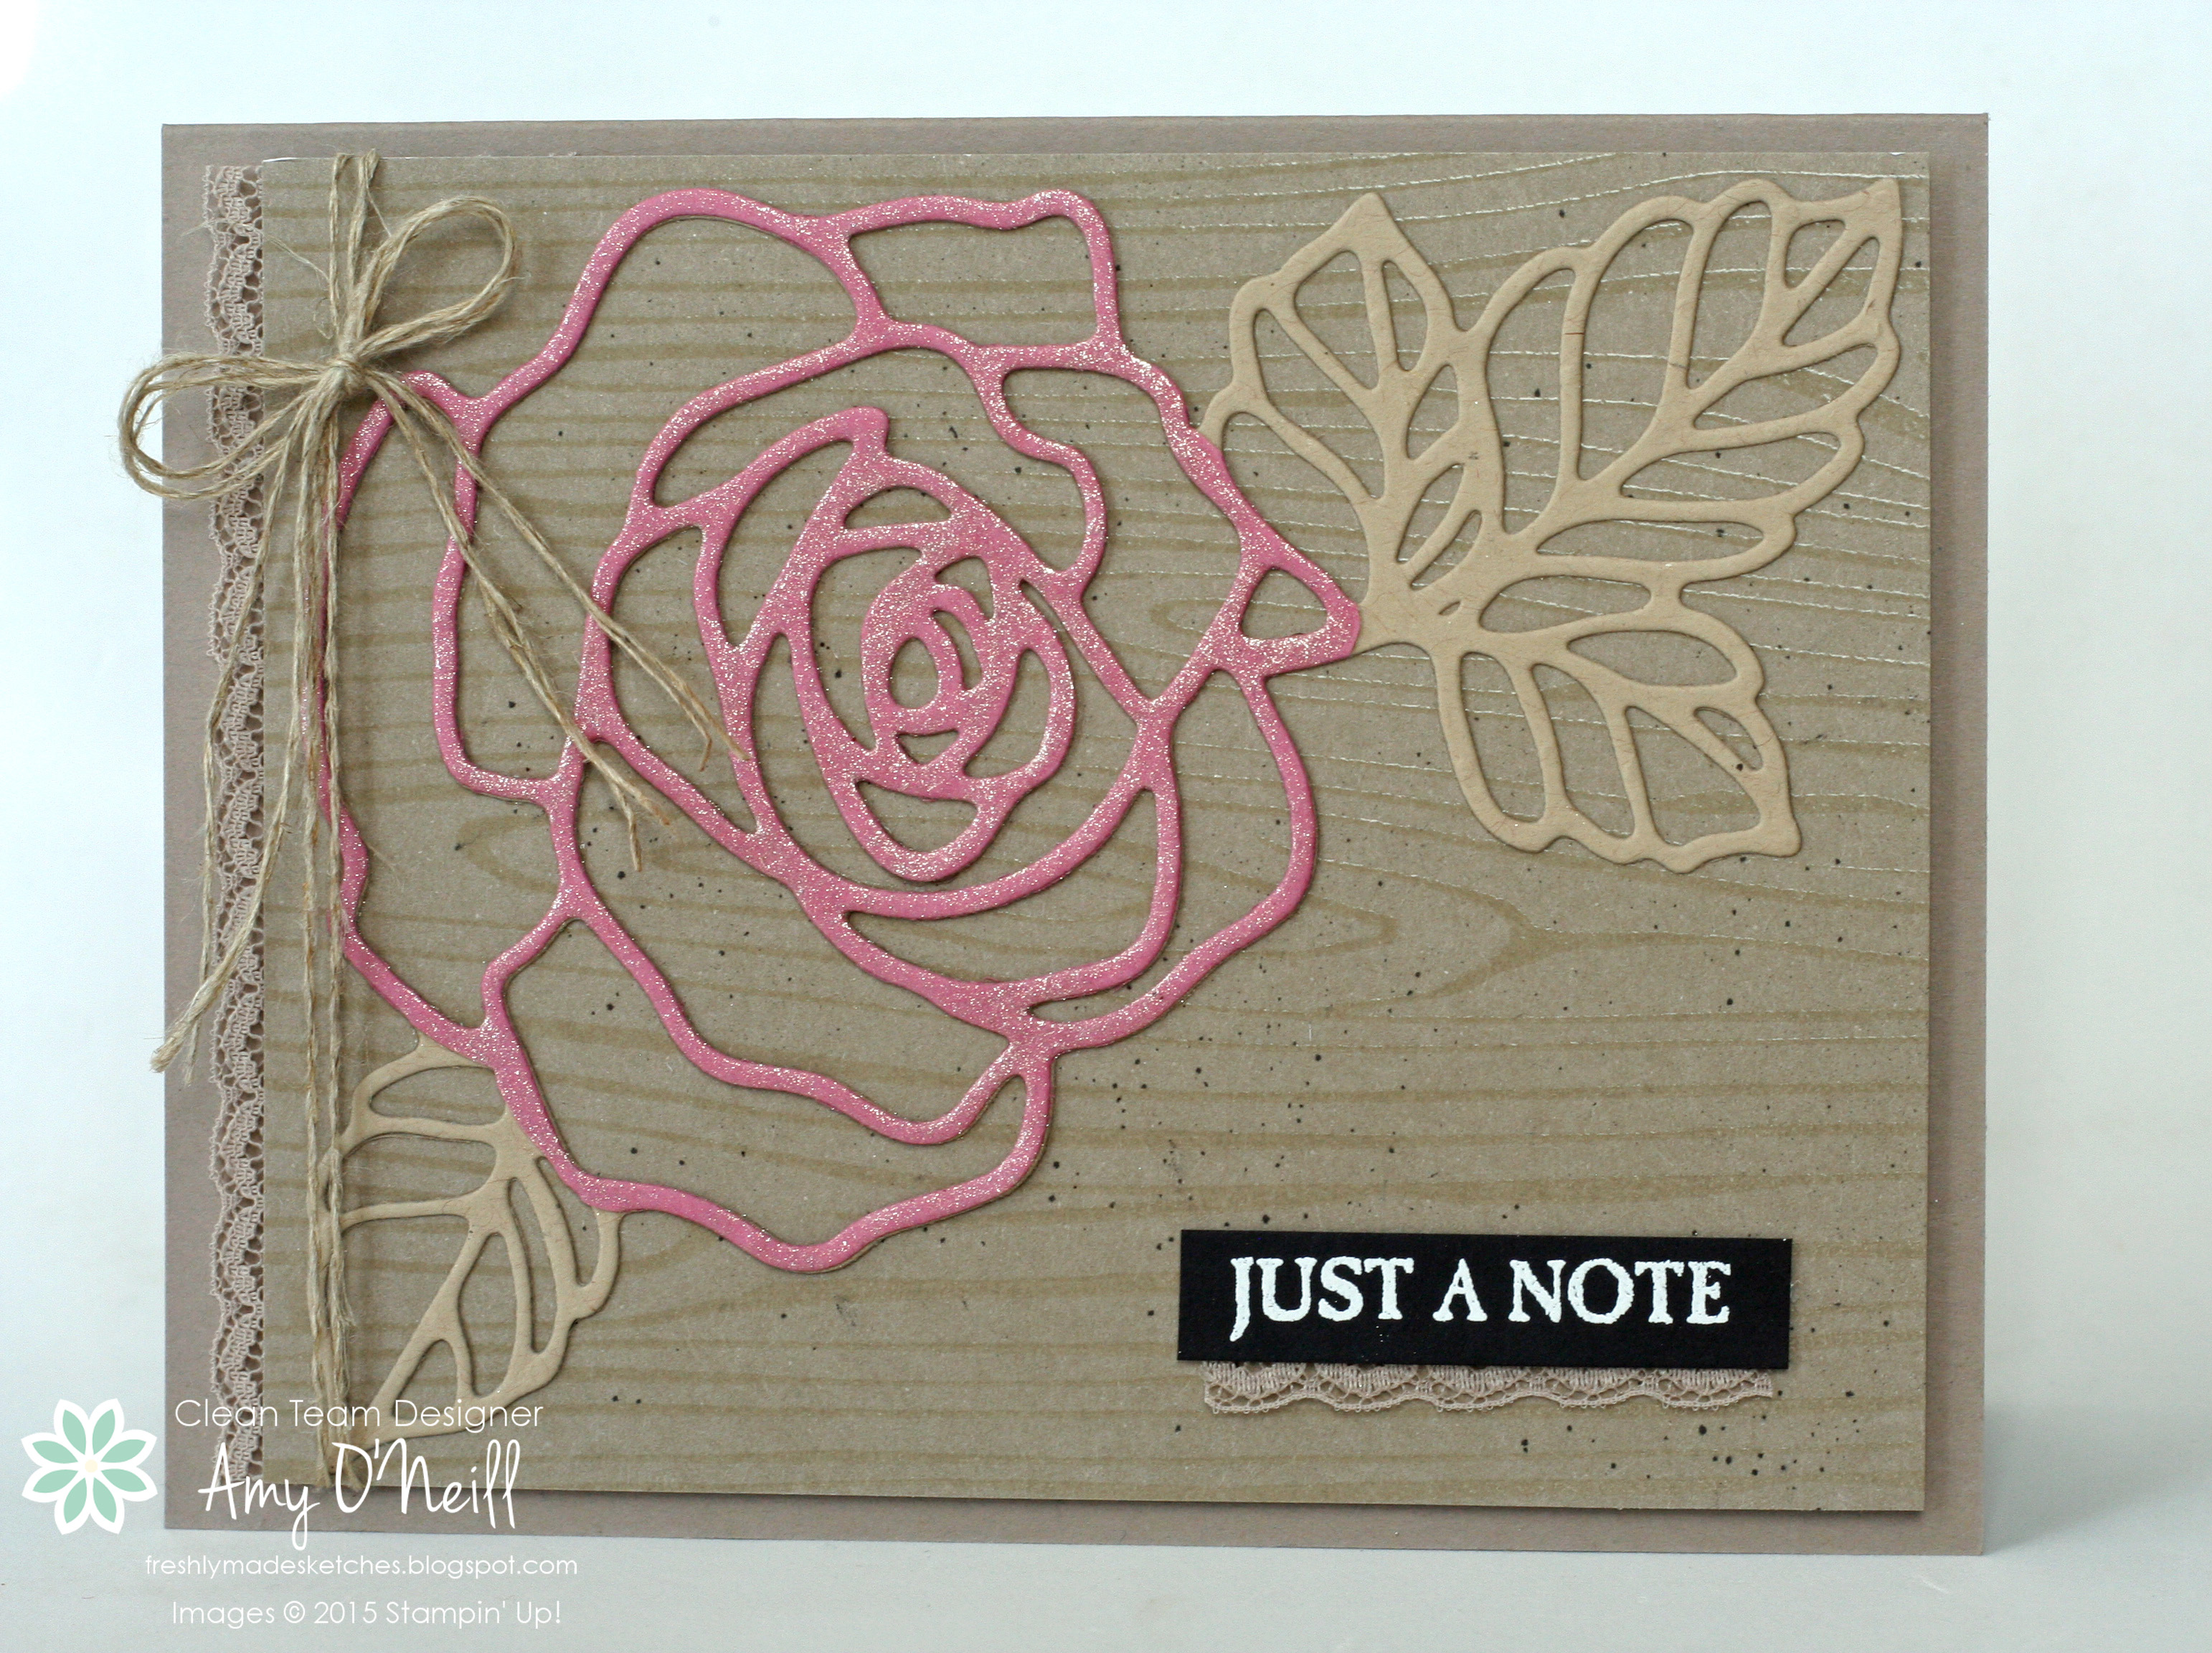
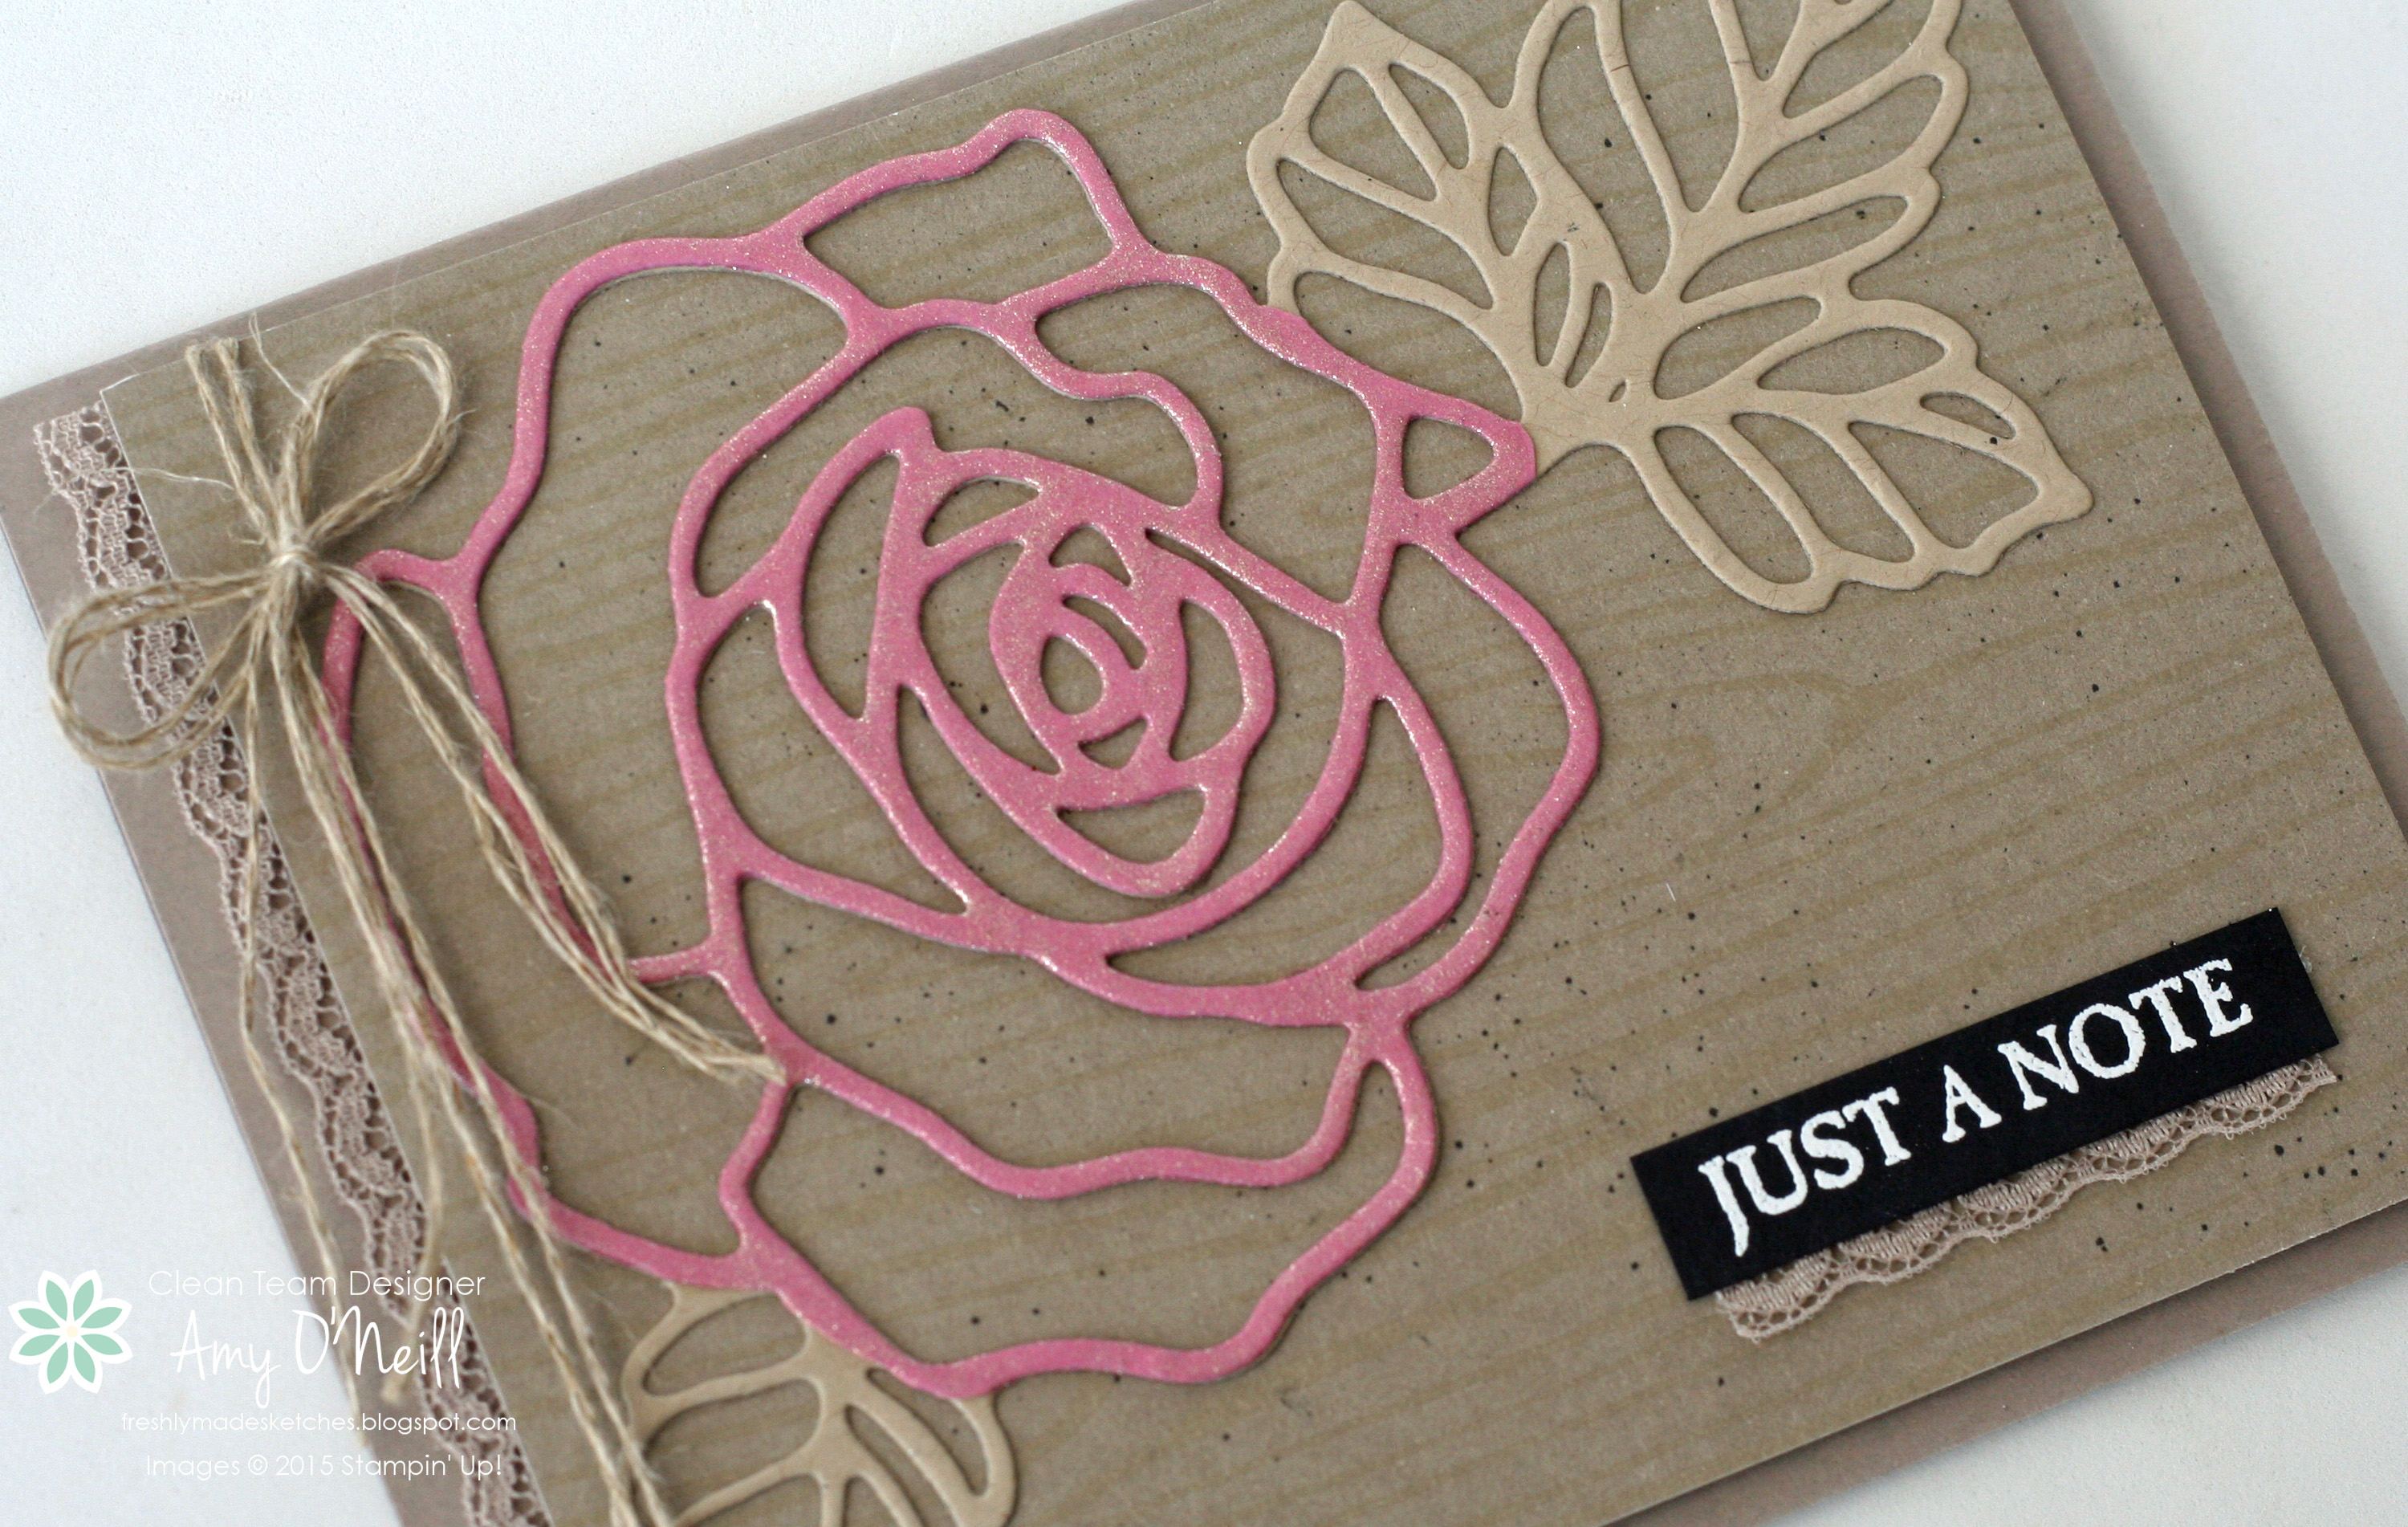
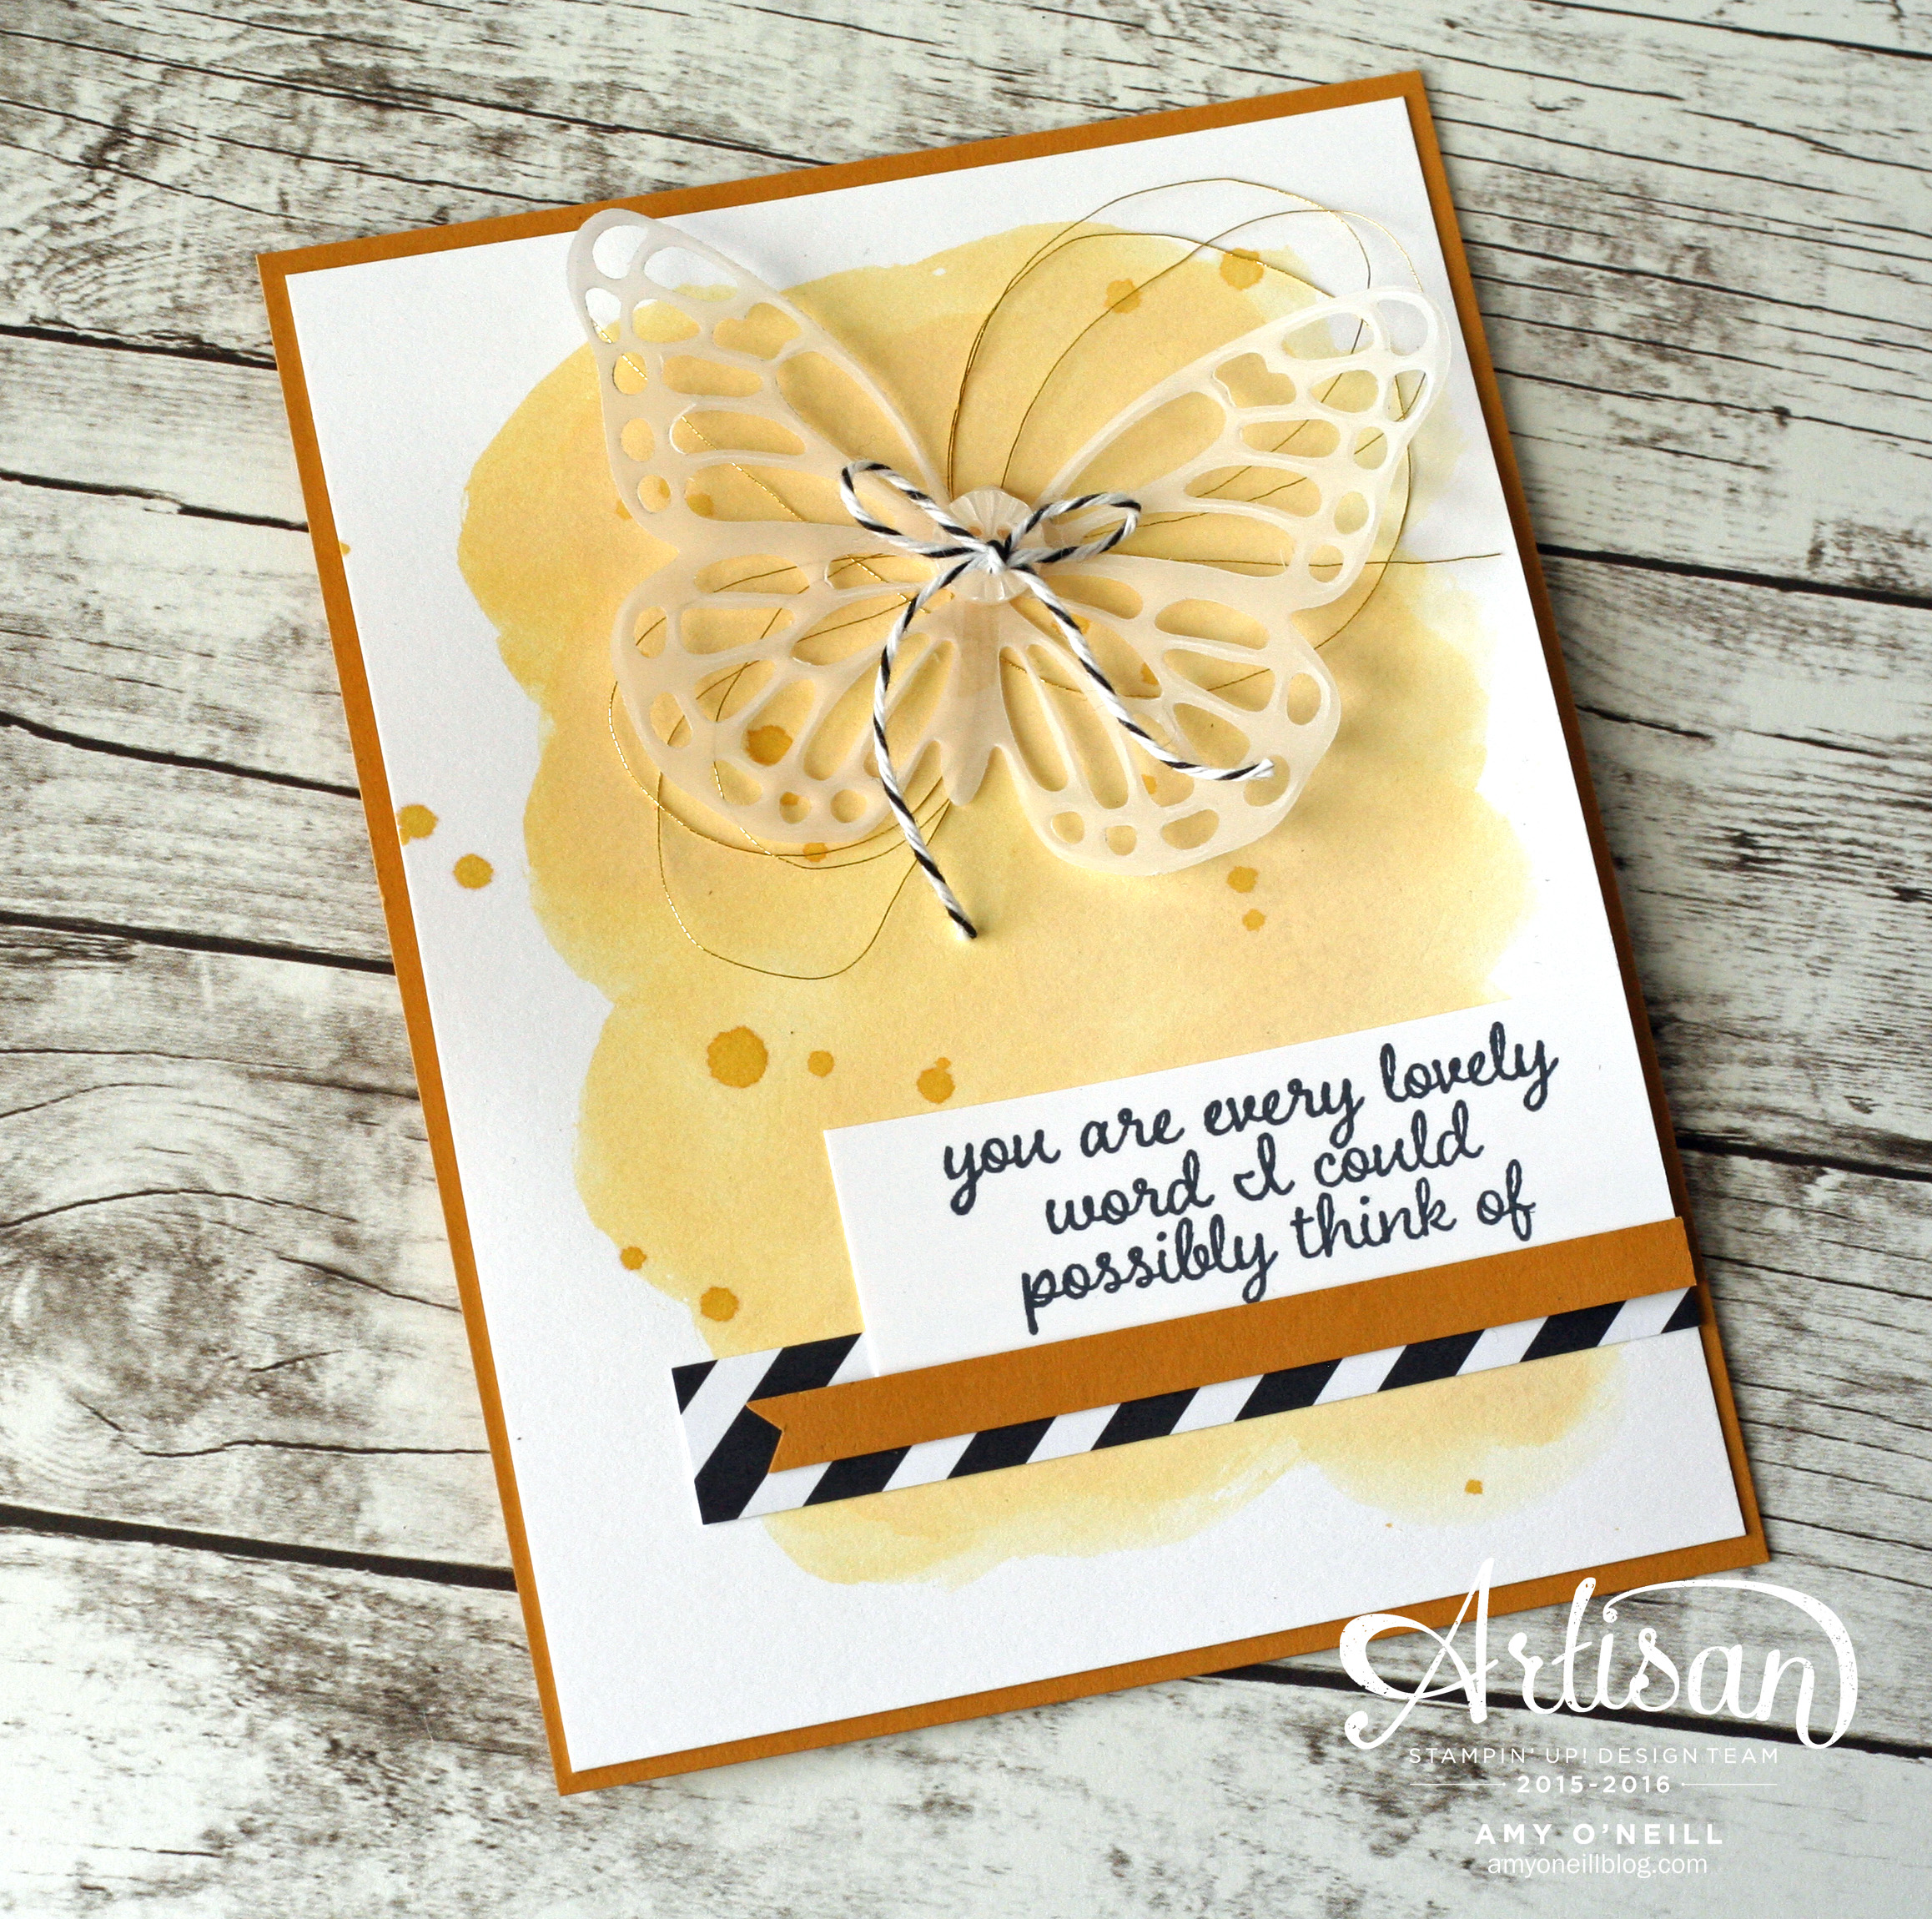
Your possibilities are pretty endless with this one!  I wasn’t sure where to start when choosing a stamp set, so I decided to focus instead on a set of dies that I love but haven’t used much — the Rose Garden Thinlits dies.

I got a box of goodies from the upcoming new catalog, and had to break open the new In Colors cardstock package.  I decided to use one of the new colors, Sweet Sugarplum, for the flower on this card.

Sweet Sugarplum Rose GardenI applied a layer of Clear Wink of Stella on top of the flower, so it’s really sparkly in person. The flower was placed on a layer of Color Me Irresistible Specialty dsp in the Tip Top Taupe color.

Sweet Sugarplum Rose Garden Close UpSome little bits of Tip Top Taupe 1″ Dotted Lace Trim were added as embellishments, and the sentiment is from the Picture Perfect stamp set.

So what do you think of the new color?  I have a hard time describing it.  Sometimes I think it looks like a shade of purple.  Sometimes it looks like a mauve.  And with the Tip Top Taupe, it almost looks pink.  Hmmm….

We hope you’ll play along and join us in this week’s challenge.  You can jump over to the Freshly Made Sketches site for some inspiration.  The other designers always inspire me!

Enjoy your Wednesday!  Thanks for stopping by!

A Cucumber Marquee

I’ve got a sneak peek for you today using the Marquee Messages stamp set, which will be available for purchase on June 1.  Here are two samples using Cucumber Crush:

Cucumber Marquee CardI made a card using sponge daubers to create a giant polka dot pattern on the card base.  I watercolored the stamped image with Watermelon Wonder, Cucumber Crush, and Daffodil Delight ink.

Cucumber Marquee BagI also made a little bag using the Gift Bag Punch Board.  I embossed the sentiments with white embossing powder and added gold Wink of Stella to the stars.  Little Rhinestone Basic Jewels were added to all of the lights on the arrow.

This stamp set has some really fun sentiments and I love the fun, retro feel of the images.

I have more cards to share using this set and some of the other In Colors in days to come.

Enjoy your Monday!  Thanks for stopping by!