Frosty Moroccan Nights — Stampin’ Up! Artisan Blog Hop

Welcome to another Stampin’ Up! Artisan Design Team Blog Hop!  There are 20 of us from around the globe who will be sharing our projects with you twice each month.  All you need to do to follow along is click on the link at the bottom of each post.

Yesterday we had a special hop — showcasing the Thoughtful Branches bundle, and today we’re back to our regular schedule with an open project hop, where we use any of the products in our latest box.

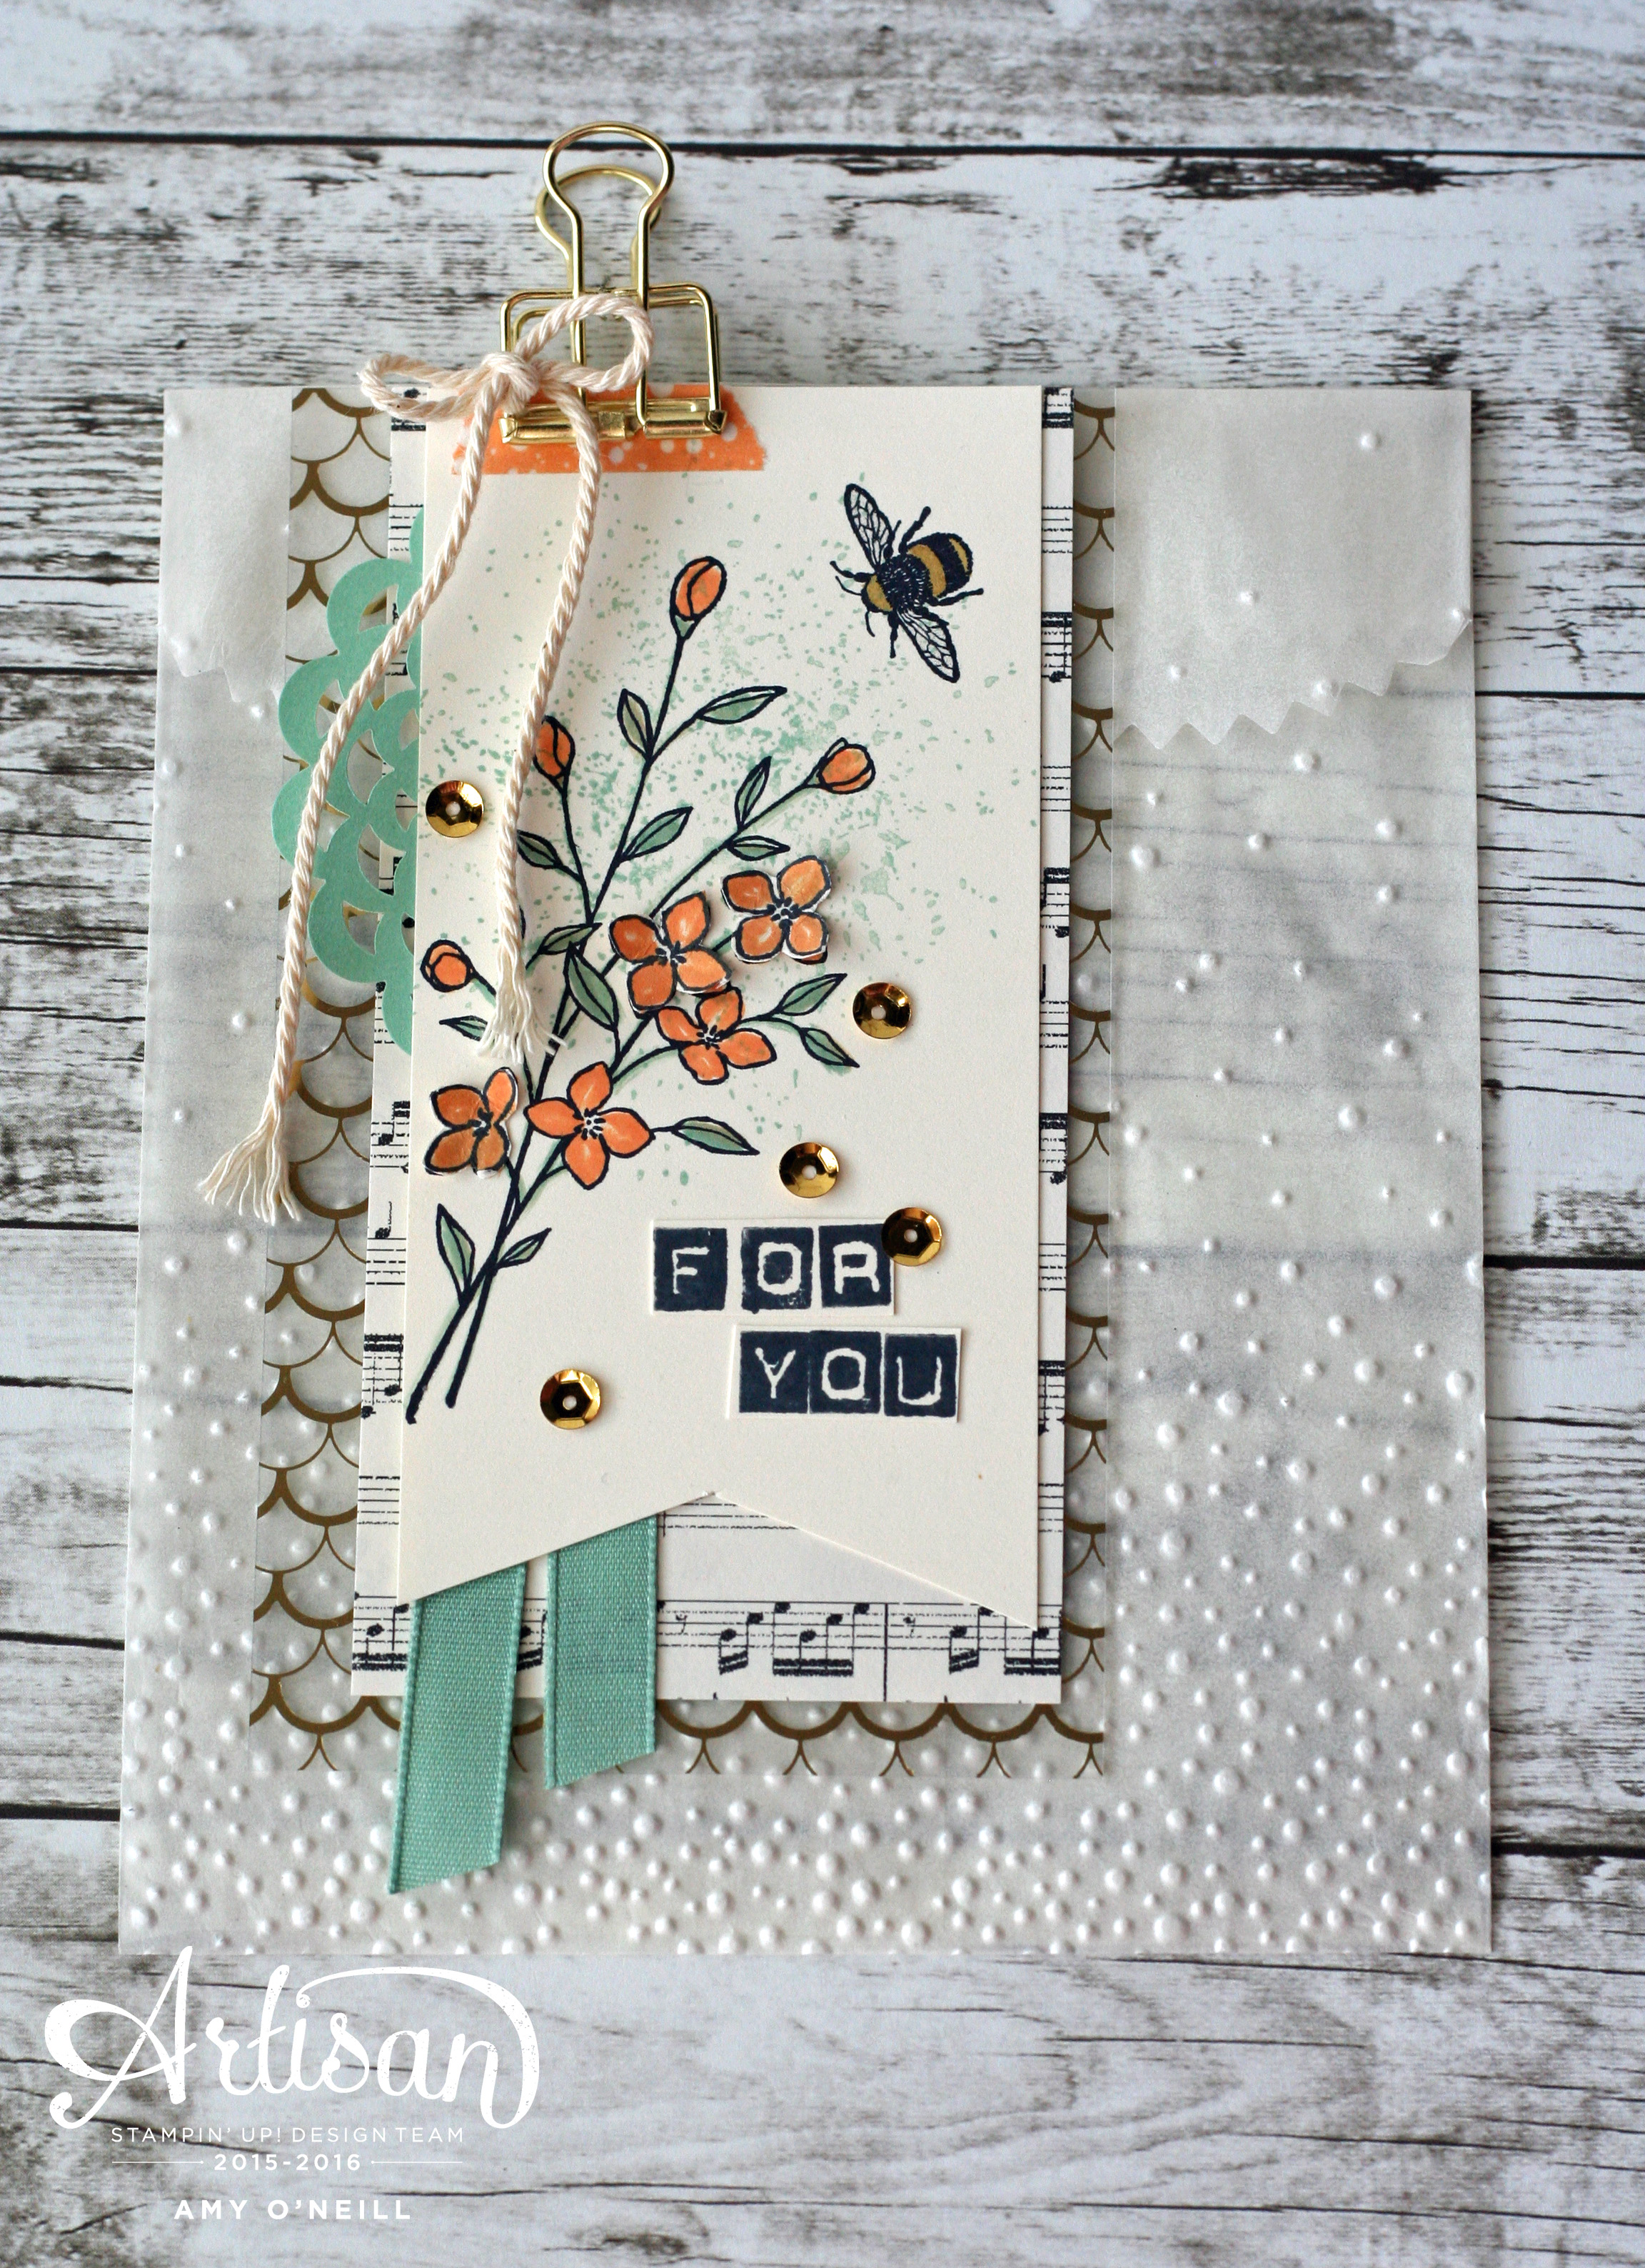
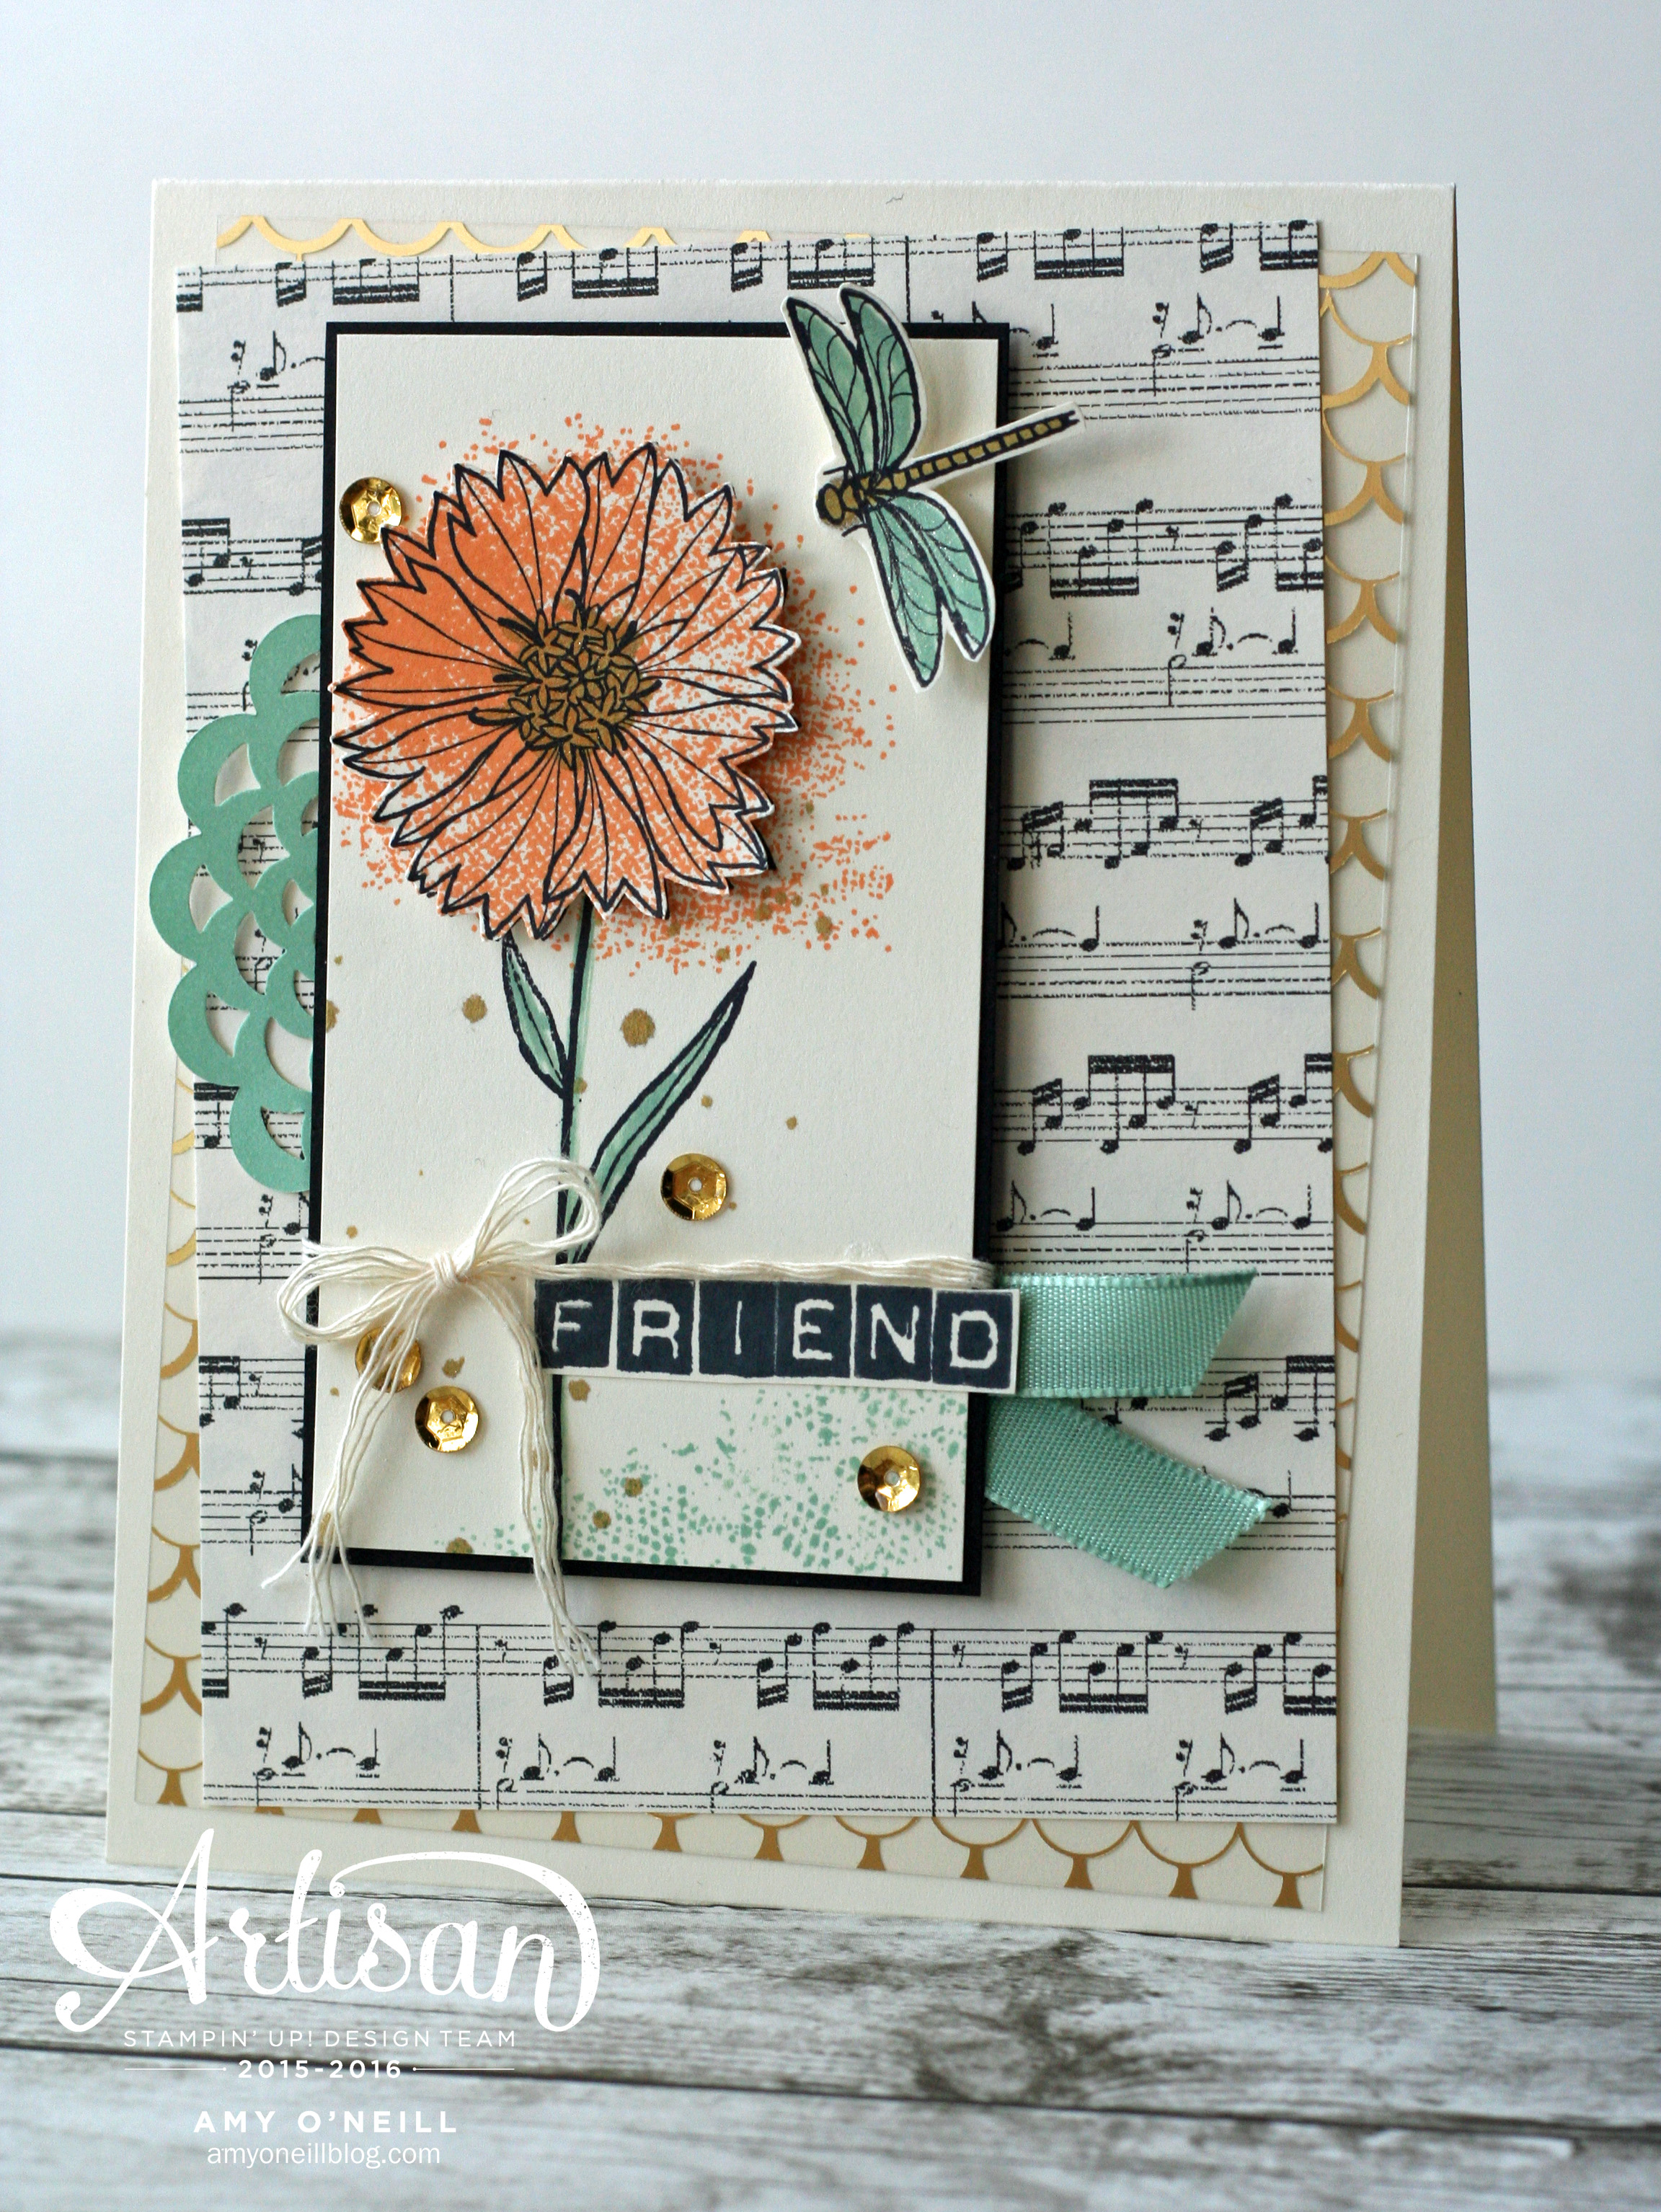
I decided to use the Moroccan Nights stamp set, but with a different color combo than what the suite features.  I decided to use a color that I love but find challenging to use, Sweet Sugarplum.  I really like most purples, but for some reason when I’m crafting, I rarely use them.  Do you have a color that you usually avoid when stamping?  Since I have totally fallen in love again with Soft Sky, I decided to pair Sweet Sugarplum with this color. It makes for a pretty, frosty look, I think.

Moroccan Frosty NightsI started by making the card.  I stamped the medallion image with Versamark ink onto some Vellum Cardstock, and embossed it with White Stampin’ Emboss Powder.  I then cut it out by hand.

Moroccan Frosty Nights Card
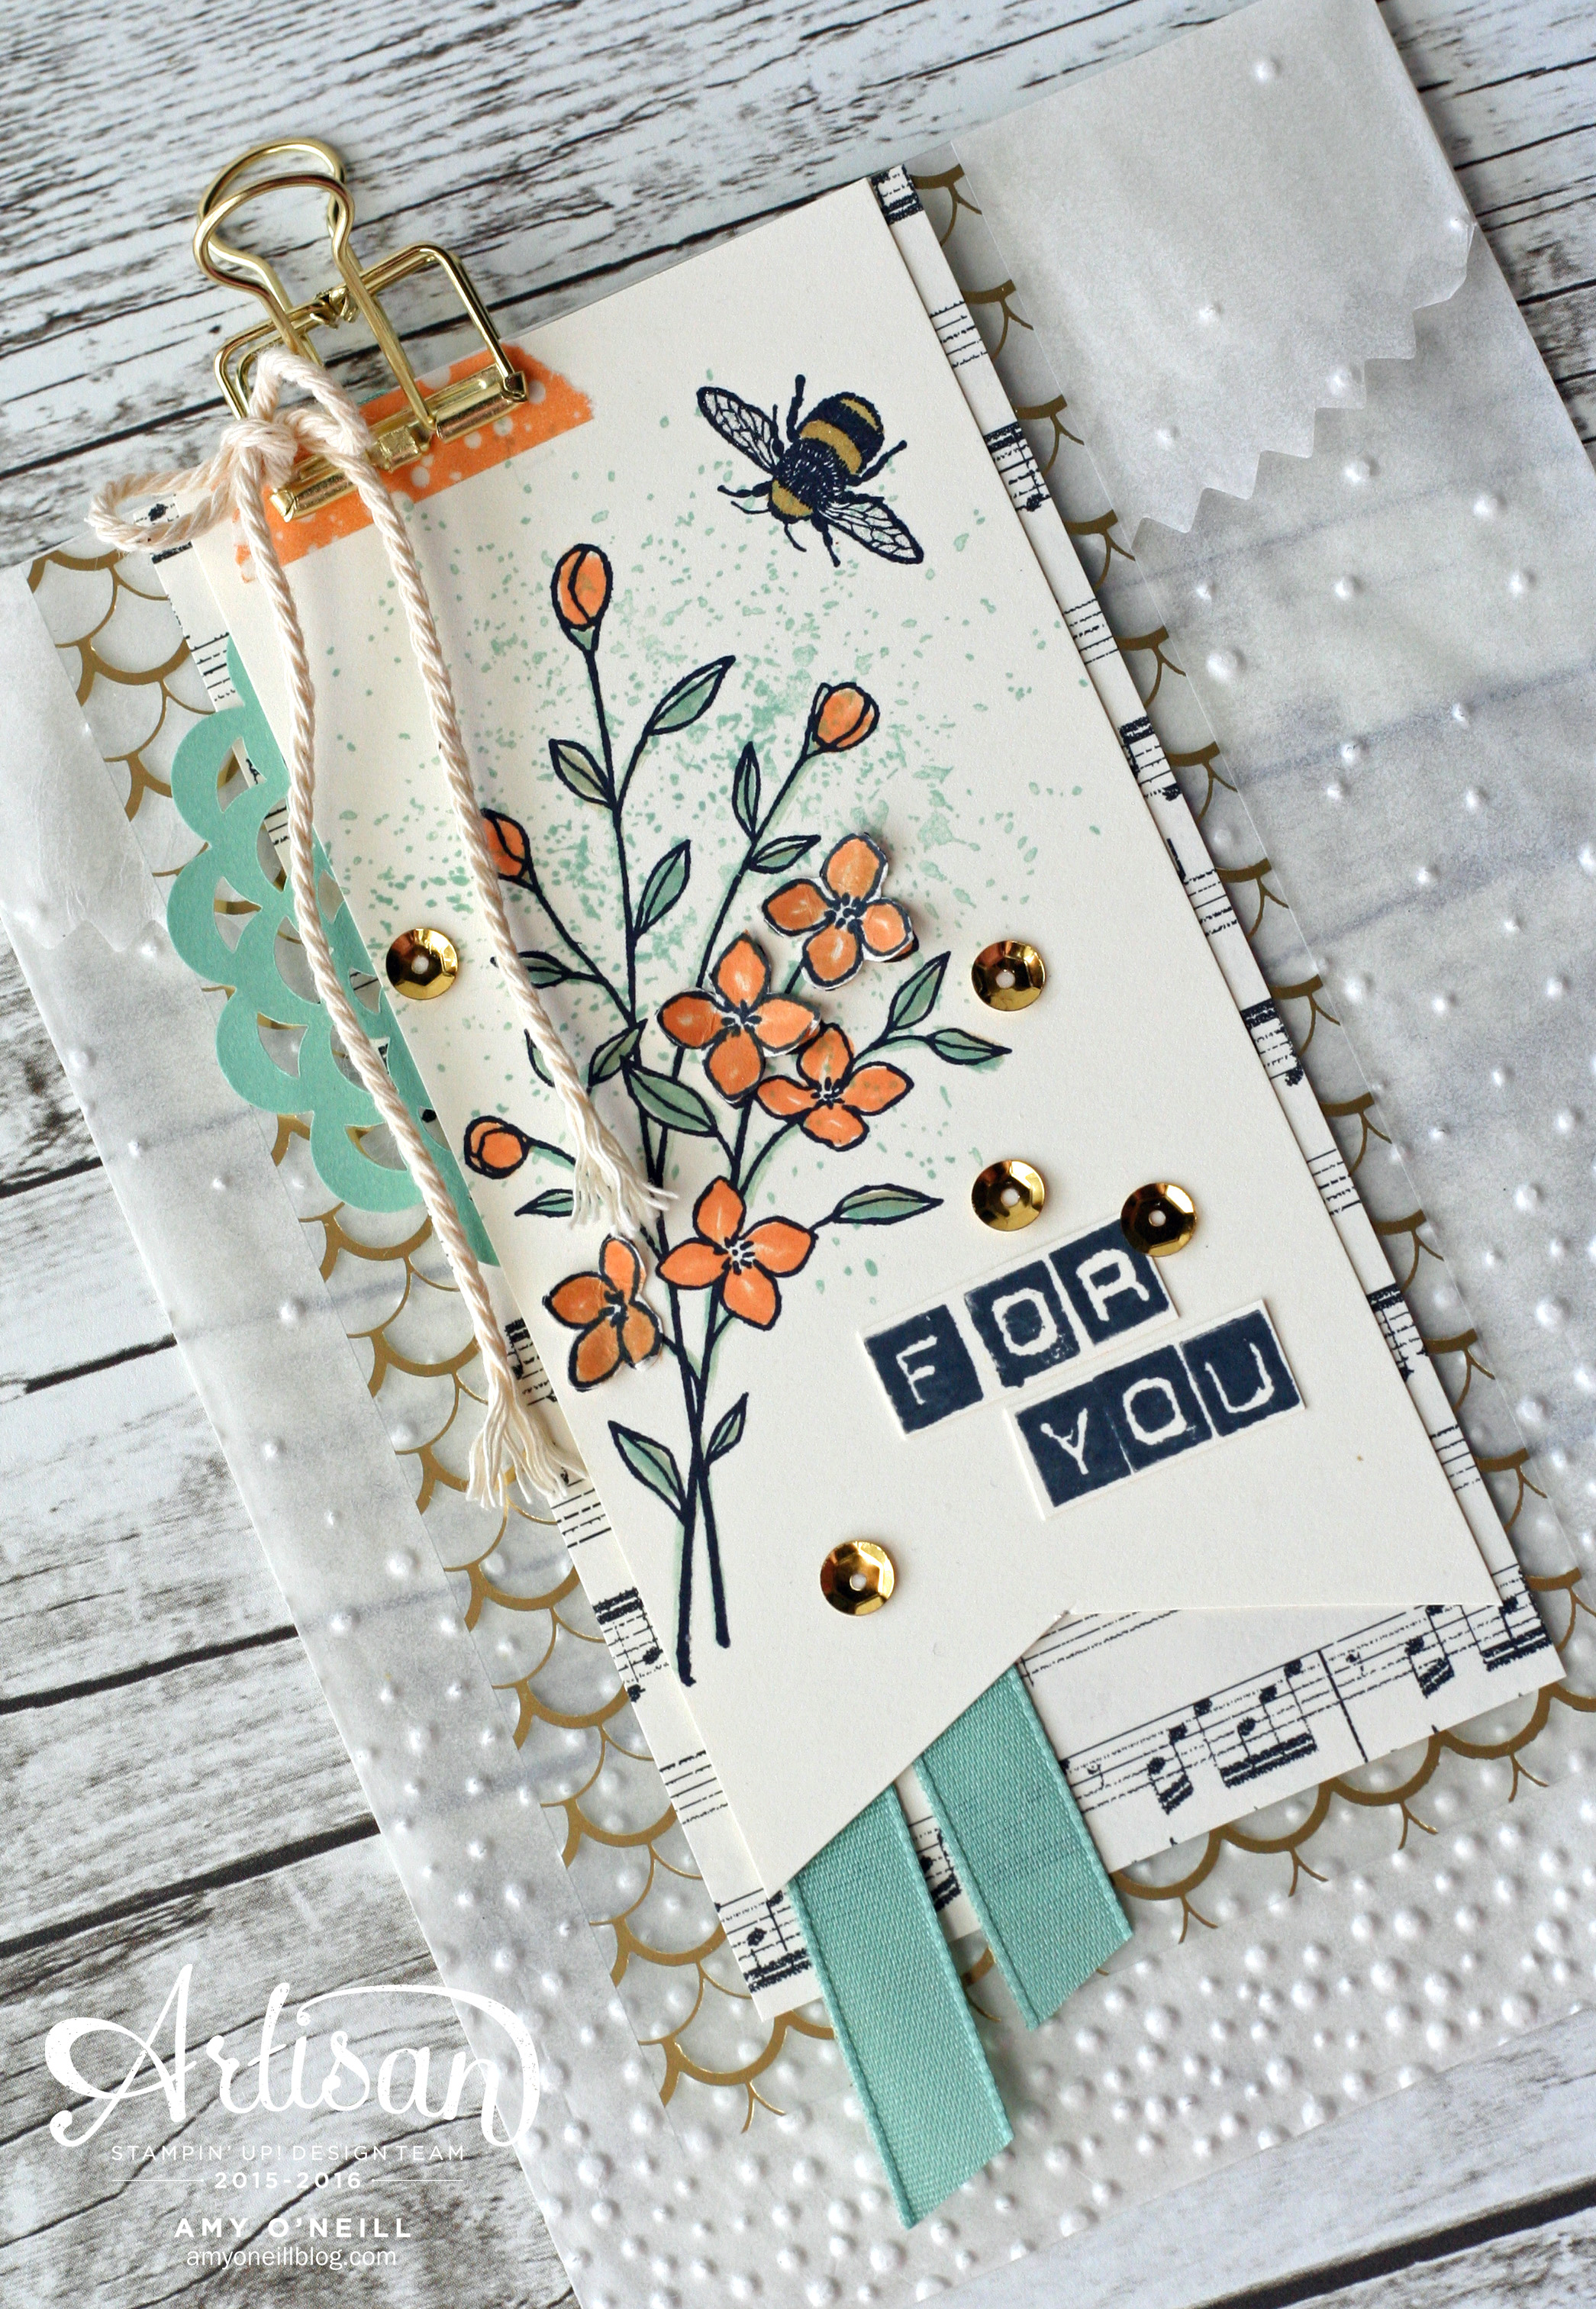
I then brushed some Sweet Sugarplum ink onto a piece of wet Watercolor Paper using an aqua painter.  Once that was dry, I stamped the splatters using a stamp from Touches of Texture.  The small medallions from Moroccan Nights were also stamped with Sweet Sugarplum ink.

Moroccan Frosty Nights Card Close UpI added some pretties — silver sequins, Soft Sky Enamel Shapes, White Perfect Accents (with the white backings peeled off) and Silver Metallic Thread.

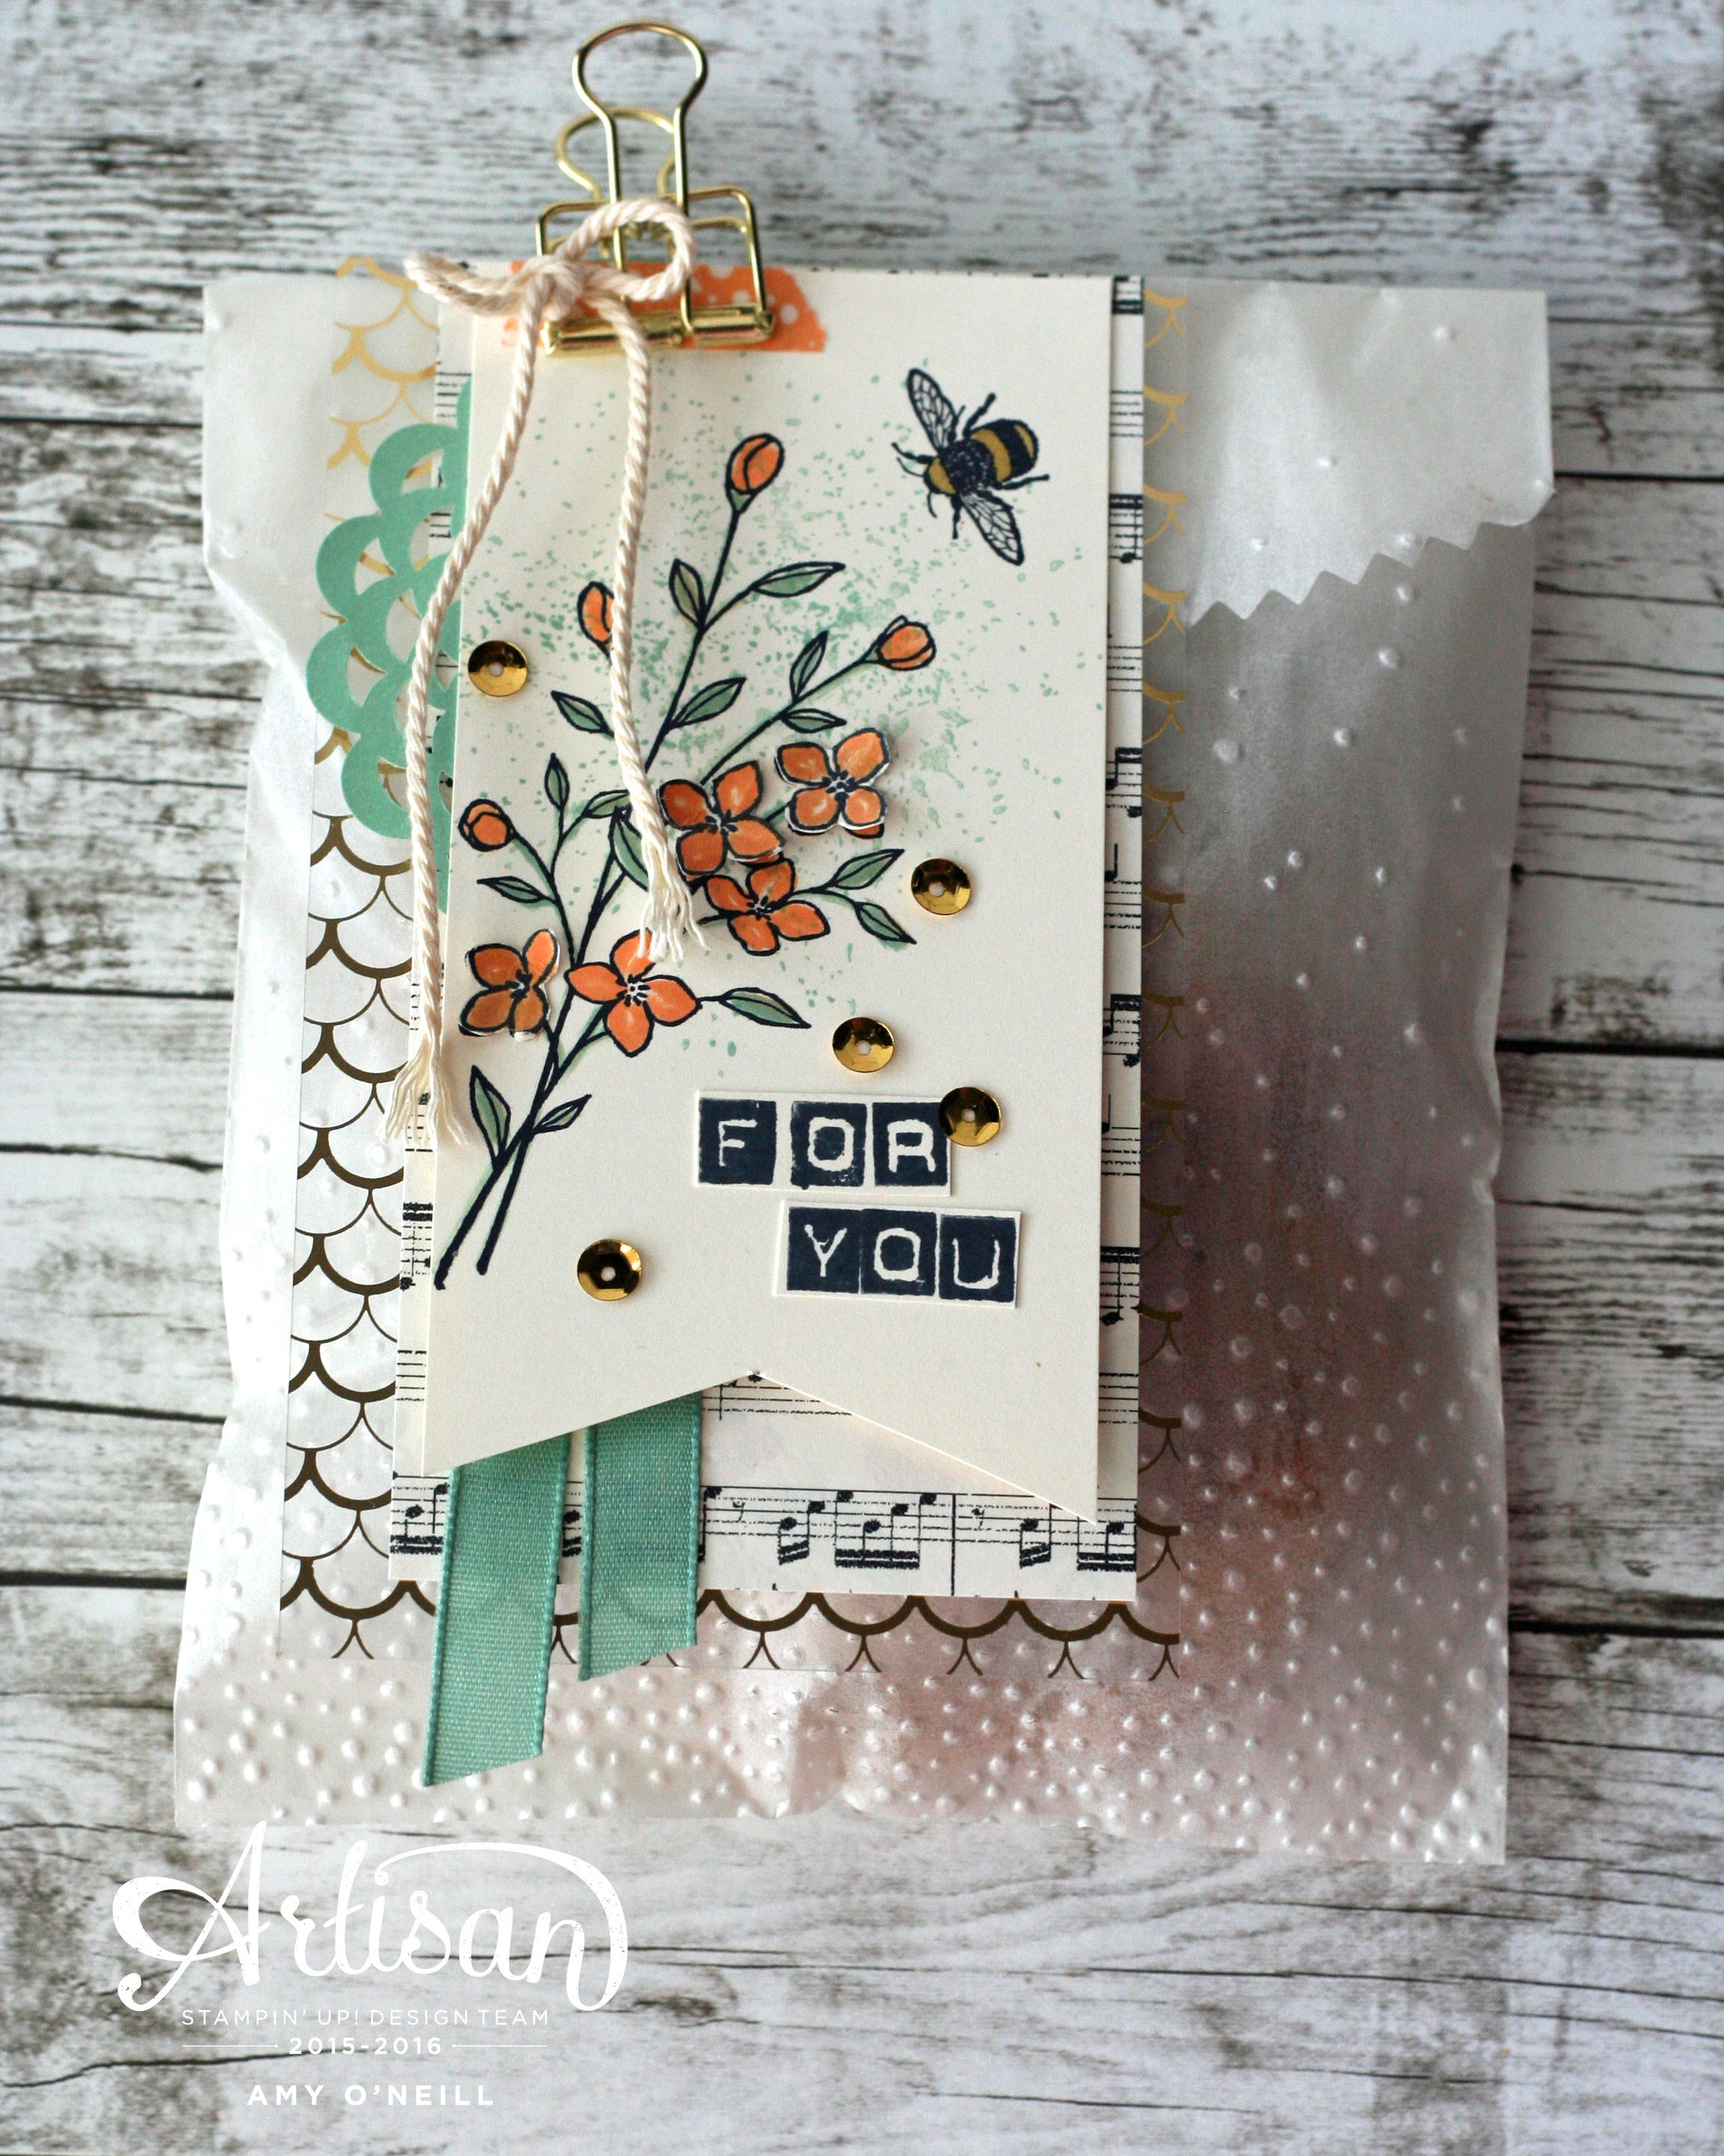
The sentiment is from the Thoughtful Branches stamp set.  Some Silver 1/8″ Ribbon and Silver Sequin Trim were looped underneath.

I then made a little coordinating gift box using the Gift Box Punch Board.  This box is 2-1/2″ all around.

Moroccan Frosty Nights BoxSome Sweet Sugarplum and White embossed medallions were stamped on the box, and a tag was made from Vellum Cardstock with the Tags & Labels framelits.  I tied some of the pretty Sweet Sugarplum 3/8″ Ruched Ribbon into a big bow to finish the box.

You’re ready to hop on over to The Netherlands and visit Chantal de Kaste’s blog by clicking on the link below.  You can use Google Translate for any blogs for which you need translation help.  It’s so fun to hop around the world!

Bloghop button_0915

Product List

Thoughtful Branches Part 2 — Stampin’ Up! Artisan Blog Hop

Welcome to another Stampin’ Up! Artisan Design Team Blog Hop!  We have a special blog hop for you today, as we are providing you with a look at a stamp set and coordinating dies that became available today.  All you need to do to follow along is click on the link at the bottom of each post.

Our projects today focus on a new exclusive and limited time stamp set called Thoughtful Branches.  It is available for purchase starting today through August 31, while supplies last (so don’t wait long to order it).  If you earned any coupons during the July Bonus Days promotion, this set is a great choice on which to use them.

This set has amazing sentiments!  One of my favorites is the one I used on the card below.

Golden LeavesI started this card with a Soft Sky card base.  I sponged some Soft Sky ink onto a piece of Irresistibly Floral Specialty Designer Series Paper.  I die cut some leaves from Gold Glimmer Paper and Gold Foil Sheets.  I love the detail on these leaves, and the size is perfect.

The sentiment was stamped on a piece of Vellum Cardstock and cut out with a Layering Circles Framelit.  The Soft Sky scalloped circle was also cut out with a framelit from this same collection.

Golden Leaves Close UpI added some Metallic Enamel Shapes, Gold 1/8″ Ribbon, and Gold Metallic Thread.

For my next project, I made a bag using the Gift Bag Punch Board and some This Christmas Specialty Designer Series Paper.

Christmas BagI started this one by applying a light wash of Garden Green ink onto a piece of Watercolor Paper.  Once that dried, I stamped the tree with Early Espresso and Garden Green inks.  I added some red berries with a Cherry Cobbler Stampin’ Write Marker.

This tag was layered over a piece of Fabulous Foil Designer Acetate, and attached to the bag with a Gold Binder Clip.  I added a bit of Gold 1/4″ Natural Trim and a little banner cut from Gold Glimmer Paper.

Christmas Bag Close UpThe sentiment was stamped with Basic Black ink and embossed with Clear Stampin’ Emboss Powder.

I love the variety of images and sentiments in this bundle, and it such a versatile set that can be used year-round.

You’re ready to hop on over to The Netherlands and visit Chantal de Kaste’s blog by clicking on the link below.  You can use Google Translate for any blogs for which you need translation help.  It’s so fun to hop around the world!

Bloghop button_0915
Product List

Christmas in July — Stampin’ Up! Artisan Blog Hop

Welcome to another Stampin’ Up! Artisan Design Team Blog Hop!  There are 20 of us from around the globe who will be sharing our projects with you twice each month.  All you need to do to follow along is click on the link at the bottom of each post.

Our theme for this month is Christmas in July.  I know there are some of you who like to get ahead and get started on your Christmas card making well before the Christmas season rolls around.  I wish I could say that I am that organized, but alas, I can’t.  Thanks to this assignment, I now have one card down and now I’m further ahead than I’ve ever been at this point in the year.  It feels good!

Christmas in July groupI started with the card and the Peace This Christmas stamp set.  I cut a piece of the This Christmas Specialty Designer Series Paper to cover the card front.  This dsp is lighter weight than normal dsp and you get four sheets of each design rather than the normal quantity of two.  This makes it perfect for mass producing your Christmas cards!

Christmas in July cardI then stamped some of the pine boughs, pine cones, and berries on a piece of Very Vanilla cardstock and cut those out.  They were arranged and layered on a piece of Very Vanilla cardstock, on which I stamped and embossed the sentiment with Gold Stampin’ Emboss Powder.  Isn’t that sentiment just beautiful?  I love it!

Christmas in July card close upI added a few gold Metallic Sequins, adhering them with my Fine-Tip Glue Pen.

While I had these supplies out, I couldn’t resist making a little treat box using one of the new Clear Tiny Treat Boxes.  These things are adorable!

Christmas in July boxThese are quick to assemble!  I decorated it with a gold Metallic Foil Doily and some of the beautiful gold 1/4″ Natural Trim Ribbon.  Easy and quick!

You’re ready to hop on over to The Netherlands and visit Chantal de Kaste’s blog by clicking on the link below.  You can use Google Translate for any blogs for which you need translation help.  It’s so fun to hop around the world!

Bloghop button_0915

Enjoy your Thursday!  Thanks for stopping by!
Product List

Introducing Thoughtful Branches — Stampin’ Up! Artisan Blog Hop

Welcome to another Stampin’ Up! Artisan Design Team Blog Hop!  We have a special blog hop for you today, as we are providing you with a sneak peek of a stamp set and coordinating dies that will be available next month.  All you need to do to follow along is click on the link at the bottom of each post.

Our projects today focus on a new exclusive and limited time stamp set called Thoughtful Branches.  It will be available for purchase next month.  There is a coordinating set of dies that go with this set, called Beautiful Branches Thinlits.

If you are a Stampin’ Up! demonstrator, you can pre-order the bundle as a (demonstrator) during July and receive a Bonus Day coupon that you can use toward the Holiday Catalog pre-order during August.  It’s just another reason to join the family as a demonstrator if you haven’t already done so!

There are a lot of different images (23 to be exact) in this stamp set, including some beautiful sentiments.  It was hard to decide which ones to share with you today!  I ended up deciding on my favorites — a tree branch die and leaf dies.  I love how they can be layered or used alone.  And they can be used for any season!

Fall TreeThe detail on this die is just amazing!  I started this card by sponging on some Soft Sky ink onto a piece of Whisper White cardstock.  I then stamped the grass image with Old Olive ink, and placed the Soft Suede tree image on top.  I then die cut some of the leaves from Crushed Curry, Early Espresso, Always Artichoke, and Cajun Craze cardstock.

Fall Tree Close Up

I added a torn strip of Vellum Cardstock as a bottom layer, and stamped the sentiment from this set with Early Espresso ink.  A few gold sequins from the Metallic Sequins assortment were thrown in the mix.

This next card uses the same tree branch outline framelit die, but I’ve added another stamp and die on top of it to add leaves to it.

Apple TreeI started by adding a watercolor wash of Pool Party and Pear Pizzazz inks.  Then I cut the tree out of Early Espresso ink using the same framelit die I used on the card above.  I stamped the leaves with Pear Pizzazz ink onto a piece of Whisper White cardstock, and used a framelit to cut out the leaf layer.  I love how the tree branches peek out from the leaf canopy.  It is such a cool effect!

Apple Tree Close UpI stamped the apples with Real Red ink and colored the stems with an Early Espresso Stampin’ Write Marker.  These were also cut out easily with a die from this framelits set. The sentiment was stamped with Basic Black ink.

The stamps and dies that I’ve used for these cards are only a few of those available in the Thoughtful Branches stamp set and Beautiful Branches Thinlits.  There is so much more to them than what I’ve shown you here.  I’m sure some of the rest of the team has used some of the other images, so you’ll get to see more of what’s in this great new set.

You’re ready to hop on over to The Netherlands and visit Chantal de Kaste’s blog by clicking on the link below.  You can use Google Translate for any blogs for which you need translation help.  It’s so fun to hop around the world!

Bloghop button_0915
Product List

Touches of Flowers and Texture — Stampin’ Up! Artisan Blog Hop

Welcome to another Stampin’ Up! Artisan Design Team Blog Hop!  There are 20 of us from around the globe who will be sharing our projects with you twice each month.  All you need to do to follow along is click on the link at the bottom of each post.

Tonight is one of our “open” hops, which means we can use any of the products in our most current box.  I was so excited to see the Touches of Texture stamp set in our box.  It was right at the top of my wish list when I first saw the new catalog.

Textured Tag Close Up

I started by running one of the new Glassine Gift Bags through the Big Shot with the Softly Falling Textured Impressions Embossing Folder.  I love the size of these bags, and I love that they are made from glassine paper.  They’re perfect for packaging up a big cookie (that’s what I put in this bag) or other treat for someone special.

Textured Bag Filled

I made a pretty tag using a piece of the new Fabulous Foil Designer Acetate.  These sheets have a gold pattern on one side and silver on the other side.  They add a little touch of glam to your projects!  Over that, I layered a piece of This Christmas Specialty Designer Series Paper.  I love how this sheet music pattern can be used year-round!

To make the top layer, I started with a piece of Very Vanilla cardstock and stamped the floral branch image with Basic Black ink.  I then stamped the splatter image with Mint Macaron and colored the flowers with Peekaboo Peach ink using a Blender Pen.  I stamped the image again on another piece of cardstock and cut out three of the little flowers to add just a little bit of dimension and texture.

Textured Bag Empty

The sentiment was stamped using the super fun Labeler Alphabet stamp set.  I LOVE this set!  An In Color Doily and a little strip of Playful Palette Designer Washi Tape were added as fun embellishments.  I attached the tag with one of the cute and super functional Gold Binder Clips, and added a piece of Mint Macaron 3/8″ Sheer Linen Ribbon.

While I had all of the supplies out, I made a card using the same supplies.

Textured Friend

This set is so fun to play with!  This is the same stamp set, just some different stamps from it.

Textured Friend Close Up

You’re ready to hop on over to The Netherlands and visit Chantal de Kaste’s blog by clicking on the link below.  You can use Google Translate for any blogs for which you need translation help.  It’s so fun to hop around the world!

Bloghop button_0915
Product List

Love & Affection — Stampin’ Up! Artisan Blog Hop

Welcome to another Stampin’ Up! Artisan Design Team Blog Hop!  There are 20 of us from around the globe who will be sharing our projects with you twice each month.  All you need to do to follow along is click on the link at the bottom of each post.

Our focus this month is on the Affectionately Yours suite of products.  The flowers in the Love & Affection stamp set are fun and sweet, and the sentiments are wonderful.  I made two different cards for this post using four of the new  In Colors — Dapper Denim, Peekaboo Peach, Flirty Flamingo, and Emerald Envy.

It’s really easy to make your own custom bouquet with this stamp set!

Group June Facebook ProjectsFor the first card , I started by embossing the floral bouquet on the card base’s left side.  I used one of the Floral Affection Textured Impressions Embossing Folders (two different folders are included in this item).

Every LovelyI then stamped some of the leaves on a Whisper White panel and some of the flower images on another piece of cardstock, cutting them out with my Paper Snips.  After placing the flowers over the leaves, I added some White Perfect Accents (with the white backing peeled off) to the flower centers and added some white sequins.

Every Lovely Close UpFor my next card, I stamped some more of the flowers and leaves on a piece of Whisper White cardstock and did some more cutting with my Paper Snips.

Sending a SmileI placed a white panel, which I embossed along one edge with my Simply Scored Scoring Tool.  I sprinkled a few sequins and added the sentiment on a banner.  This card is very clean and shows off the beautiful colors of the flowers.

Sending a Smile Close Up

You’re ready to hop on over to The Netherlands and visit Chantal de Kaste’s blog by clicking on the link below.  You can use Google Translate for any blogs for which you need translation help.  It’s so fun to hop around the world!

Bloghop button_0915

Enjoy your Thursday!  Thanks for stopping by!

Supplies Used:
Stamps:  Love & Affection
Ink:  Dapper Denim, Peekaboo Peach, Emerald Envy, Flirty Flamingo Basic Black
Paper:  Whisper White cardstock, Dapper Denim cardstock
Accessories:  White Perfect Accents, Metallic Sequins Assortment, Floral Affection Textured Impressions Embossing Folders


Sending a Smile with Affectionately Yours Suite — Stampin’ Up! Artisan Blog Hop

Welcome to another Stampin’ Up! Artisan Design Team Blog Hop!  There are 20 of us from around the globe who will be sharing our projects with you twice each month.  All you need to do to follow along is click on the link at the bottom of each post.

Our box for June contained products from the Affectionately Yours Suite, which features florals and copper.  For this hop I chose to focus on the beautiful Affectionately Yours Specialty Designer Series Paper, the coordinating Love & Affection stamp set, and the Copper Stampin’ Emboss Powder.

I started by making a pocket card using the Mini Treat Bag Thinlits and a piece of the dsp. I stamped the flowers and leaves and cut them out with my Paper Snips.  The large flower was stamped with Versamark ink and embossed with the Copper Stampin’ Emboss Powder.

Sending a Smile Pocket ClosedI made an insert, which slides right into the pocket, from a piece of Crumb Cake cardstock, adding a strip of Affectionately Yours Designer Washi Tape at the bottom.  I love the sweet sentiments in this stamp set.

Sending a Smile Pocket Open

While I had all of the supplies out on my desk, I made a couple of note cards as well.  They are sized at 3-1/4″ x 5″.

Sending a Smile Single 1

These use a color scheme of Night of Navy, Watermelon Wonder, Cucumber Crush, and Daffodil Delight.

Sending a Smile Single 2

It’s fun to make custom-made bouquets with this set!

You’re ready to hop on over to The Netherlands and visit Chantal de Kaste’s blog by clicking on the link below.  You can use Google Translate for any blogs for which you need translation help.  It’s so fun to hop around the world!

Bloghop button_0915

Enjoy your Thursday!  Thanks for stopping by!

Supplies Used:
Stamps:  Love & Affection
Ink:  Watermelon Wonder, Daffodil Delight, Night of Navy, Cucumber Crush, Versamark
Paper:  Affectionately Yours Specialty Designer Series Paper, Crumb Cake, Night of Navy, Whisper White, Watermelon Wonder, Daffodil Delight
Accessories:  Linen Thread, Copper Stampin’ Emboss Powder, Mini Treat Bag Thinlits, Pearl Basic Jewels, Affectionately Yours Designer Washi Tape, 2″ Circle Punch

A Grateful Bunch for K — Stampin’ Up! Artisan Blog Hop

Welcome to another Stampin’ Up! Artisan Design Team Blog Hop!  There are 20 of us from around the globe who will be sharing our projects with you twice each month.  All you need to do to follow along is click on the link at the bottom of each post.

Our theme for this month is “May flowers.”  We had three different stamp sets from which to choose, and for this hop I chose the Grateful Bunch stamp set and coordinating Blossom Bunch Punch.

Letter KI have a daughter whose favorite color rotates between yellow and orange.  She loves sunny, happy colors.  And her name starts with a “K.”  I found these fun wooden letters at a local big box store and decided to decorate one for her room.

I stamped these fun flowers using Hello Honey, Tangelo Twist and Pumpkin Pie ink and punched them out using the coordinating punch.  This is a project that looks like it would take a long time to create because there are so many flowers.  But it really didn’t take that long because the stamp and punch make three flowers at a time.  I just used glue dots to adhere all of the flowers to the monogram.

Letter K Close Up

I made a bow from the Pumpkin Pie 1/4″ Cotton Ribbon and a few strands of the White 1-1/4″ Jute Ribbon and a Very Vintage Designer Button.  I had to get a little ribbon-tying lesson from fellow Artisan, Connie Collins.  She ties beautiful bows and was so kind in giving me a quick lesson across the miles.  Love her!

K Grateful Bunch NotecardI made a little coordinating gift card to enclose with the monogram letter.  I used the Epic Alphabet for the letter “k.”

K Grateful Bunch Notecard Close Up

You’re ready to hop on over to The Netherlands and visit Chantal de Kaste’s blog by clicking on the link below.  You can use Google Translate for any blogs for which you need translation help.  It’s so fun to hop around the world!

Bloghop button_0915

Enjoy your Thursday!  Thanks for stopping by!

Supplies Used:
Stamps:  Grateful Bunch, Epic Alphabet
Ink:  Tangelo Twist, Hello Honey, Pumpkin Pie
Paper:  Whisper White
Embellishments:  Blossom Bunch Punch, Pumpkin Pie 1/4″ Cotton Ribbon, White 1-1/4″ Jute Ribbon, Very Vintage Designer Buttons, White Baker’s Twine

Growing Thanks and Congrats — Stampin’ Up! Artisan Blog Hop

Welcome to another Stampin’ Up! Artisan Design Team Blog Hop!  There are 20 of us from around the globe who will be sharing our projects with you twice each month.  All you need to do to follow along is click on the link at the bottom of each post.

Our theme for this month is “May flowers.”  We had three different stamp sets from which to choose, and for this hop I chose the Helping Me Grow set.  I love the flowers in this set, and it has some other great elements as well.

Growing ThanksFor this first card, I stamped the flowers on a sheet of Whisper White card stock and colored them with a Blender Pen using Real Red, Tangerine Tango, So Saffron, and Hello Honey ink pads.  I then cut them out using my Paper Snips.  The little leaves were cut out of Old Olive cardstock with one of the Botanical Builder Framelits Dies.  I pressed the Expressions Natural Elements sentiment onto a Versamark pad and embossed it with Black Stampin’ Emboss Powder.

Growing Thanks Close UpI love the bright flowers against the Typeset dsp, which is on the retiring list (boy, am I going to miss this stuff!).

Growing CongratsFor this next card, I stamped the image onto a Project Life 3″ x 4″ Grid Card.   This is another retiring item I am really going to miss, as I use them for a lot of other things besides Project Life memory keeping.

I colored the flowers with Real Red, Old Olive, Hello Honey, and Soft Sky inks using a Blender Pen.  A Tea Lace Paper Doily and some 1-1/4″ Burlap Ribbon, which I cut to a narrower width with my Craft Scissors (gasp — these are retiring, too!  Get them quick!), were added as embellishments.

Growing Congrats Close Up

You’re ready to hop on over to The Netherlands and visit Chantal de Kaste’s blog by clicking on the link below.  You can use Google Translate for any blogs for which you need translation help.  It’s so fun to hop around the world!

Bloghop button_0915

Enjoy your Thursday!  Thanks for stopping by!

Supplies Used:
Stamps:  Helping Me Grow
Ink:  Real Red, Tangerine Tango, So Saffron, Old Olive, Hello Honey, Basic Black, and Soft Sky, Versamark
Paper:  Kraft Cardstock, Whisper White, Basic Black, Typeset Specialty dsp, Project Life 3″ x 4″ Grid Cards
Accessories:  Tea Lace Paper Doilies, 1-1/4″ Burlap Ribbon, Expressions Natural Elements, Black Stampin’ Emboss Powder, Black Baker’s Twine, Gold Basic Metal Buttons,  Botanical Builder Framelits Dies

A Baby Shower Made with Love — Stampin’ Up! Artisan Blog Hop

Welcome to another Stampin’ Up! Artisan Design Team Blog Hop!  There are 20 of us from around the globe who will be sharing our projects with you twice each month.  All you need to do to follow along is click on the link at the bottom of each post.

For this month we were asked to focus our projects on packaging, and we were given the Gift Box Punch Board and the Bow Builder Punch.  I paired my tools with the Made with Love stamp set and the Shine On Specialty Designer Series Paper, and created some favor boxes, a gift box, and a gift card for a baby shower.

April Facebook Project Group ShotI made several boxes for party favors and one box to hold a small baby gift.  The gift box is sized at 3-1/4″ square and the favor boxes are sized at 1-3/4″ square.  They were so quick and easy to make!  With the small boxes, I was able to make four boxes from one sheet of dsp.

Baby Party FavorsI made the little tags out of Watercolor Paper and colored the sweet images from Made with Love with an Aquapainter.  I cut them out using the Tags and Labels Framelits Dies.  A little Metallic Foil Doilie was placed on top of the box and topped with a Watermelon Wonder bow made with the Bow Builder Punch.

Baby GiftThe gift box was made the same way as the favor boxes, but was topped with a bow using the Watermelon Wonder 1″ Stitched  Satin Ribbon.

Baby Gift CardGoing along with the same theme and colors, I made a little 3″ x 3″ note card to enclose with the gift.  The cute little onesie was paper pieced from some Cherry on Top dsp.

You’re ready to hop on over to The Netherlands and visit Chantal de Kaste’s blog by clicking on the link below.  You can use Google Translate for any blogs for which you need translation help.  It’s so fun to hop around the world!

Bloghop button_0915

Supplies Used:
Stamps:  Made with Love
Ink:  Basic Black, Soft Suede, Smoky Slate, Blushing Bride, Soft Sky, Crushed Curry, Watermelon Wonder
Paper:  Shine On Specialty DSP, Watercolor Paper, Kraft cardstock, Whisper White, Watermelon Wonder, Cherry on Top DSP stack
Accessories:  Bow Builder Punch, Gift Box Punch Board, Watermelon Wonder 1″ Stitched Satin Ribbon, Metallic Foil Doilies, White Baker’s Twine, Tags and Labels Framelits Dies, Aquapainter